Introduction
This is the second and final blog on Sentiment Analysis and its implementation in Power BI series. In the first part, we learned the basics of Sentiment Analysis. We also discussed why it is important and how it is done theoretically. In this part, we will implement an end-to-end Sentiment Analysis pipeline in Power BI using Azure Cognitive Services. To read the first part, click here.
Sentiment Analysis in Power BI using Azure Cognitive Services
Azure Cognitive Services provide cloud-based AI capabilities, including text analytics such as Sentiment Analysis and keyphrase extraction. Its documentation can be found here.
Pre-Requisites:
The implementation of Sentiment Analysis in Power BI is simple, and this blog is intended to provide set of instructions to get you started with Sentiment Analysis in Power BI. However, to implement the working example, there are certain pre-requisites:
- A beginner level knowledge of Power BI or that of a similar reporting application
- Power BI Desktop
- Azure Account with Text Analytics set up. Azure allows a free trial of its Cognitive Services, which can be set up completely free here. Once Azure Cognitive Service’s Text Analytics is set up, it will provide us following information that is required we will need for the case study below:
Now without further ado, it is time to implement a basic Sentiment Analysis pipeline.
Data:
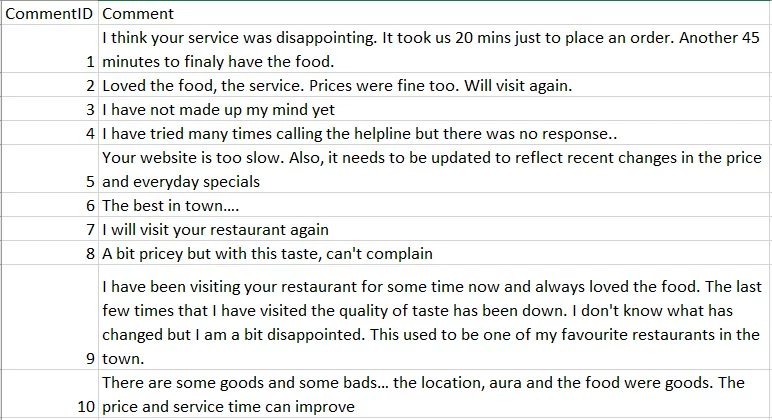
Let us assume we have the following simple data in an excel file that contains “commentID” and “Comment” columns. Our goal is to do Sentiment Analysis on the text data in the “Comment” column.
Importing the Data:
Once we have the data, the next step is to import the data into the Power BI Desktop. This can be done by going into the home tab, then “Get Data,” and then by clicking on “Excel.” The excel data file can then can be selected, which will take us to the “Navigator” screen. Once we are in the “Navigator” window, we need to click “Transform Data.” This will open a Query editor where we can transform the data. Our goal here is to make a custom function that will call Azure Cognitive Services to fetch sentiment and the confidence values for each row in the comment column.
Ready to Unleash the Full Potential of your Data with Power BI?
Discover how integrating Power BI with Azure Cognitive Services can revolutionize data analysis. AlphaBOLD's Power BI experts have years of experience and can guide you through the journey.
Request a Demo
Custom Function:
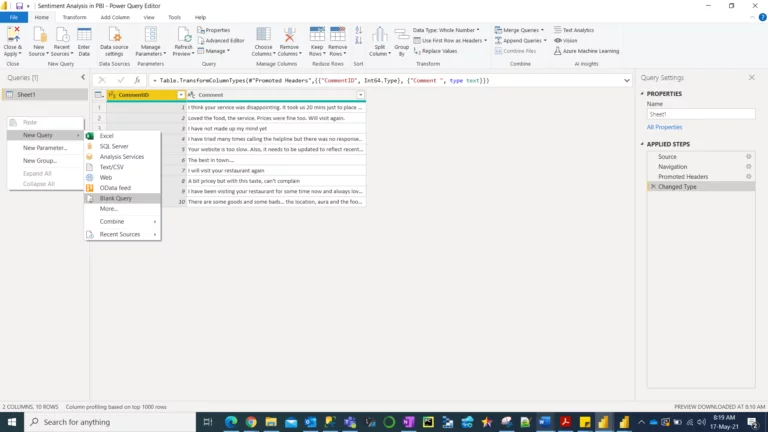
To make a custom function to connect with Azure Cognitive Services, we need to right-click on the blank space in the Queries Panel, then hover on “New Query,” and then select “Blank Query.”
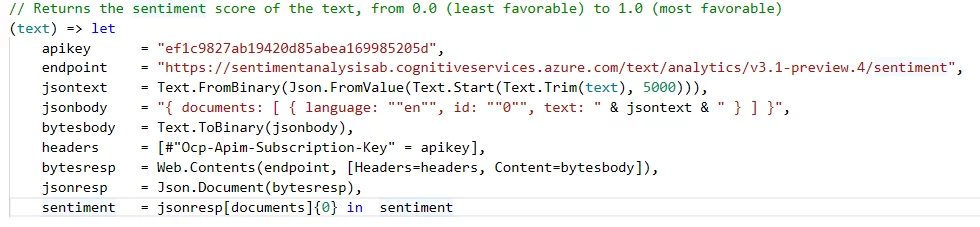
Once the new query appears in the “Queries” panel, we can rename it. Then we need to select it and click “Advanced Editor” in the home tab. Once inside the “Advanced Editor,”,,” we need to copy and paste the following script making sure that “apikey” and “endpoint” are replaced with our individual Text Analytics resource.
Let us suppose we renamed the custom function as SA (Short for Ssentiment Analysis). Also, since the first row of the data contains column names, we need to promote the first row as a header by selecting “Use First Row as Headers” in the home tab. Additionally, we can change the data type of the columns appropriately. After that, we need to invoke the SA custom function to perform Sentiment Analysis. To do this, select the “Comment” column and then click “Add Column” and then “Invoke Custom Function” and select the following details:
Authenticating and Connecting to the API:
Once we invoke the custom function, a banner may appear asking us to connect to the API.
Click “Edit Credentials,”,,” making sure Anonymous is selected in the dialog, and then click Connect. (plagiarism) Next, a banner may appear asking us to provide information about data sources’ privacy.
Click Continue and choose “Public” for each of the data sources in the dialog. (plagiarism) Then click Save. Once authentication is completed, we will see that the selected Function Query is the SA custom function that we scripted, and it is being run on the “Comment” Column. The output will be displayed under a new column with the name “Sentiment.”
Consolidating the Results from Azure Cognitive Services:
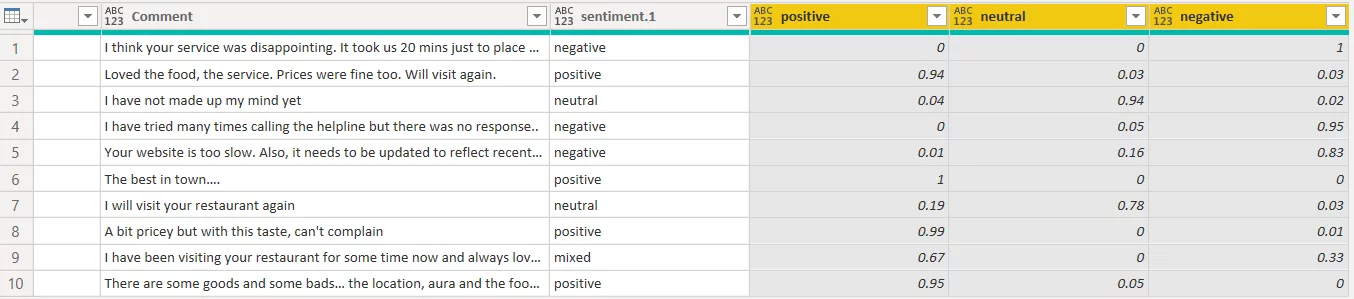
The next step is to expand the new “Sentiment” column to display “Sentiment” and “confidenceScores.” Further, we can expand “confidenceScores” column to show “positive”,,” “negative” and “neutral” columns as shown:
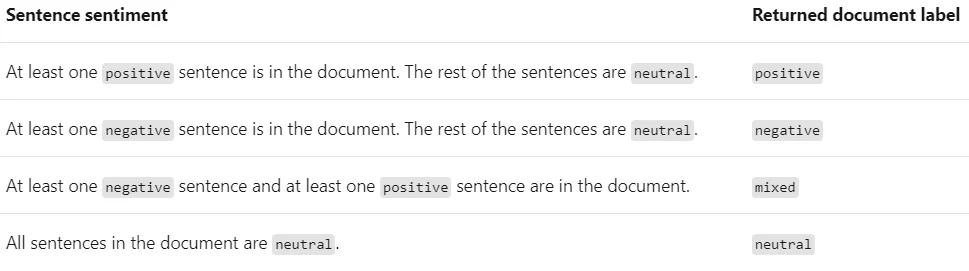
We now have the Sentiment classification by Azure Text Analytics for each row that can be Positive, Negative, Neutral, or Mixed. Along with that information, Azure Text Analytics has also provided us the confidence score for each classification per row. The confidence score ranges from 0 (minimum) to 1 (maximum). For example, the first row is classified as having a “negative” sentiment with a confidence score of 100%. Similarly, the 9th row has been classified as having “Mixed” sentiments with a confidence score of 67 % in it being a positive comment and 33% as a negative comment. The description of the labels is as below:
Further details can be found in the official documentation.
Next, we can add a conditional column to get a single confidence score corresponding to the predicted classification. Also, there are many ways in how we can handle the “Mixed” classification.
We can simply assign a confidence score of 0 to all classifications with a “Mixed” outcome in the simplest implementation.
Reporting:
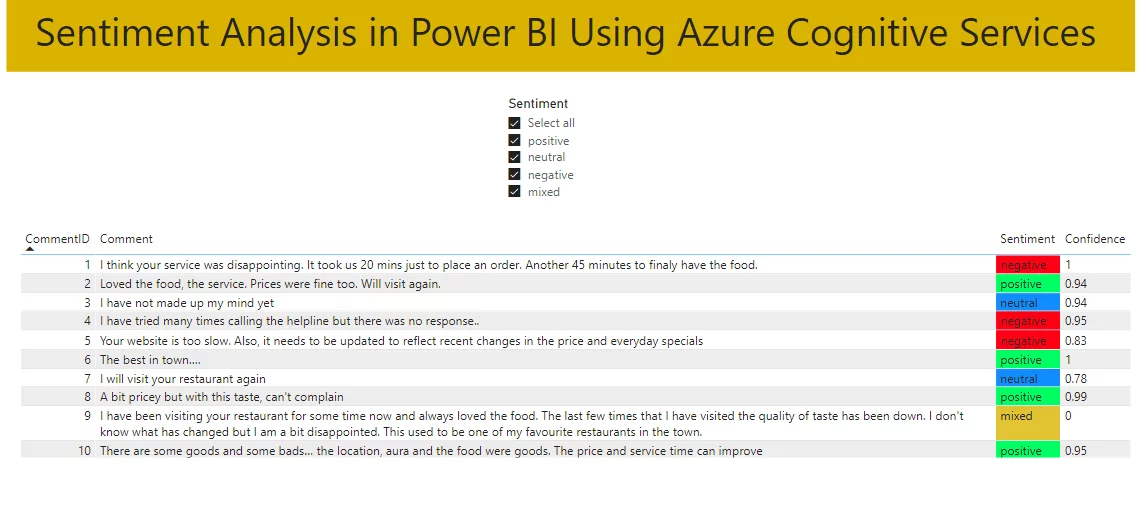
Once we have done that, we can click on “Close & Apply” in the home tab to do any modeling and to perform reporting and , analytics on the prepared dataset. As can be seen below, we can filter the data based on any selection. We can also slice and dice the data and perform advanced analytics on it.
Want to Transform your Business Insights with Advanced Analytics?
Learn how Power BI and Azure Cognitive Services can elevate your data-driven decision-making. Let AlphaBOLD’s experienced team show you the way.
Request a Demo
Conclusion
To conclude, these two blogs have given us an understanding of what Sentiment Analysis is. We also know its most common applications for business users. We also briefly discussed the inner workings of a Sentiment Analyzer. Finally, we looked at how easily we can implement a Sentiment Analysis pipeline in Power BI using Azure Cognitive Services.
Explore Recent Blog Posts