Introduction to Connecting BLE Devices with Flutter
Nowadays, Bluetooth is a necessary feature required in any smartphone. With the influx of numerous gadgets being developed and released every year to be synced with consumer mobile phones, providing their own set of unique uses, such as various kinds of wearables and smartwatches, wireless earbuds, stereo systems etc. All these BLE (Bluetooth Low Energy) devices, as they are called, most of the time come with an embedded application which is vital for the devices’ connectivity and syncing with the mobile phone.
These applications may control all administrative and consumer-based features of their BLE device, such as performing firmware upgrades, syncing times, changing the theme of a wearable or music settings for an audio device. Thus, it is very vital for these applications to function smoothly for the Bluetooth device to carry out its operations in an effective manner.
In this series of tutorials, we’ll be building a mobile application which will connect to a specific Bluetooth device and perform various operations in sync with it. In this tutorial, we’ll be setting up our Bluetooth package, OS level permissions, getting the Bluetooth permission from the user and constantly keeping an eye on the devices’ Bluetooth state. And, in the case of Android we’ll also be implementing the functionality of turning the devices Bluetooth on or off directly from the mobile application!
Overview
Framework Essentials for Connecting BLE Devices
In part 1 of our tutorial, we will only be working on the front-end application, so we’ll only require details regarding that. The front-end application will be developed on the Flutter Framework for both iOS and Android platforms.
In the future, we may require backend services which may be developed using Node.js for the web APIs and database services hosted on cloud platforms. But we’ll discuss more about that in future tutorials.
Packages:
The following packages will be used and added in our project’s pubspec.yaml file:
- https://pub.dev/packages/flutter_blue_plus
- https://pub.dev/packages/permission_handler
There are other BLE related packages available in the pub.dev repository, however we’ll be using the Flutter Blue Plus package as it is the most actively maintained and feature-complete BLE package on the pub store. It’s a continuation of the original Flutter Blue package with significant improvements and ongoing support.
The permission handler package, on the other hand, is the best library available for handling OS level permissions for all platforms supported by Flutter and works seamlessly for Bluetooth integrations.
Setup:
iOS:
It is important to add the following permissions inside the info.plist file in your iOS project. All code must be added within the ‘dict’ tag
<key>NSBluetoothAlwaysUsageDescription</key>
<string>This app needs access to Bluetooth to connect to BLE devices</string>
<key>NSBluetoothPeripheralUsageDescription</key>
<string>This app needs access to Bluetooth to connect to BLE devices</string>
Android:
For Android, the setup is a little longer but still quite simple. First add the following permissions inside the AndroidManifest.xml file within the ‘manifest’ tag (before the ‘application’ tag).
<uses-permission android:name=”android.permission.BLUETOOTH” />
<uses-permission android:name=”android.permission.BLUETOOTH_ADMIN” />
<uses-permission android:name=”android.permission.ACCESS_COARSE_LOCATION”/>
<uses-permission android:name=”android.permission.ACCESS_FINE_LOCATION” />
<!– Required for Android 12+ (API level 31+) –>
<uses-permission android:name=”android.permission.BLUETOOTH_SCAN”
android:usesPermissionFlags=”neverForLocation” />
<uses-permission android:name=”android.permission.BLUETOOTH_CONNECT” />
<uses-permission android:name=”android.permission.BLUETOOTH_ADVERTISE” />
The ‘BLUETOOTH_SCAN’, ‘BLUETOOTH_CONNECT’, and ‘BLUETOOTH_ADVERTISE’ permissions are required for Android SDK API level 31 and above (mainly Android 12 and versions above it). The rest of the Bluetooth permissions are used for API levels 30 and below. Location permissions are required for BLE scanning on most Android versions.
Next, the minimum and target SDK versions need to be set to at least 21 and 34 respectively. These can be changed inside the app/build.gradle file within the ‘android’ section. Note that flutter_blue_plus requires minimum SDK 21.
android {
compileSdkVersion 34
defaultConfig {
minSdkVersion 21
targetSdkVersion 34
}
}
Code:
Once we have setup our application, we will now start coding our app. We will divide this section into various fragments, explaining each type of code in detail. Our application, in its current form, will basically keep tabs on the Bluetooth state of the device, whether the Bluetooth is on or off etc. This is a vital and fundamental feature required in every BLE application in order to handle changes in Bluetooth state and inform the user of the change.
Our app will traverse to and from the ‘Bluetooth Connected’ and ‘Bluetooth Disconnected’ state automatically. And manually as well by enabling it or disabling it via the application in case of Android.
Dependencies:
First, add the required dependencies to your pubspec.yaml file:
dependencies:
flutter:
sdk: flutter
flutter_blue_plus: ^1.35.5
permission_handler: ^11.3.1
Import Statements:
At the top of your main Dart files, import the necessary packages:
import ‘package:flutter/material.dart’;
import ‘package:flutter_blue_plus/flutter_blue_plus.dart’;
import ‘package:permission_handler/permission_handler.dart’;
import ‘dart:io’;
Transform your Flutter App by Connecting BLE Devices
Ready to enhance your Flutter app with seamless BLE device connectivity? Tap into AlphaBOLD's mobile development expertise to integrate the essential features for connecting BLE devices.
Request a ConsultationUI:
Our first task would be to develop and design both the Bluetooth Connected and Disconnected screens which would traverse between one another depending on the Bluetooth state. Code snippets of both screens are displayed below.
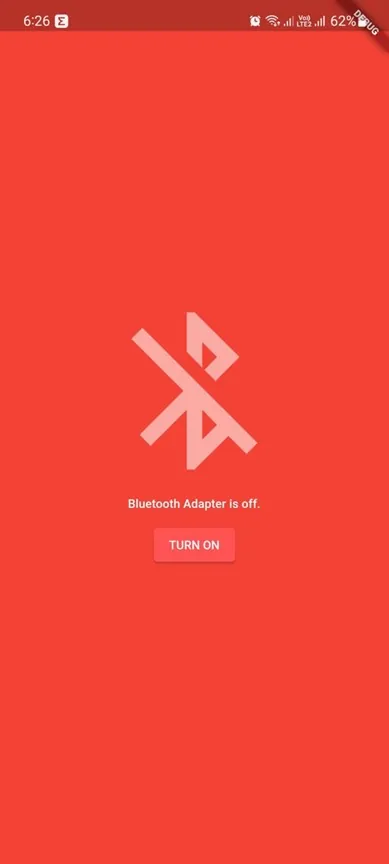
The connected screen would have a blue background, as set inside the Scaffold widget’s ‘backgroundColor’ property, and the disconnected screen would have the red background. Both screens would contain a Column and inside there would be an icon depicting the Bluetooth status as well as a text String stating the status as well.
The disconnected page would have a connect button at the bottom of the column while the connected page would have the disconnect button in the app bar of the screen as an action button. This was done as the body of the screen would be used to display all nearby discoverable devices in future tutorials.
Explore more about BLE Devices: Connecting BLE Devices with Flutter (Part 2)- Bluetooth State
Bluetooth Connected Screen:
class BluetoothConnectedScreen extends StatelessWidget {
const BluetoothConnectedScreen({Key? key}) : super(key: key);
@override
Widget build(BuildContext context) {
return Scaffold(
backgroundColor: Colors.blue,
appBar: AppBar(
title: const Text(‘Bluetooth Connected’),
backgroundColor: Colors.blue,
actions: [
IconButton(
icon: const Icon(Icons.bluetooth_disabled),
onPressed: () async {
if (Platform.isAndroid) {
await FlutterBluePlus.turnOff();
}
},
),
],
),
body: const Center(
child: Column(
mainAxisAlignment: MainAxisAlignment.center,
children: [
Icon(
Icons.bluetooth_connected,
size: 100,
color: Colors.white,
),
SizedBox(height: 20),
Text(
‘Bluetooth is Connected’,
style: TextStyle(
fontSize: 24,
color: Colors.white,
fontWeight: FontWeight.bold,
),
),
],
),
),
);
}
}
Bluetooth Disconnected Screen:
class BluetoothDisconnectedScreen extends StatelessWidget {
final BluetoothAdapterState adapterState;
const BluetoothDisconnectedScreen({
Key? key,
required this.adapterState
}) : super(key: key);
@override
Widget build(BuildContext context) {
return Scaffold(
backgroundColor: Colors.red,
appBar: AppBar(
title: const Text(‘Bluetooth Disconnected’),
backgroundColor: Colors.red,
),
body: Center(
child: Column(
mainAxisAlignment: MainAxisAlignment.center,
children: [
const Icon(
Icons.bluetooth_disabled,
size: 100,
color: Colors.white,
),
const SizedBox(height: 20),
Text(
_getStateText(),
style: const TextStyle(
fontSize: 24,
color: Colors.white,
fontWeight: FontWeight.bold,
),
textAlign: TextAlign.center,
),
const SizedBox(height: 40),
if (Platform.isAndroid && adapterState == BluetoothAdapterState.off)
ElevatedButton(
onPressed: _requestPermissionAndTurnOn,
child: const Text(‘Turn On Bluetooth’),
),
],
),
),
);
}
String _getStateText() {
switch (adapterState) {
case BluetoothAdapterState.off:
return ‘Bluetooth is Off’;
case BluetoothAdapterState.turningOn:
return ‘Bluetooth is Turning On…’;
case BluetoothAdapterState.turningOff:
return ‘Bluetooth is Turning Off…’;
case BluetoothAdapterState.unauthorized:
return ‘Bluetooth Permission Denied’;
case BluetoothAdapterState.unavailable:
return ‘Bluetooth Not Available’;
case BluetoothAdapterState.unknown:
default:
return ‘Bluetooth State Unknown’;
}
}
Future<void> _requestPermissionAndTurnOn() async {
if (Platform.isAndroid) {
// Request Bluetooth permissions
Map<Permission, PermissionStatus> permissions = await [
Permission.bluetooth,
Permission.bluetoothScan,
Permission.bluetoothConnect,
Permission.locationWhenInUse,
].request();
bool allGranted = permissions.values.every(
(status) => status == PermissionStatus.granted,
);
if (allGranted) {
try {
await FlutterBluePlus.turnOn();
} catch (e) {
print(‘Error turning on Bluetooth: $e’);
}
}
}
}
}
Logic:
Main App Structure:
The answer lies at the root of the application. While defining the ‘home’ field inside the MaterialApp widget, the root would be a StreamBuilder of type ‘BluetoothAdapterState’. The Flutter Blue Plus package provides a Stream that returns a snapshot of the Bluetooth state every time it changes. The StreamBuilder widget would listen to the state stream and change the UI depending on the result of each snapshot, as shown below.
class MyApp extends StatelessWidget {
const MyApp({Key? key}) : super(key: key);
@override
Widget build(BuildContext context) {
return MaterialApp(
title: ‘BLE Flutter App’,
theme: ThemeData(
primarySwatch: Colors.blue,
),
home: StreamBuilder<BluetoothAdapterState>(
stream: FlutterBluePlus.adapterState,
initialData: BluetoothAdapterState.unknown,
builder: (context, snapshot) {
final adapterState = snapshot.data!;
if (adapterState == BluetoothAdapterState.on) {
return const BluetoothConnectedScreen();
} else {
return BluetoothDisconnectedScreen(adapterState: adapterState);
}
},
),
);
}
}
Bluetooth State Management:
For more advanced state management, you can also listen to the adapter state in your widgets directly:
class BluetoothStateManager extends StatefulWidget {
const BluetoothStateManager({Key? key}) : super(key: key);
@override
State<BluetoothStateManager> createState() => _BluetoothStateManagerState();
}
class _BluetoothStateManagerState extends State<BluetoothStateManager> {
BluetoothAdapterState _adapterState = BluetoothAdapterState.unknown;
late StreamSubscription<BluetoothAdapterState> _adapterStateSubscription;
@override
void initState() {
super.initState();
_adapterStateSubscription = FlutterBluePlus.adapterState.listen((state) {
if (mounted) {
setState(() {
_adapterState = state;
});
}
});
}
@override
void dispose() {
_adapterStateSubscription.cancel();
super.dispose();
}
@override
Widget build(BuildContext context) {
return Scaffold(
body: Center(
child: Text(‘Current Bluetooth State: $_adapterState’),
),
);
}
}
Bluetooth Toggle On/Off (Android):
The Android OS allows apps to programmatically turn Bluetooth on or off, provided the user has approved the relevant permissions. The Flutter Blue Plus package provides simple methods for this functionality. Note that on iOS, users must manually control Bluetooth through the system settings.
class BluetoothController {
// Turn on Bluetooth (Android only)
static Future<void> turnOnBluetooth() async {
if (Platform.isAndroid) {
try {
await FlutterBluePlus.turnOn();
} catch (e) {
print(‘Error turning on Bluetooth: $e’);
}
}
}
// Turn off Bluetooth (Android only)
static Future<void> turnOffBluetooth() async {
if (Platform.isAndroid) {
try {
await FlutterBluePlus.turnOff();
} catch (e) {
print(‘Error turning off Bluetooth: $e’);
}
}
}
// Check if Bluetooth is supported
static Future<bool> isBluetoothSupported() async {
return await FlutterBluePlus.isSupported;
}
// Request permissions before using Bluetooth
static Future<bool> requestPermissions() async {
if (Platform.isAndroid) {
Map<Permission, PermissionStatus> permissions = await [
Permission.bluetooth,
Permission.bluetoothScan,
Permission.bluetoothConnect,
Permission.locationWhenInUse,
].request();
return permissions.values.every(
(status) => status == PermissionStatus.granted,
);
}
return true; // iOS permissions are handled automatically
}
}
Complete Main Function Setup:
Here’s how to set up your main function with proper initialization:
void main() {
// Optional: Set log level for debugging
FlutterBluePlus.setLogLevel(LogLevel.verbose, color: true);
runApp(const MyApp());
}
class MyApp extends StatefulWidget {
const MyApp({Key? key}) : super(key: key);
@override
State<MyApp> createState() => _MyAppState();
}
class _MyAppState extends State<MyApp> {
BluetoothAdapterState _adapterState = BluetoothAdapterState.unknown;
late StreamSubscription<BluetoothAdapterState> _adapterStateSubscription;
@override
void initState() {
super.initState();
_initBluetooth();
}
Future<void> _initBluetooth() async {
// Check if Bluetooth is supported
if (await FlutterBluePlus.isSupported == false) {
print(“Bluetooth not supported by this device”);
return;
}
// Listen to adapter state changes
_adapterStateSubscription = FlutterBluePlus.adapterState.listen((state) {
if (mounted) {
setState(() {
_adapterState = state;
});
}
});
}
@override
void dispose() {
_adapterStateSubscription.cancel();
super.dispose();
}
@override
Widget build(BuildContext context) {
return MaterialApp(
title: ‘BLE Flutter App’,
theme: ThemeData(
primarySwatch: Colors.blue,
),
home: _buildHome(),
);
}
Widget _buildHome() {
if (_adapterState == BluetoothAdapterState.on) {
return const BluetoothConnectedScreen();
} else {
return BluetoothDisconnectedScreen(adapterState: _adapterState);
}
}
}
Result:
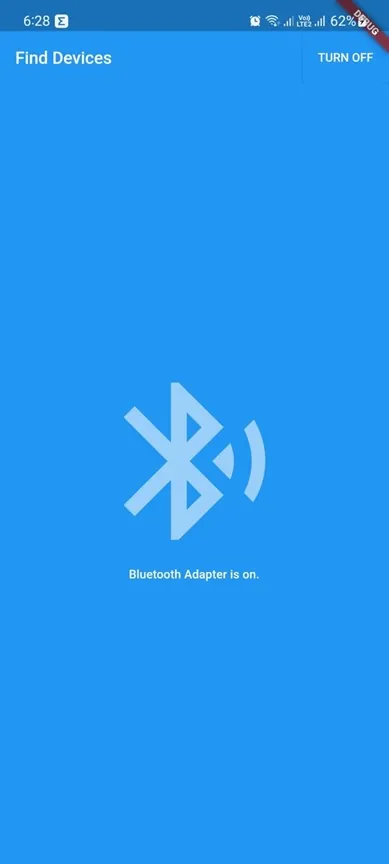
In the end our app looks something like the following, with automatic state management and the ability to turn Bluetooth on/off on Android devices.
The app will automatically switch between the connected (blue) and disconnected (red) screens based on the Bluetooth adapter state, providing a seamless user experience.
Unlock Flutter's Full Potential with AlphaBOLD
Intrigued by the integration of BLE devices in Flutter? Or do you have questions about how connecting BLE devices can enhance your app? We're here to help! Maximize your app's capabilities with our expert web app development services.
Request a ConsultationConclusion
In this tutorial we have successfully set up our application’s Bluetooth services and permissions using the latest flutter_blue_plus package and taken the first step toward building a comprehensive BLE application. We’ve implemented proper state management, permission handling, and cross-platform compatibility.
Key improvements in this updated version include:
- Updated to flutter_blue_plus 1.35.5 with the latest API
- Proper Android 12+ permission handling
- Better error handling and state management
- Improved code structure and organization
- Enhanced UI responsiveness
Further on, we will dive more into creating a full-fledged product and start connecting our app with BLE devices, managing multiple connections, and implementing advanced BLE operations.
We hope you found our article informative and comprehensive, and hope you stick around for more parts in this series. We hope to see you again soon! 😊
Explore Recent Blog Posts