Introduction
In this fifth sequel of the SPFx blog series, let’s discuss how we can deploy a web part to the SharePoint App catalog site. In case you have not followed our previous blogs, you can access the links below!
- SharePoint Framework Development (SPFx)
- Build your first SPFx client-side web part
- Set up SharePoint Framework (SPFx) Development Environment
- Setting up an App Catalog site
Please note that an App Catalog site is a pre-requisite to the deployment! Hence, you need to ensure that an App Catalog set up is ready to deploy!
Maximize your SharePoint Potential with AlphaBOLD
Connect with AlphaBOLD's SharePoint experts for tailored solutions that enhance your business productivity.
Request a ConsultationLet’s Deploy!
The first thing that we need to do to deploy our web part is to create a deployable package that can be uploaded to the App Catalog:
How To Create A Package?
- Launch the Node.JS or console window and set path to our SPFx web part directory.
- On the Node.JS command prompt or console window type the following command: “gulp clean”
- The gulp clean command cleans the deployment file “.sppkg” in the project directory SharePoint folder

- On Node.JS command prompt or console window type the following command: “gulp bundle -ship”

Note: “gulp bundle -ship” is a mandatory command in the deployment process because if we do not use this command and directly run “gulp package-solution -ship,” it will connect to localhost rather than the desired environment.
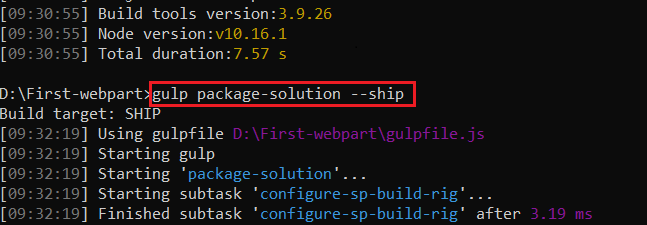
- After successful execution of the above command, type the following command into Node.JS command prompt or on the console window: “gulp package-solution –ship”

Deploy Your Package:
- After you have performed the steps mentioned above, you will see a created package with the following extension “.sppkg” in the project directory: “myprojectsharepointsolutionmypackage.sppkg”.
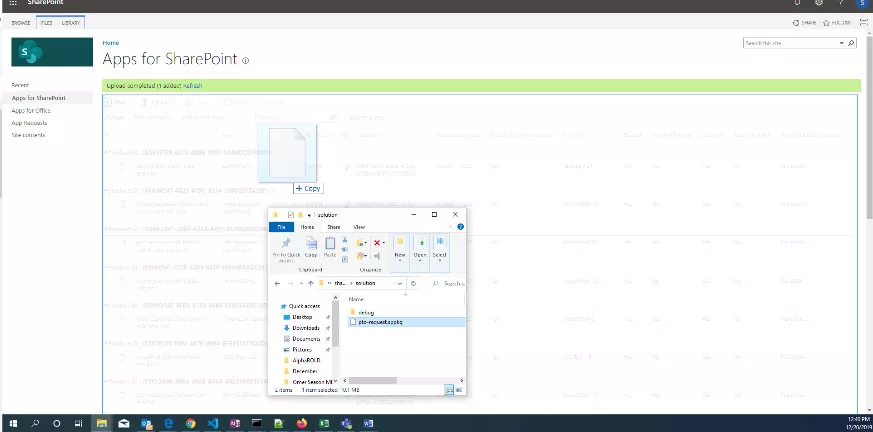
- Simply open the project directory in the windows explorer and then drag and drop the “.sppkg” file into the App Catalog.

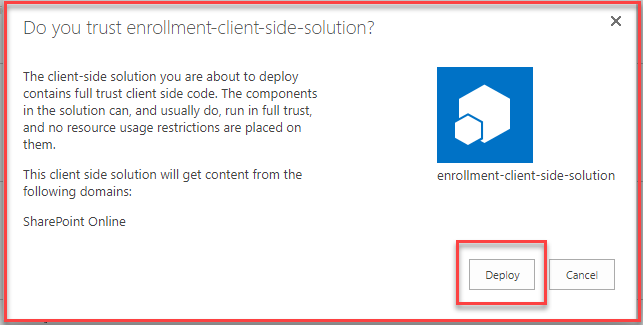
After the package has finished uploading, a dialog box will be prompted. Click on the “Deploy” button.

That’s it, your SPFx web part is deployed to the App Catalog site.

Elevate your Business with AlphaBOLD’s SharePoint Expertise
AlphaBOLD’s team of SharePoint professionals is here to assist. From deployment to customization, we ensure your SharePoint platform aligns perfectly with your business objectives.
Request a ConsultationConclusion
We can deploy the SPFx web part by running few commands onto the Node.JS command prompt and drag and drop the package to App Catalog. After deploying the web part, it will be available for addition as an app in site contents, and later we can add this app on the page as a web part. In the next blog post, we will learn how you can add deployed web parts on the SharePoint modern page.
If you have any question or queries, do not hesitate to reach out to us!
Explore Recent Blog Posts


