Dynamics 365 Field Service is an application that is designed to help organizations deliver onsite services to customers. This module comprises of Workflow automation, scheduling algorithms, mobility for field agents, and other supporting tools.
The Field Service Application has many features, a few of which are mentioned in the following list:
• Work orders
• Scheduling and dispatch tools
• An easy-to-use mobile application
• Asset management
• Preventive maintenance
• Inventory, purchasing, and returns capabilities
• Billing capabilities
In the next section of this blog, we will give you some guidelines related to the Field Service MB-240 exam. Let’s start with the scheduler module of the Field Service application.
Overview of scheduling capabilities
Organizations that manage mobile workforces or deliver services to customers can encounter a wide range of scheduling scenarios and challenges. Many things need to be considered while scheduling resources to deliver items. For example:
- when is an item ready to be scheduled?
- who is qualified to work on this item?
- when does it need to be done?
- is there anything at the customer level that would influence decisions on which resource to schedule?
- how do we deal with cancellations or requests to reschedule?
- what if someone is not available?
- how and what can schedule changes impact?
Typically, three approaches can be leveraged to schedule items:
Manually: A dispatcher or scheduler manually identifies people, and either schedules/reschedules items accordingly.
Semi-Automated: Potential qualified resources are suggested based on specific criteria defined on the item they are trying to schedule.
Fully Automated: Uses algorithms, combined with goals, and constraints to automatically schedule and reschedule items.
Dynamics 365 provides three tools that can be leveraged to assist with each approach:
- Manual scheduling with the schedule board
- Fully Automated scheduling with Resource Scheduling Optimization
Goals of fully automated scheduling
- Maximizing technician working time
- Minimizing travel
- Scheduling high priority items first
The primary tool that helps organizations is the schedule board. From the schedule board, manual as well as semi-automated tools can be leveraged to start identifying and scheduling the right resources for the right projects.
Schedule Board
Dispatchers need the following information to effectively dispatch work orders with the available resources:
- What is currently scheduled?
- What needs to be scheduled?
- Who is available?
- What does the traffic look like?
A schedule board consists of the following panels/panes:
Resource Requirements: Provides a list of active requirements that need to be scheduled.
Filter and Map Panel: Provides access to interactive filters and maps that can be leveraged to assist in scheduling.
Details: Provides additional details of the item that is currently selected.
Schedule Calendar: Displays a list of resources and currently scheduled items. The schedule calendar can be used to schedule new items, as well as interact with existing scheduled items.

When you open the schedule board, it shows the following:
- All resources available to be scheduled
- The total time and percentage of a resource for which that is scheduled on each resource tile.
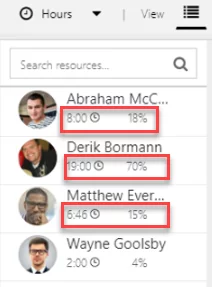
The percent scheduled of a resource is based on its capacity and the date range used on the board.
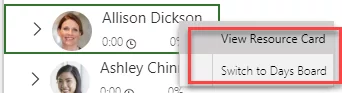
When you hover over a resource tile, you can see 2 options:
- View Resource Card
- Switch to Days Board
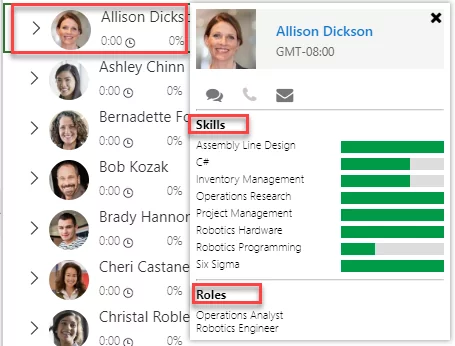
When you choose the “View Resource Card” option, you can see specific details about that resource, such as Skills and Roles of that resource.
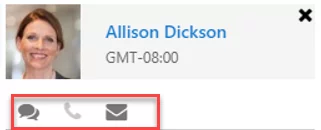
There are multiple communication options available to communicate with the resource, i.e., chat, phone, or email.
The calendar of the schedule board shows the scheduled work orders for each resource. Each tile in the calendar shows the Work Order number along with the duration in hours and minutes.

The Schedule Board Toolbar
The toolbar is an important part of the schedule board. By using the toolbar, you can perform actions like getting directions, book a resource, and sort items on the board. The following is the detail of each option available on the toolbar:

- View Mode: Shows different types of scales that will be used to present resources scheduled on the board. Possible values for this are hours, days, weeks, and
- View: Allows us to see different graphical layouts to present resources on the board. Possible options are horizontal, vertical, list, and map.
- Dates: Lets you specify date range within which you want to see resources scheduling on the board.
- Book: You can create a booking for a resource using this option.
- Actions: Provides a list of actions that you can perform against items on the board. These actions include:
- Get Driving Directions: Lets you get directions from one location to another.
- Move the Booking to a Different Day: As the name suggests, you can use this option to change booking days.
- Print Schedule Board: You can print the entire schedule or specific elements
- Create Booking Alert: Lets you create an alert that will be presented to the dispatcher in the alerts section of the board. Alerts can be used to communicate important or unique information to the dispatcher. For example, you might use a booking alert if a piece of equipment is broken and should not be scheduled.
- Sort: Allows you to define how items on the board are sorted. By default, they can be sorted by name or rating value.
Working with the Filter View
You can work with this option by expanding the “Filter and Map View” on the left side of the board.
The filter lets dispatchers categorize the specific resources displayed on the board, based on the defined criteria. The possible filter options in this view are:
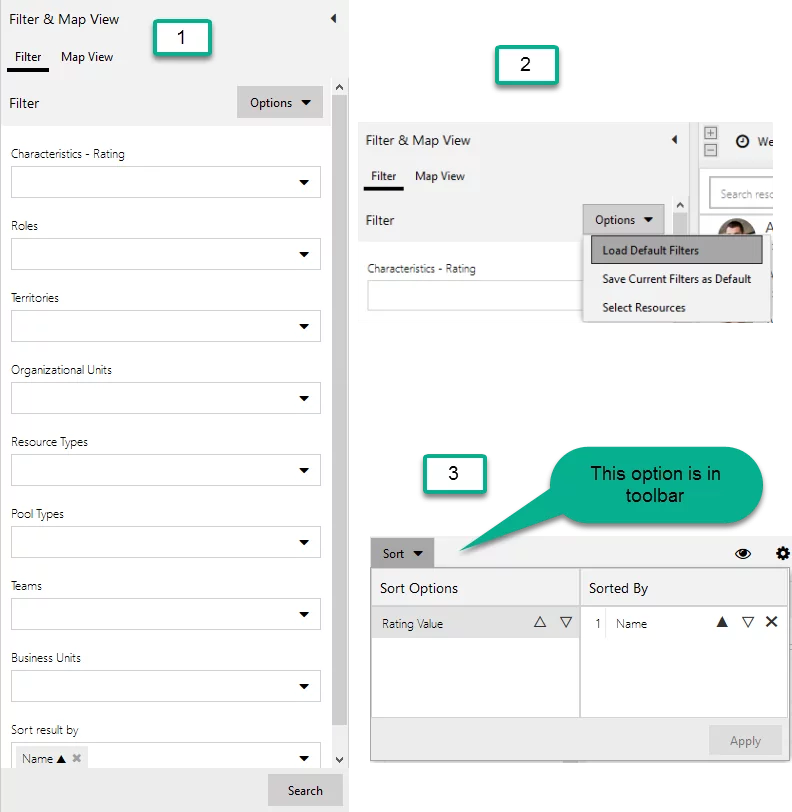
Define Filter Criteria: By default, you can filter resources by characteristics, roles, territories, organizational units, resource type, pool type, teams, and business units. You can see the filter criteria options in the image below labeled as 1.
Default Filters: A default filter can be defined that will be loaded when that schedule board tab is loaded. It can be re-applied at any time. Refer to the 2nd label in the screenshot below.
Select Resources: By using this option, you can specify the resources you want to display on the schedule board tab. Once those resources are defined, the filters can be applied just to those resources. Refer to the 2nd label in the screenshot below.
Modify how resources are sorted: By default, you can sort by “Name” or “Rating Value”. This is labeled as 3 in the screenshot below.
Note: If you need additional filtering and sorting criteria different from default options, you can do so using the filter customizations.
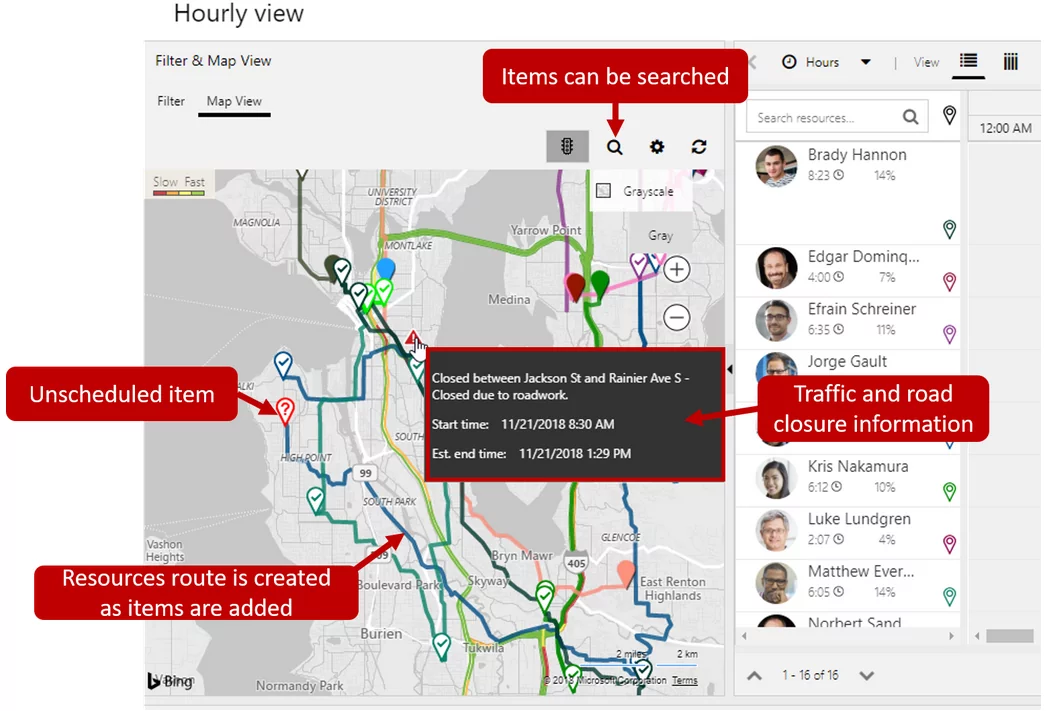
Working with the Interactive Map
When you switch to the map view, you will be able to see and interact with relevant scheduling items such as organizational units, resources, scheduled items, and unscheduled items. As you zoom in on specific areas, you will be able to see additional relevant information such as traffic and route information. That data can be used to make further scheduling decisions.
Map Features
Maps Types: 4 map types can be used, Road, Aerial, Bird’s eye, and StreetSide. By default, the map displays in a grayscale.
- Show traffic: Shows current traffic information to assist in scheduling items. The traffic shows item slowdowns and road closures.
- View open requirements: Pins for unscheduled items are placed on the map. Requirements can be scheduled right from the map itself.
- Resource routes: As resources are scheduled for items, their route will be displayed. As additional requirements need to be scheduled, dispatchers can view people who would potentially already be in the area and schedule them as needed.
- Current resource location: When resources use the mobile app, their current location can be displayed on the map to see where the resource is.
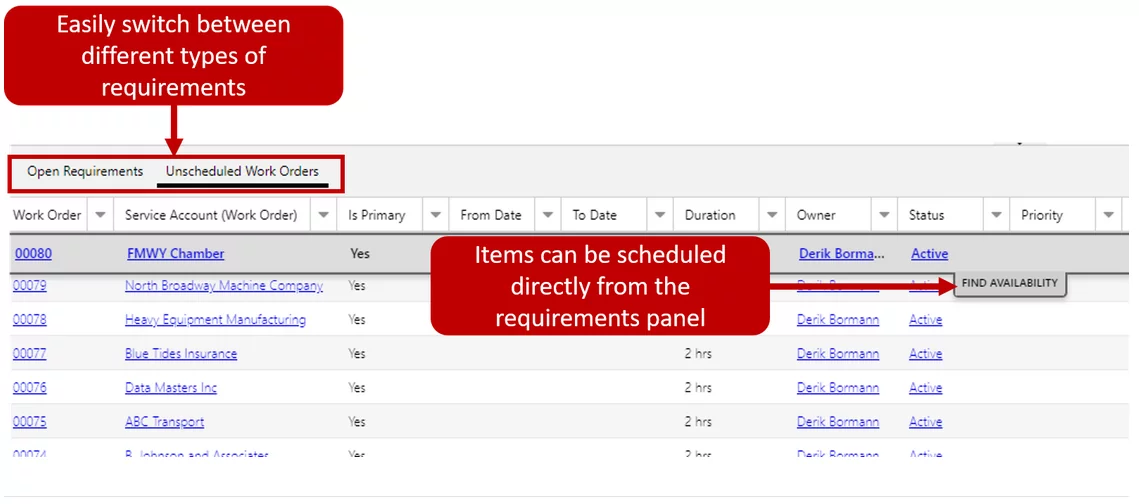
Requirements Panel
Requirements allow the dispatcher to see the list of the currently active resource requirements that need to be scheduled. Requirements are displayed for any record that is enabled for URS and has active requirements that meet the conditions defined in the panel tabs.
The tabs available (depending on your installed solution) includes:
- Open Requirements: Displays a list of all active requirement records related to any entity enabled for URS.
- Unscheduled Work Orders: Displays a list of all active requirement records related to unscheduled work orders. (added when Field Service is installed)
- Projects: Displays a list of all active requirement records related to unscheduled project items. (added when Project Service Automation is installed)
Additional tabs can be added as needed. Items for the requirement panel can be scheduled by dragging them or using the find availability button.
Details Pane
The details pane will provide additional information about the item that is selected. For example, if a requirement is selected, the details section will display information about the requirement. If a booking is selected, it will display information about the booking.
I hope this will be helpful.
Thanks!
Conclusion
In this blog, we gave a basic overview related to the MB-240 Certification for Microsoft Dynamics 365 Field Service. Stay tuned for the second part of this blog, in which we will cover things in more detail. If you have any questions, queries, or insights, please leave a comment below.