Introduction to Connecting BLE Devices with Flutter
Framework Essentials for Connecting BLE Devices
This tutorial is divided into multiple parts. In part 1 of our tutorial, we will work on the front-end application. The front-end application will be developed on the Flutter Framework for iOS and Android platforms. Flutter offers a robust and versatile framework for developing cross-platform mobile applications that can connect with and manage BLE devices efficiently.
In the future, we may require back-end services that can be developed using Node.js for the web APIs and Cosmos DB hosted on either Azure or AWS (Amazon Web Services) platforms.
Packages:
The following packages are used and added in our projects pubspec.yaml file:
There are other BLE-related packages available in the pub.dev repository. However, we are using the Flutter Blue Plus package as it is a more updated and maintained version of the most popular BLE package on the pub store, Flutter Blue.
On the other hand, the permission handler package is the best library on the market for handling OS-level permissions for all frameworks supported by Flutter and works seamlessly for Bluetooth integrations.
Setup:
The permission handler package does not require any OS-level permissions by itself. A certain code must be added to use Bluetooth services on both iOS and Android.
iOS:
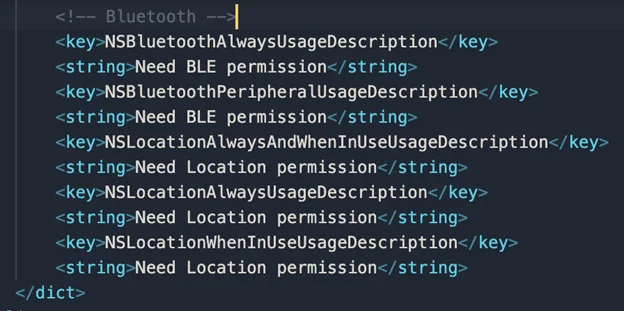
It is important to add the following permissions inside the info.plist file in your iOS project. All code must be added within the ‘dict’ tag.
Android:
For Android, the setup is quite simple but takes up more time. We must first add the following permissions inside the AndroidManifest.xml file within the ‘application’ tag.

The ‘BLUETOOTH_CONNECT’ permission is only used for Android SDK API level 31 and above (mainly Android 12 and the version above it). The rest of the Bluetooth permissions are used for API levels 30 and less. Location permissions will come in handy later.
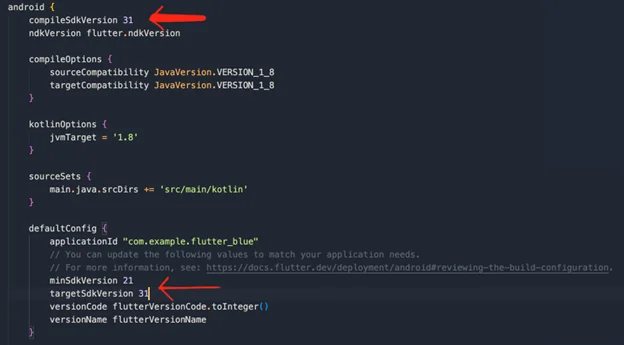
Next, the minimum and target SDK versions must be set to at least 19 and 31, respectively. These can be changed inside the app/build.gradle file within the ‘android’ section. You will want to set these numbers high to ensure your application is updated compatible.
Code:
Once we have set up our application for connecting BLE devices, we will now start coding our app. We will divide this section into fragments, explaining each type of code in detail. Our application, in its current form, will keep tabs on the Bluetooth state of the device, whether the Bluetooth is on or off, etc. This is a vital and fundamental feature required in every BLE application to handle changes in Bluetooth state and inform the user of the change.
Our app will automatically traverse to and from the ‘Bluetooth Connected’ and ‘Bluetooth Disconnected’ states. And manually as well by enabling it or disabling it via the application in the case of Android.
Transform your Flutter App by Connecting BLE Devices
Ready to enhance your Flutter app with seamless BLE device connectivity? Tap into AlphaBOLD's mobile development expertise to integrate the essential features for connecting BLE devices.
Request a DemoUI:
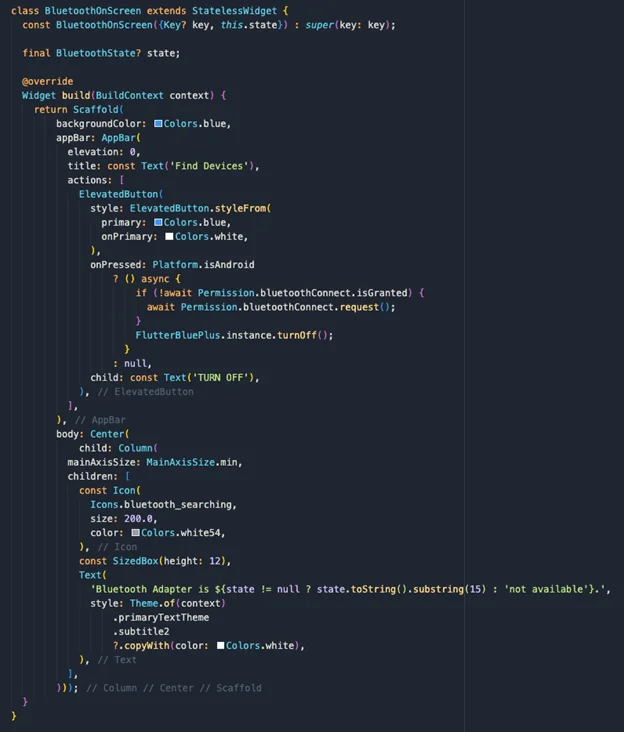
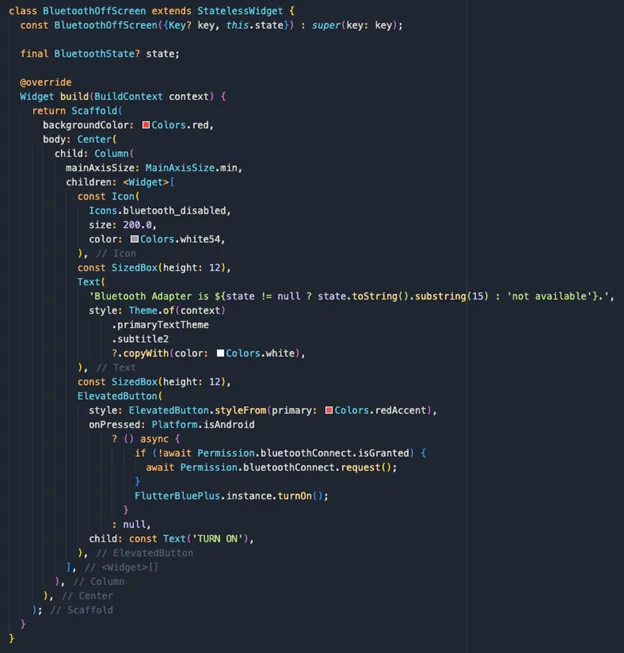
Our first task would be to develop and design both the Bluetooth Connected and Disconnected screens for BLE devices, which would traverse between one another depending on the Bluetooth state. Code snippets of both screens are displayed below.
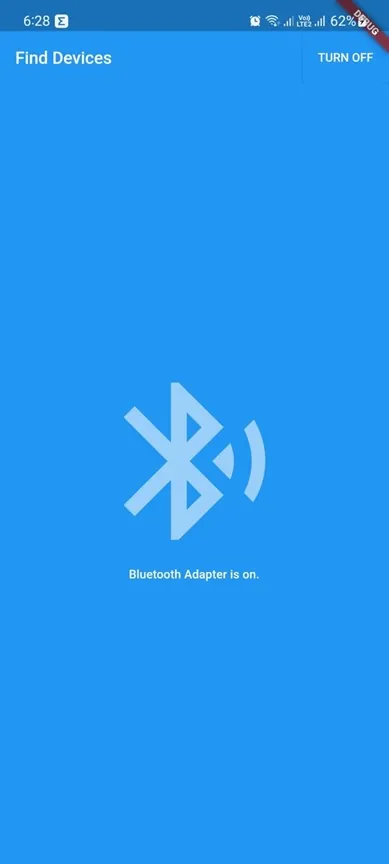
The connected screen would have a blue background, as set inside the Scaffold widget’s ‘backgroundColor’ property, and the disconnected screen would have a red background. Both screens would contain a Column, and inside there would be an icon depicting the Bluetooth status and a text String stating the status.
The disconnected page would have a connect button at the bottom of the column, while the connected page would feature the disconnect button in the app bar as an action button. This setup is specifically designed for connecting BLE devices, as the body of the screen will be used to display all nearby discoverable BLE devices in future tutorials.
Explore more about BLE Devices: Connecting BLE Devices with Flutter (Part 2)- Bluetooth State
Bluetooth Connected Screen:
Bluetooth Disconnected Screen:
Logic:
A key feature of the application is its ability to monitor changes in the Bluetooth state of BLE devices, including the capability to manually override this state on Android devices. This is where the Flutter Blue Plus package significantly simplifies the process, providing the necessary tools to effectively manage the Bluetooth connectivity of BLE devices.
Bluetooth State:
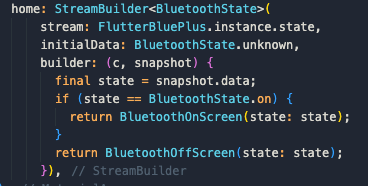
The answer lies at the root of the application. While defining the ‘home’ field inside the MaterialApp widget, the root would be a StreamBuilder of type ‘BluetoothState’. The Flutter Blue Plus package provides a Stream type get method which returns a snapshot of the Bluetooth state every time it changes. The StreamBuilder widget listens to the state stream and changes the UI depending on the result of each snapshot
Bluetooth Toggle On/Off (Android):
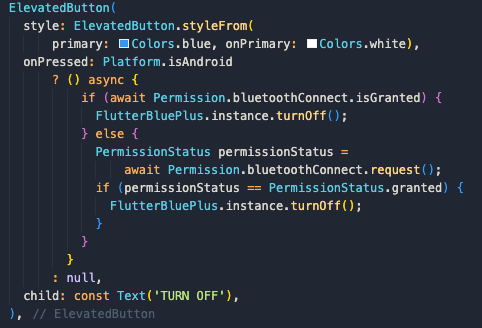
The Android OS empowers users to control their Bluetooth service directly through a mobile application, including the capability to turn it on or off, provided they have granted the necessary permissions. This functionality is particularly useful when managing BLE devices, ensuring seamless connectivity. The Flutter Blue package facilitates this process by offering two straightforward methods that developers can invoke as needed. These methods are accessible directly from the plugin’s static singleton constructor, streamlining the development of applications that interact with BLE devices.
- FlutterBluePlus.instance.turnOn()
- FlutterBluePlus.instance.turnOff()
However, the user would require enabling Bluetooth permissions for this to work. This is where the Permission Handler package prompts the user to enable Bluetooth permissions. The following code snippet displays the entire methodology. The code for the toggle-off button will be the same. Please note that only the method for turning it off needs to be changed, as explained above.
Result:
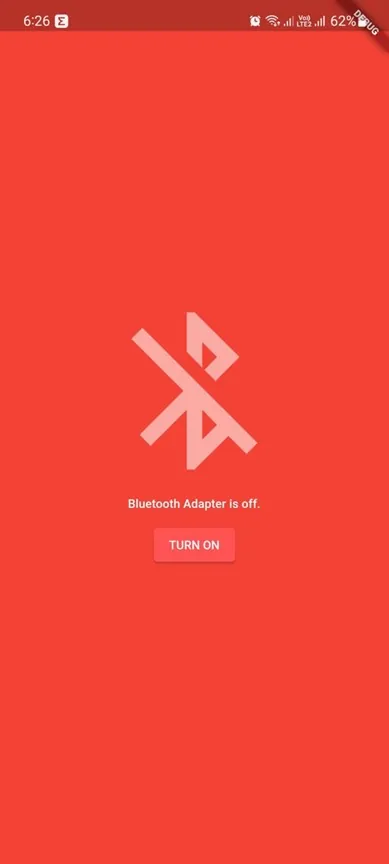
In the end, our app looks something like the following.
Unlock Flutter's Full Potential with AlphaBOLD
Intrigued by the integration of BLE devices in Flutter? Or do you have questions about how connecting BLE devices can enhance your app? We're here to help! Maximize your app's capabilities with our expert web app development services.
Request a DemoConclusion
In this tutorial, we have successfully set up our application’s Bluetooth services and permissions and taken the first step to making a future competitor to Apple Health:). Further on, we will dive more into creating a full-fledged product, connecting BLE devices with our app, and keeping them running in the background.
We hope you found our article informative and comprehensive, and we hope you stick around for more.😉.
Explore Recent Blog Posts


