D365 Portals: Working with radio button option sets and using them to dynamically modify other fields

Daniel Gonet
Introduction
As we have built Dynamics 365 portals for our customers, we have encountered aspects of configuration that do not translate to the same functionality on portals as one would expect. Working with some of the field options of entity forms is one such area, as there are some unexpected intricacies in how certain tasks are accomplished.
Let us walk through a scenario, in which a company would like to allow its customers to submit warranty inquiries for its products from a D365 Customer Self-Service portal. The company has the following requirements for this form:
- The form must include a field that asks the customer where the product was purchased.
– This field should be displayed as a set of radio buttons.
- Some of the purchase source options need additional information from the customer. We need to display a dynamics field based on the option selected to get additional details from the customer.
– This information will be different per option and will thus need to have different labels. per option, but should all use a single field for simplicity of the data model.
– The field into which the customer adds this information must be required, but only for options that need it.
– The field must be hidden when it is not needed.
This blog will cover the configurations required to meet these objectives:
- [OOB (Out of the BOX) Configuration] Displaying an option set as radio buttons.
- [JavaScript] Getting the selected value of a field displayed as radio buttons.
- [JavaScript] Dynamically modifying the label of a field.
- [JavaScript] Dynamically making a field visible or hidden.
- [JavaScript] Dynamically making a field required or not required.
Displaying an Option Set As Radio Buttons
Reformatting an option set is quite simple in portal management, as it can be done directly within D365 configuration rather than requiring any custom code. Here are the steps for doing so:
- Open the appropriate entity form and navigate to the Entity Form Metadata tab, then click New Entity Form Metadata.

- In the Type field select Attribute, then pick the option set field that you would like to modify from the dropdown below.
- Scroll down to where you see the format; pick the appropriate option from this dropdown. In our case, we will be selecting “Option Set as Horizontal Radio Button List.
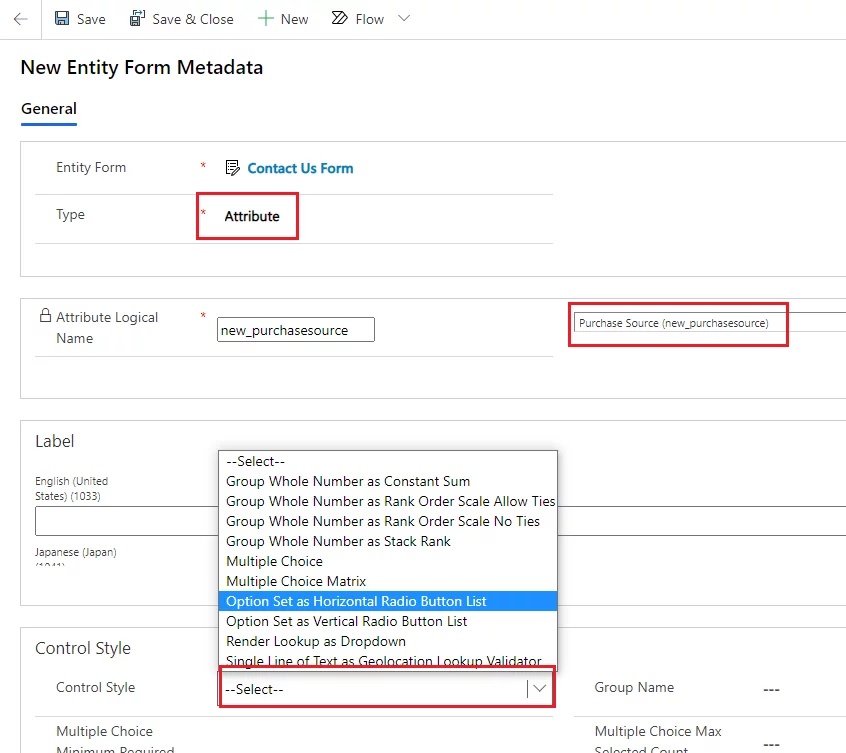
- Save and Close.
That is it! Once we refresh the site, we should see that the option set has been reformatted into radio buttons rather than a dropdown.
Read More: How to Make a D365 API Call from a Power Apps Portal
Getting the Selected Value of a Field Displayed as Radio Buttons
While a normal option set formatted as a drop-down is straightforward to get the selected value, radio button options for an option set field are considered separate controls by the portal. This means there is not an easy way to check which option is selected from a single source; we need to check each individual option to see whether it is selected and return a result once we have found the selected value.
The portal creates these option set value controls with a consistent pattern, appending the index of the option to the name of the field. Here is what this looks like in practice, assuming there are three options in the product source option set (returning the ID value of the option, not the text):
$(document).ready(function () {
// format
$(“#”).change(onPurchaseSourceChange);
// in scenario context
$(“#new_purchasesource”).change(onPurchaseSourceChange);
});
function onPurchaseSourceChange() {
let purchaseSourceValue;
// format
if ($(“#_”).is(“:checked”)) {
purchaseSourceValue = $(“#_”).val();
}
// in scenario context
if ($(“#new_purchasesource_0”).is(“:checked”)) {
purchaseSourceValue = $(“#new_purchasesource_0”).val();
} else if ($(“#new_purchasesource_1”).is(“:checked”)) {
purchaseSourceValue = $(“#new_purchasesource_1”).val();
} else if ($(“#new_purchasesource_2”).is(“:checked”)) {
purchaseSourceValue = $(“#new_purchasesource_2”).val();
}
}
Dynamically Modifying the Label of a Field
Modifying the label is straight forward. It is just a matter of knowing how to format the control and which property to modify. Here is a quick code snippet to show the format and an example that fits our scenario:
// format
$(“#_label”).text(“”);
// in scenario context
$(“#new_purchasesourcedetails_label”).text(“What is the name of the website?”);
Unlock the Full Potential of Dynamics 365 Portals with AlphaBOLD's Expertise
Ready to elevate your Dynamics 365 Portals experience? Connect with AlphaBOLD for personalized consultations and unleash the power of Dynamics 365 Portals in your business.
Request a DemoDynamically Making a Field Visible or Hidden.
Like modifying the label, dynamically hiding a field is concise and straightforward. The main difference here is that, as per our requirements, the field needs to be hidden by default; this means we need to add a statement to the “document.ready” function that hides it right at the start, as doing so in the form configuration will cause it to not be available on the portal at all. . The code for handling field visibility looks something like this:
// format
$(“#”).closest(“tr”).hide();
$(“#”).closest(“tr”).show();
// in scenario context
$(“#new_purchasesourcedetails”).closest(“tr”).hide();
$(“#new_purchasesourcedetails”).closest(“tr”).show();
Dynamically Making a Field Required or Not Required.
Dynamic field requirement modifications on a portal are different from doing so directly in Dynamics with the Web API (Application Program Interface). Instead of simply adjusting a requirement parameter on the field, we need to create our own custom validator to handle the requirement state of the control.
Fortunately, this validation logic can be copy-pasted directly into your project as a helper function and will work for any number of the field controls you need. Here is a code snippet that shows both the function itself and how to call it:
// format
setRequired(“”, boolean)
// in scenario context
setRequired(“new_purchasesourcedetails”, true);
setRequired(“new_purchasesourcedetails”, false);
// helper function for requirement validation (pasted directly into the form’s javascript)
function setRequired(fieldLogicalName, isRequired) {
try {
const fieldControlId = ”#” + fieldLogicalName;
const fieldLabelId = fieldControlId + ”_label”;
if ($(fieldControlId) != undefined) {
$(fieldControlId).prop(‘required’, isRequired);
if (isRequired) {
$(fieldControlId).closest(“.control”).prev().addClass(“required”);
// create a new validator
const requiredValidator = document.createElement(‘span’);
requiredValidator.style.display = ”none”;
requiredValidator.id = fieldLogicalName + ”Validator”;
requiredValidator.controltovalidate = fieldLogicalName;
requiredValidator.errormessage = ”” + $(fieldLabelId).html() + ” is a required field.”;
requiredValidator.initialvalue = ””;
requiredValidator.evaluationfunction = () => {
const fieldValue = $(fieldControlId).val();
if (fieldValue == null || fieldValue == ””) {
return false;
} else {
return true;
}
};
// add the validator to the array of existing validators on the page
Page_Validators.push(requiredValidator);
} else {
$(fieldControlId).closest(“.control”).prev().removeClass(“required”);
// remove the validator from the array of existing validators on the page
for (i = 0; i < Page_Validators.length; i++) { if (Page_Validators[i].id == fieldLogicalName + ”Validator”) { Page_Validators.splice(i); } } } } } catch (error) { errorHandler(error); } }
Transform Customer Experiences - Explore Dynamics 365 Portals with AlphaBOLD
Ready to revolutionize your customer experiences? Explore the capabilities of Dynamics 365 Portals with AlphaBOLD's proven expertise.
Request a DemoD365 Portals are extremely powerful, but at times do require a bit of custom work to meet certain requirements. These snippets should be universally applicable to most business use cases, and allow for a great deal of business impact when used to configure entity forms. Here is an example of what the fields look like when configuration is complete:

As a final send-off, here is the complete JavaScript resource that incorporates all of all the elements outlined in this blog:
// AlphaBOLD - D365 Portals: Working with radio button option sets and using them to dynamically modify other fields
$(document).ready(function () {
// hide the purchase source details field until needed
$(“#new_purchasesourcedetails”).closest(“tr”).hide();
// run this function when the field value changes
$(“#new_purchasesource”).change(onPurchaseSourceChange);
});
function onPurchaseSourceChange() {
let purchaseSourceValue;
// find the purchase source value selected by the user
if ($(“#new_purchasesource_0”).is(“:checked”)) {
purchaseSourceValue = $(“#new_purchasesource_0”).val();
} else if ($(“#new_purchasesource_1”).is(“:checked”)) {
purchaseSourceValue = $(“#new_purchasesource_1”).val();
} else if ($(“#new_purchasesource_2”).is(“:checked”)) {
purchaseSourceValue = $(“#new_purchasesource_2”).val();
}
// handle show/hide, requirement, and label text for purchase source details
if (purchaseSourceValue == “100000000”) { // online purchase
$(“#new_purchasesourcedetails”).closest(“tr”).show();
$(“#new_purchasesourcedetails_label”).text(“What is the name of the website?”);
setRequired(“new_purchasesourcedetails”, true);
} else if (purchaseSourceValue == “100000001”) { // retail purchase
$(“#new_purchasesourcedetails”).closest(“tr”).show();
$(“#new_purchasesourcedetails_label”).text(“What is the name of the retail store?”);
setRequired(“new_purchasesourcedetails”, true);
} else if (purchaseSourceValue == “100000002”) { // private seller
$(“#new_purchasesourcedetails”).closest(“tr”).show();
$(“#new_purchasesourcedetails_label”).text(“What is the name of the private seller?”);
setRequired(“new_purchasesourcedetails”, true);
}
}
// set requirement status on field
function setRequired(fieldLogicalName, isRequired) {
try {
const fieldControlId = “#” + fieldLogicalName;
const fieldLabelId = fieldControlId + “_label”;
if ($(fieldControlId) != undefined) {
$(fieldControlId).prop(‘required’, isRequired);
if (isRequired) {
$(fieldControlId).closest(“.control”).prev().addClass(“required”);
// create a new validator
const requiredValidator = document.createElement(‘span’);
requiredValidator.style.display = “none”;
requiredValidator.id = fieldLogicalName + “Validator”;
requiredValidator.controltovalidate = fieldLogicalName;
requiredValidator.errormessage = “<a href=” + fieldLabelId + “>” + $(fieldLabelId).html() + “ is a required field.</a>”;
requiredValidator.initialvalue = “”;
requiredValidator.evaluationfunction = () => {
const fieldValue = $(fieldControlId).val();
if (fieldValue == null || fieldValue == “”) {
return false;
} else {
return true;
}
};
// add the validator to the array of existing validators on the page
Page_Validators.push(requiredValidator);
} else {
$(fieldControlId).closest(“.control”).prev().removeClass(“required”);
// remove the validator from the array of existing validators on the page
for (i = 0; i < Page_Validators.length; i++) {
if (Page_Validators[i].id == fieldLogicalName + “Validator”) {
Page_Validators.splice(i);
}
}
}
}
} catch (error) {
errorHandler(error);
}
}
Conclusion
In conclusion, this blog has delved into the nuances of customizing Microsoft Dynamics 365 portals, emphasizing the use of radio button option sets to dynamically modify other fields. We’ve provided practical solutions and JavaScript code examples for a range of tasks, including displaying option sets as radio buttons, retrieving selected values, and dynamically altering field labels, visibility, and requirement statuses. Our goal is to deliver valuable insights to you, our readers. For further details on our Dynamics 365 offerings, please click here.
Explore Recent Blog Posts