Introduction
Dynamics 365’s Power Apps Portal functionality is incredibly useful for various things, from internal intranets to allowing customers to submit information to Dynamics directly. A lot can be accomplished with them out of the box, but sometimes, we need additional context from the D365 API call to finish a request submitted by a customer.
Learn more about Dynamics 365!
Normally, this can be done from within Dynamics itself with simple web requests. However, this process is a bit different on portals, as Dynamics’ security model prevents the portal from making requests directly to the API. Instead, we need to request a record in the portal, which essentially makes the D365 API call request on our behalf. To do so, we will need to create the following records, in order:
- Web Template
- Page Template
- Web Page
Building the Web Template (including the FetchXML required for the API):
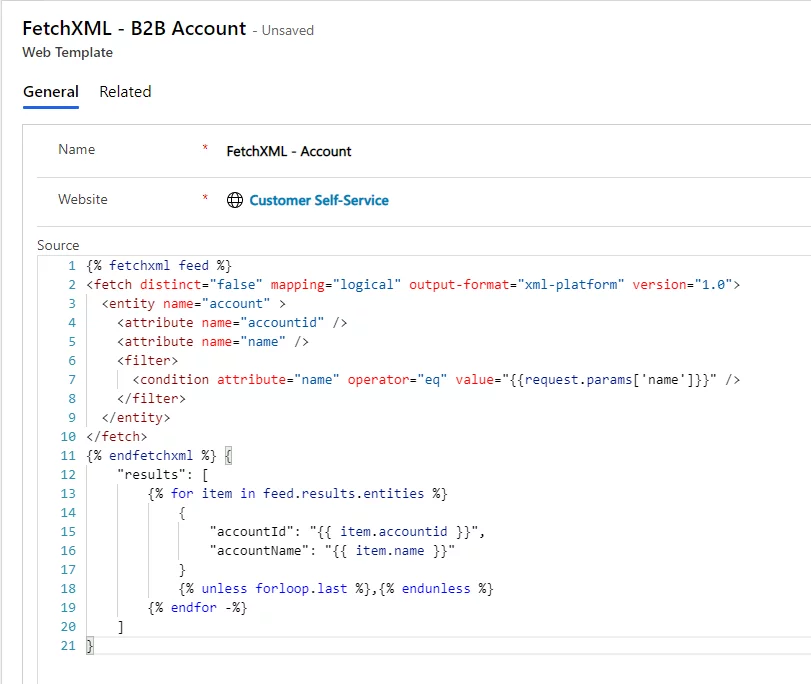
The Web Template will contain the FetchXML query, as well as some additional boilerplate that allows us to grab the values as needed via JavaScript elsewhere. As an example, here is a snippet that shows what we would put in this Web Template record if we wanted to get a list of accounts that match the provided name:
{% fetchxml feed %}
<fetch distinct=“false” mapping=“logical” output-format=“xml-platform” version=“1.0”>
<entity name=“account” >
<attribute name=“accountid” />
<attribute name=“name” />
<filter>
<condition attribute=“name” operator=“eq” value=“{{request.params[‘name’]}}” />
</filter>
</entity>
</fetch>
{% endfetchxml %} {
“results”: [
{% for item in feed.results.entities %}
{
“accountId”: “{{ item.accountid }}”,
“accountName”: “{{ item.name }}”
}
{% unless forloop.last %},{% endunless %}
{% endfor -%}
]
}
Elevate your CRM with Power BI Integration
AlphaBOLD guides you through every step, from API calls to comprehensive CRM solutions. Let's transform your business processes together.
Request a ConsultationLet us dissect this for a moment to illustrate what each component represents. The FetchXML query can be copy-pasted from any existing query, e.g., XRMToolbox’s FetchXML Builder or an export from Dynamics. This query will need to be modified if it needs dynamic parameters, however, with the following format:
=”{{request.params[‘<parameter>’]}}”
In the example above, we are sending a parameter called name as the value for a filter condition.
Below the FetchXML, we must include some Liquid text that helps us parse the results. Everything here is standard, except for the contents of the four loops. Each key-value pair represents the output of one field; the key is custom text that can be used in JavaScript, and the value simply points to an attribute in the FetchXML. Each pair will have the following format:
“fieldname”: “{{ item.fetchAttribute }}”
With all of this in mind, the Web Template should look something like the following:

Adding a Page Template:
The process of making an API call from Power Apps is more involved than making a similar request directly through D365. It is also a particularly useful tool when building customer-focused entity forms and web pages. We have encountered multiple scenarios with our customers where this pattern is useful, resulting in better customer experience and data integrity. Some requirements are impossible without relying on the D365 API call, so this feature solidifies Power Apps Portals as a great solution for externally accessible web interactivity.
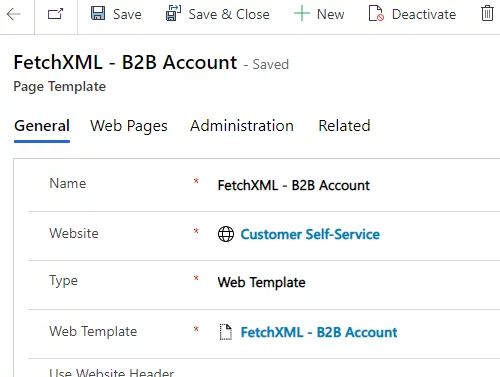
Once the Web Template has been created, we must create a Page Template. This record bridges the web template (our code) and the web page (JavaScript). All we need to do here is add the Website and change the Type to Web Template so that we can select the template we created above.
Further Read: Using Microsoft Dynamics CRM API to get Status Reason Metadata Option

Creating the Web Page:
The last configuration record we need to create is the web page, which we will call from JavaScript to the portal. We will need to fill in the following fields & values:
- Name: The same as the Web Template and Page Template (for continuity)
- Website: The website being used
- Parent Page: Use the default top level page, which will be Home
- Partial URL: Text you will use in the JavaScript request to refer to this page
- Page Template: The template we created above
- Publishing State: Published
The appropriate records will automatically be created if multi-language support is enabled on the portal.
Constructing the D365 API Call Request in JavaScript:
Once all these pieces are in place, we can finally make the request we need. The request will look something like this:
const nameParameter = “Account Name”;
$.getJSON(“/fetchxml-b2baccount” + “?name=” + nameParameter, function (data) {
if (data.results.length > 0) {
// handle each record separately data.results.forEach(function (element) {
const accountId = element.accountId; const accountName = element.accountName;
// use the variables as you normally would in JS
});
}
});
Empower your Business with Dynamics 365 and Power Apps
Empower your business with the combined capabilities of Dynamics 365 and Power Apps. AlphaBOLD is ready to help you harness the power of advanced CRM solutions and custom applications.
Request a ConsultationConclusion
Explore Recent Blog Posts


