Deployment of Serverless Containerized WordPress through AWS Fargate

Naqi Hassan Raza
Introduction
Deploying WordPress through AWS Fargate has emerged as a revolutionary approach for developers and businesses alike, seeking scalable, efficient, and secure web hosting solutions. This innovative approach to hosting WordPress through AWS Fargate offers the promise of eliminating server management overhead while providing the flexibility to scale applications seamlessly with demand. In this comprehensive guide, we delve into the nuances of setting up WordPress through AWS Fargate, showcasing the steps to harness the power of serverless computing. From creating a robust architecture to navigating the deployment process, we unlock the potential of AWS Fargate to transform your WordPress hosting experience.
The Architecture of AWS Fargate
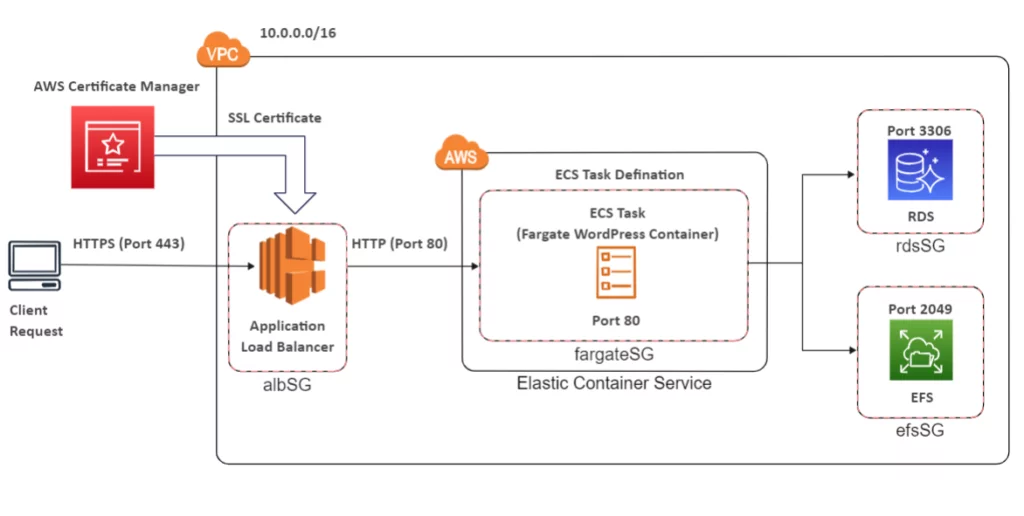
These AWS services will be required for the WordPress deployment as prerequisites.
AWS VPC
- Subnets
- Security Group
AWS RDS
- Aurora Serverless DB
AWS ALB
- Load Balancer
- Target Groups
AWS EFS
- File System
AWS ECS
- Cluster
- Task Definition
- Task
Learn more about AlphaBOLD’s cloud capabilities here.
AWS Virtual Private Cloud
VPC is a service of AWS that provides security to your resources. It’s just like a wall that protects your resources from anonymous attacks.
Navigate to VPCs and create a Virtual Private Cloud for your application security with a few clicks; the VPC used in this blog is fargateVPC.
Note: VPC is like a wall, protecting your application from anonymous attacks.
In this VPC, we will create two subnets in different availability zones and enable them to auto-assign IPs so that the subnets assign IPs to the services.
- 10.0.0.0/24
- 10.0.1.0/24
Read more: How to Use Azure BLOB and AWS S3 with JuiceFS as a Shared storage
Leverage AWS for Seamless Deployment!
Ready to take the plunge into serverless computing with AWS Fargate? Join AlphaBOLD in exploring cutting-edge cloud technologies that make deployment effortless and efficient.
Request a ConsultationWordPress through AWS Fargate: Security Groups
We will use four security group rules to provision WordPress in Fargate.
- albSG
This security group allows traffic from the internet on ports 80(HTTP) and 443(HTTP).
- frigates
This security group inherits the albSG rules and hides the WordPress IP from the internet.
- rdsSG
This security group allows traffic to be on port 3306.
- efsSG
This security group allows traffic to be on port 2049.

AWS RDS
AWS RDS is a Relational Cloud Service that supports PostgreSQL, MySQL, Maria DB, Oracle, SQL Server, and Amazon Aurora.
The next step is to provide Aurora Serverless databases for our WordPress website.
By following these steps, we can create databases (DB).
- Select the Aurora DB and select serverless.
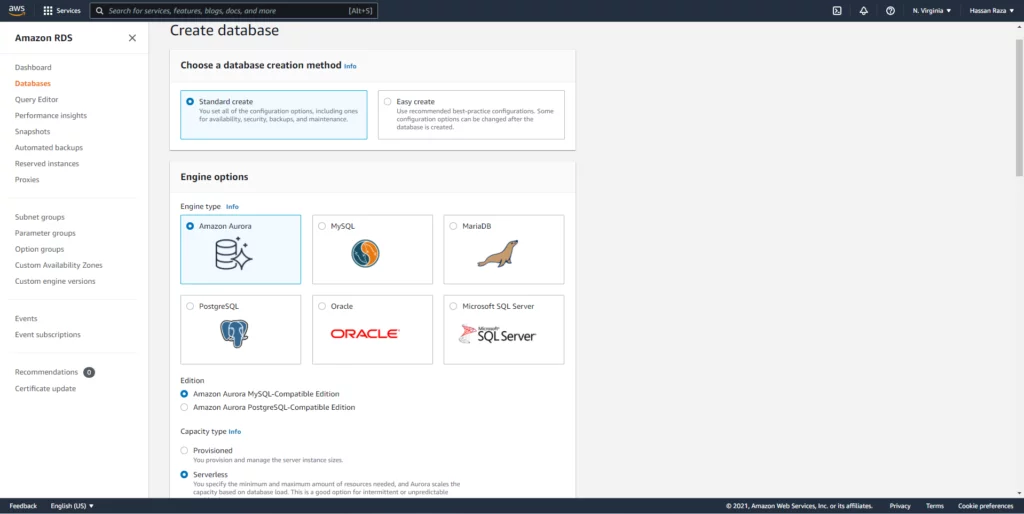
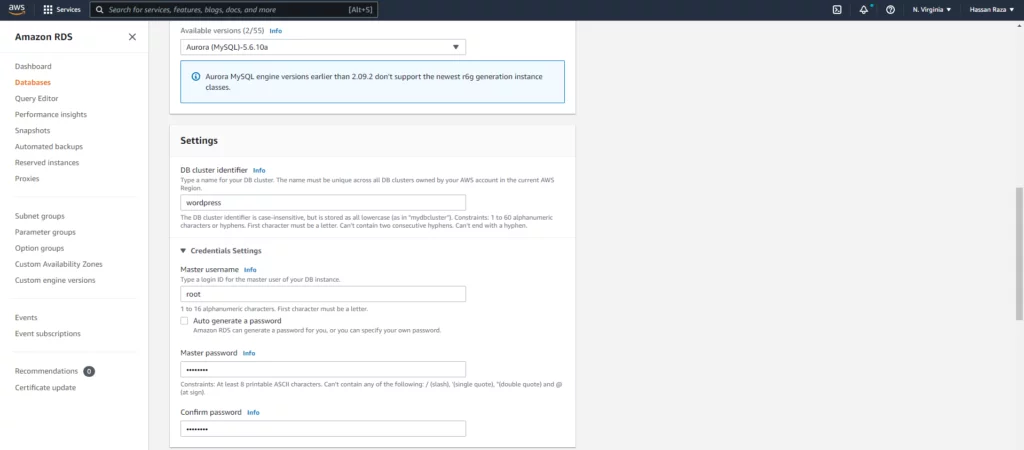
- Select your DB Identifier, the username and the hidden password.
In this section you must select connectivity for your databases. All applications must be in the same VPC to interconnect with each other, so we select the recently created fargateVPC. Select your desired configuration for the databases and click the create databases button.
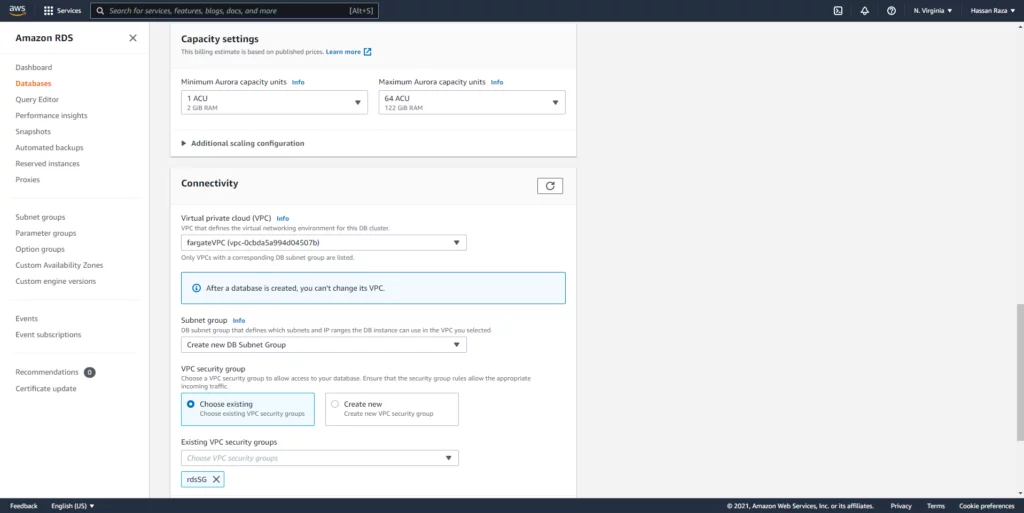
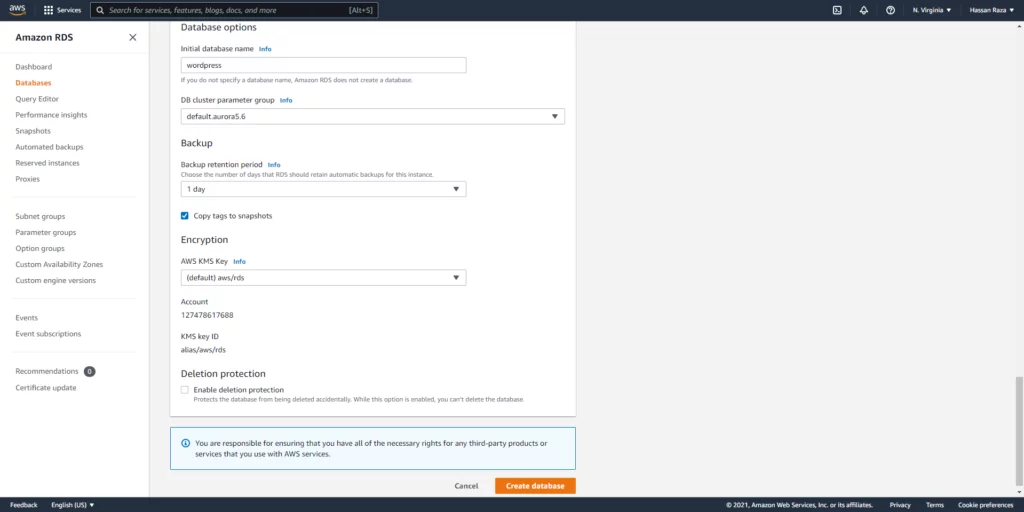
- DB username: root
- DB password: ********
- DB Name: wordpress
AWS EFS
AWS EFS is a cloud-based storage file solution for applications and services running on the AWS.
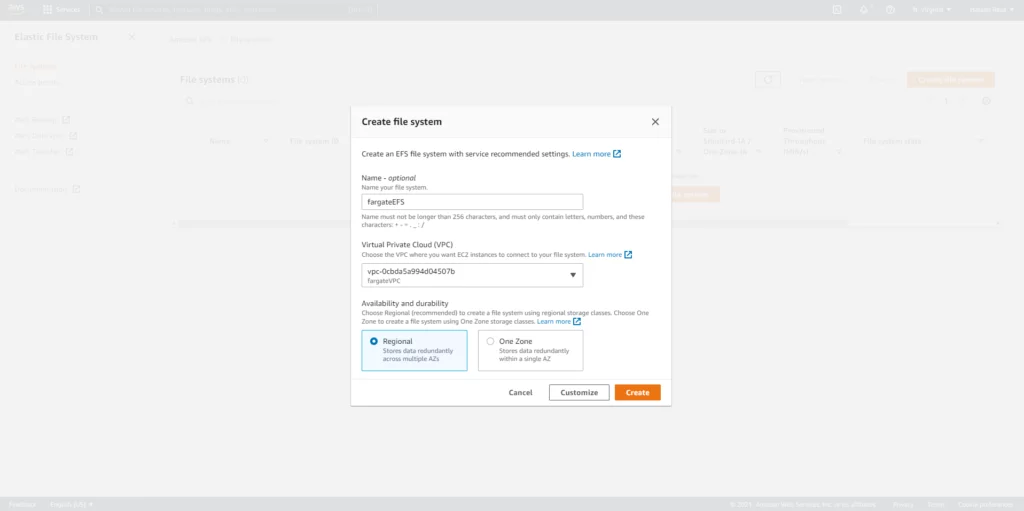
Our next step is to create the AWS EFS (file system), which will store the directories and files of a WordPress website.
AWS ALB & Target Groups
ALB:
Application Load Balancer, an Elastic Load Balancing feature, plays a crucial role in deploying WordPress through AWS Fargate by allowing developers to configure and route incoming end-user traffic to AWS public cloud-based applications, including WordPress sites hosted on Fargate.
Target Groups:
Target Groups create a traffic route for load balancers.
Application load balancer: The ALB gets a request on port 80/443, and depending on the path (URL), it’ll redirect the request to our application in the container. Create the ALB and Target Group so we can receive requests from the internet.
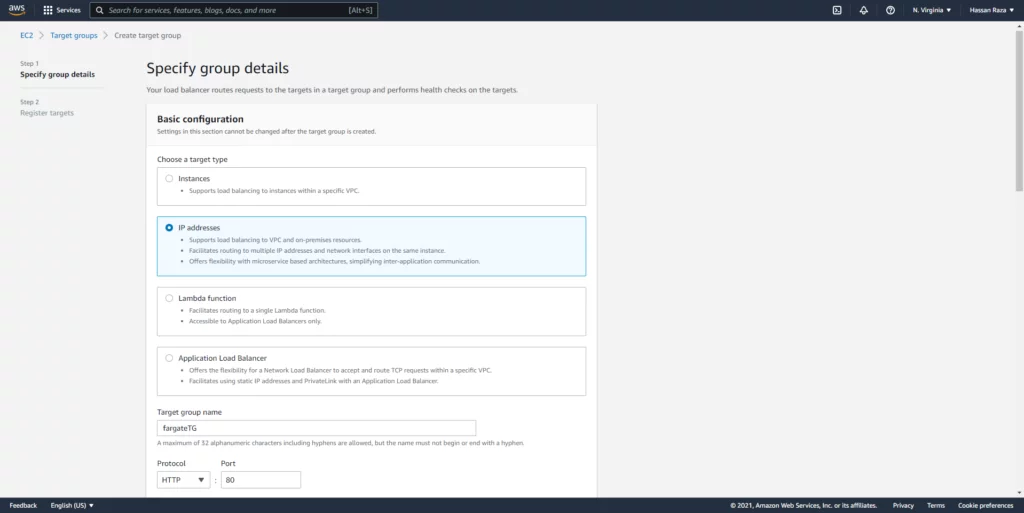
The target type should be the IP address type.
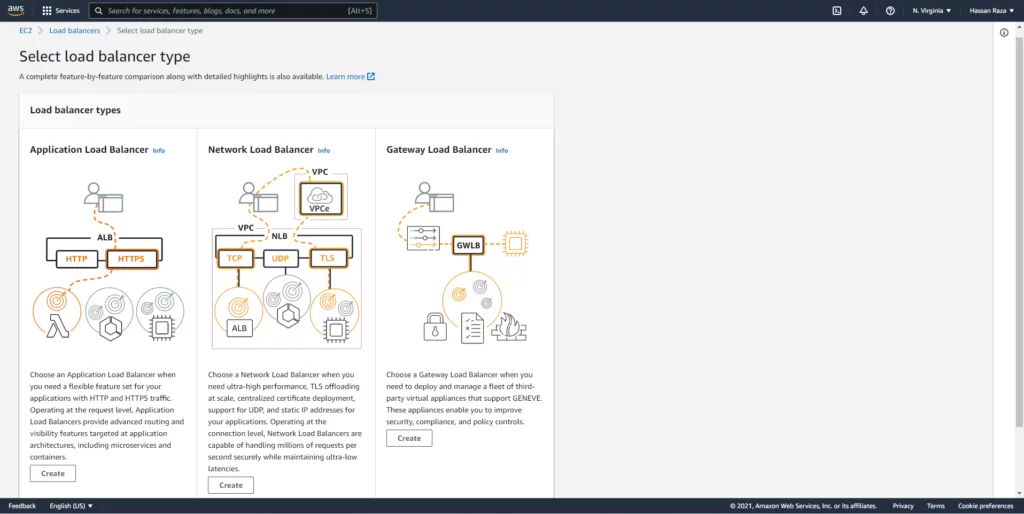
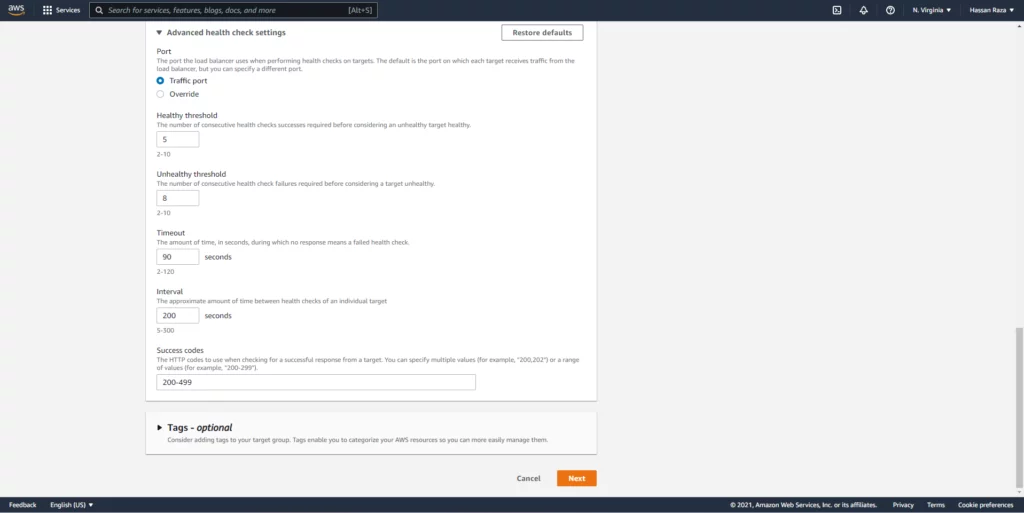
In between we can create Target Group by following these steps below.
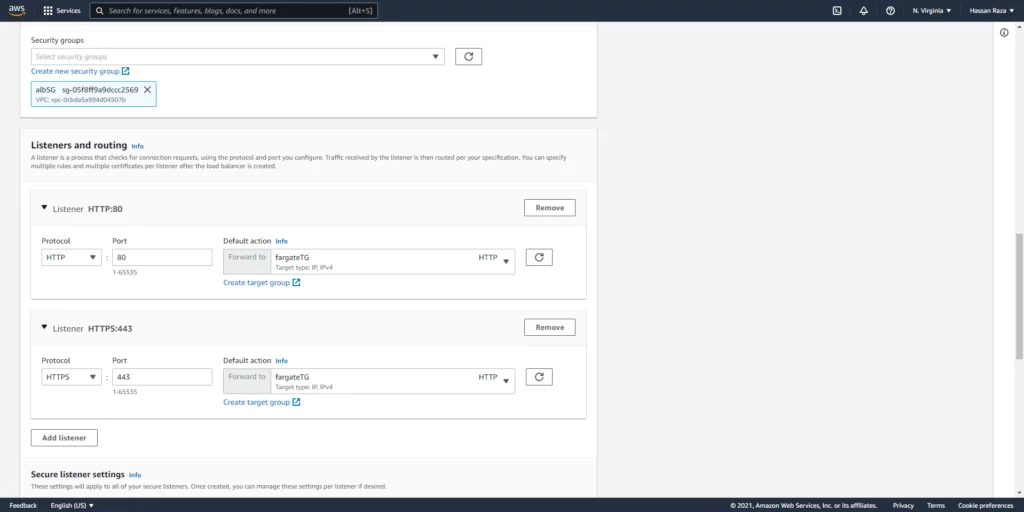
Create two listeners for your load balancer for port 80 and 443 and select the target groups which we created and then create the load balancer.
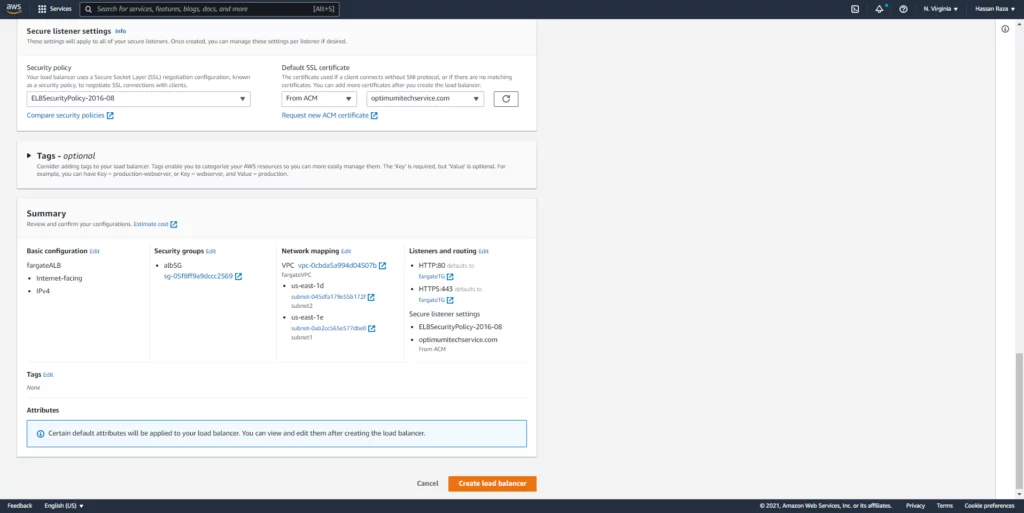
If you want your website to run securely on port 443, add a valid SSL Certificate here through the AWS ACM service.
The AWS ACM is a service that allows you to import your SSL certificate or request a new one from AWS against your valid domain, which as a result, exchanges the DNS records.
AWS ECS
AWS Elastic Container Service (ECS) is an orchestration service that plays a pivotal role in deploying WordPress through AWS Fargate by providing fully managed containers. It offers on-demand scalability, reliability, and security, making it ideal for hosting WordPress. The ECS ensures automated deployment solutions for applications, including WordPress sites hosted through AWS Fargate.
The feature of ECS highlighted in this blog is Fargate, which significantly simplifies infrastructure management and enhances scalability for WordPress deployments. This allows teams to concentrate more on development rather than operational complexities.
To start deploying WordPress through AWS Fargate, navigate to AWS ECS and create a cluster by selecting the “Networking only” cluster template, specifically designed for the Fargate service.
Read more: Deploy Dockerized WordPress with AWS RDS & AWS EFS
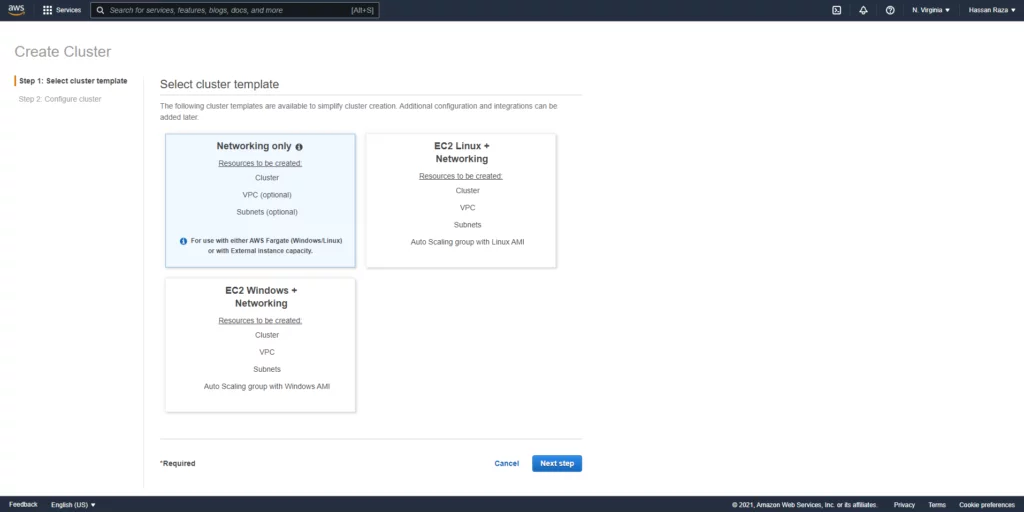
As we don’t have any service, task, or task definition after creating a cluster, we will need to create a new one.
Unlock the Power of AWS for your Business!
Dive into the world of AWS with AlphaBOLD, and let us help you leverage AWS Fargate for streamlined, cost-effective deployments. Transform your web presence today.
Request a Consultation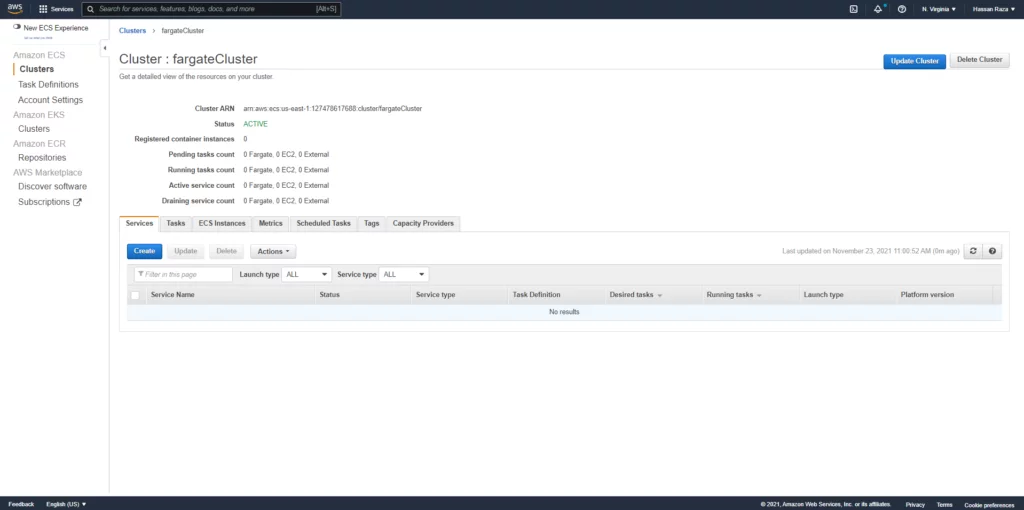

Before we begin, we must know the difference between the Task Definition, Task, and Service.
- Task Definition: TD consists of container configurations such as container Images, databases, and the file system from which our application deals.
- Task: The Task launches a container.
- Service: Services are typically used for long-running applications like web services. Services can be configured to use a load balancer for any specified containers to create the tasks accordingly.
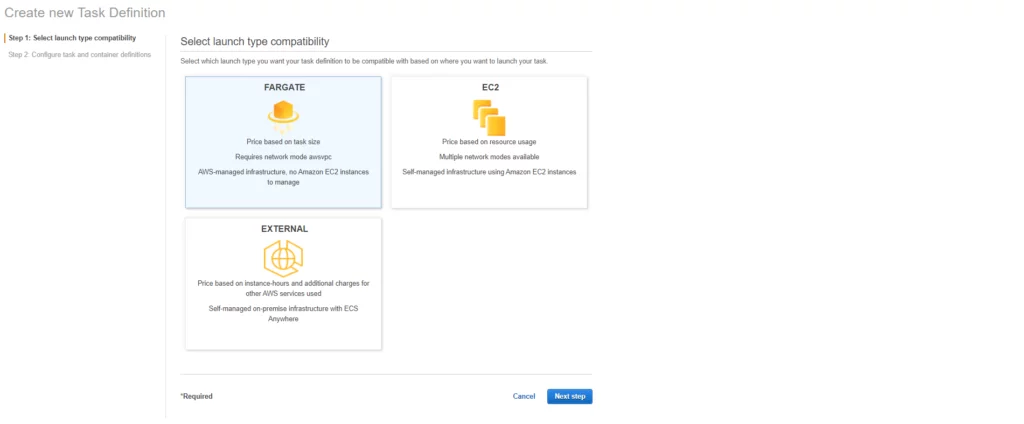
Select Linux as OS type.
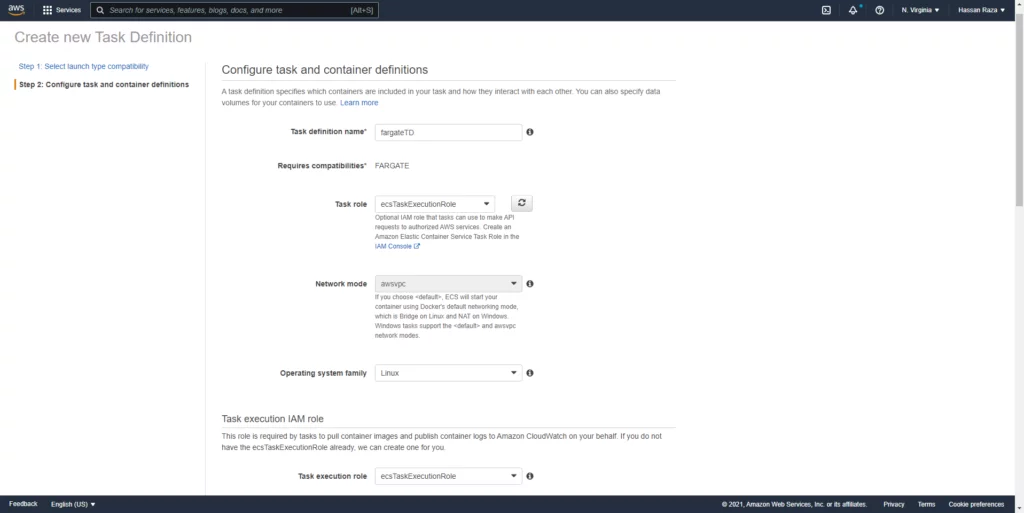
Select the EFS and specify the volume path.
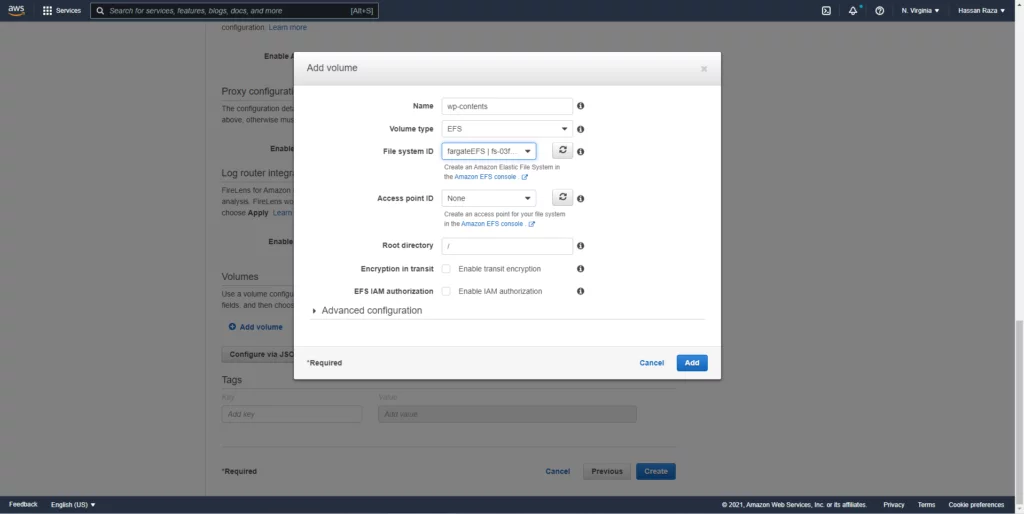
Select your desired values for container memory and CPU for the container configuration.

Add Container and insert your container image as (image:tag) wordpress:latestPort must be 80, as by default WordPress listens on port 80.
Read more: Simplify your Azure Infrastructure with Azure Blueprints
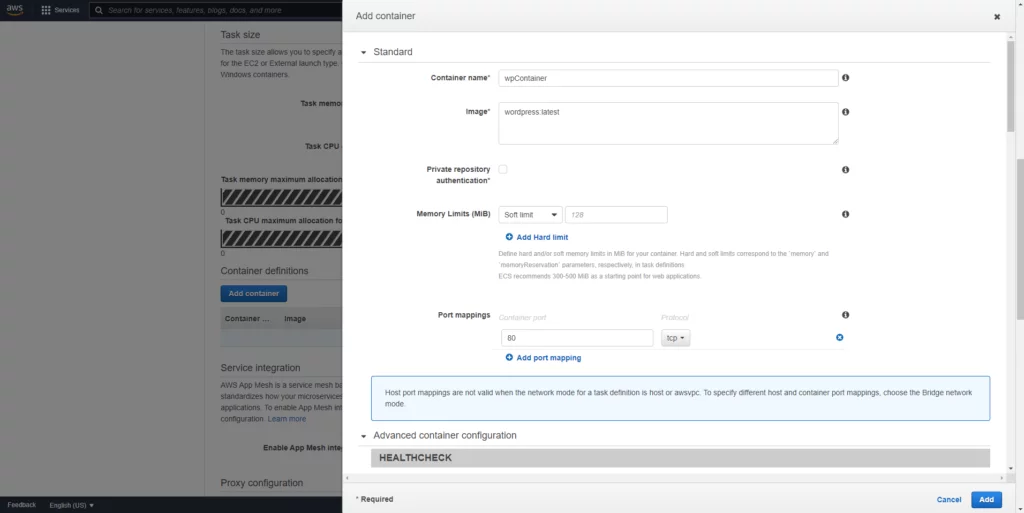
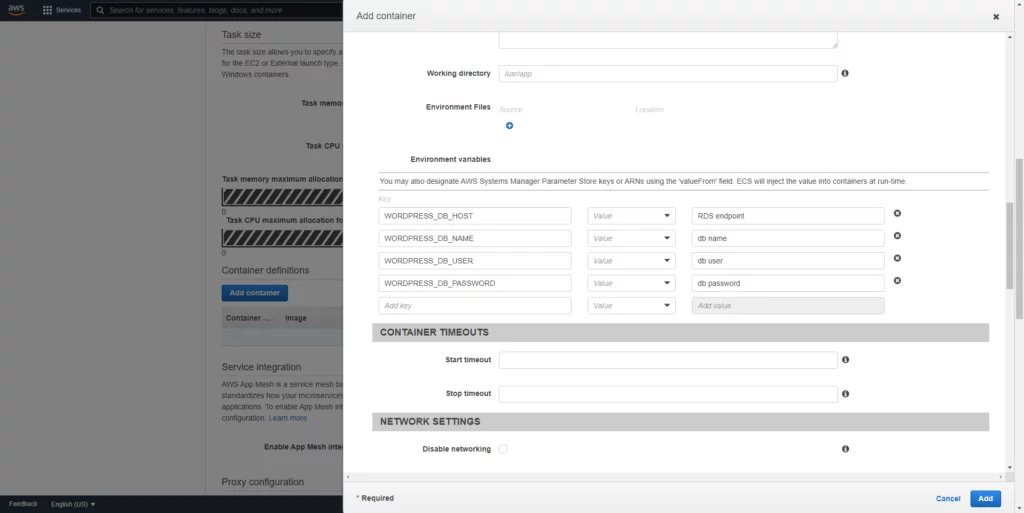
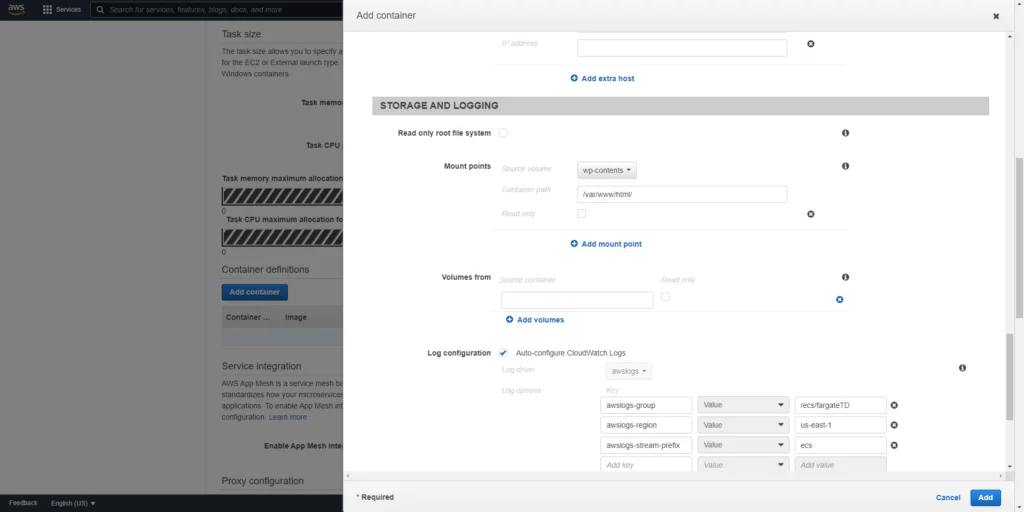
After creating task definition creation, we will create a service.
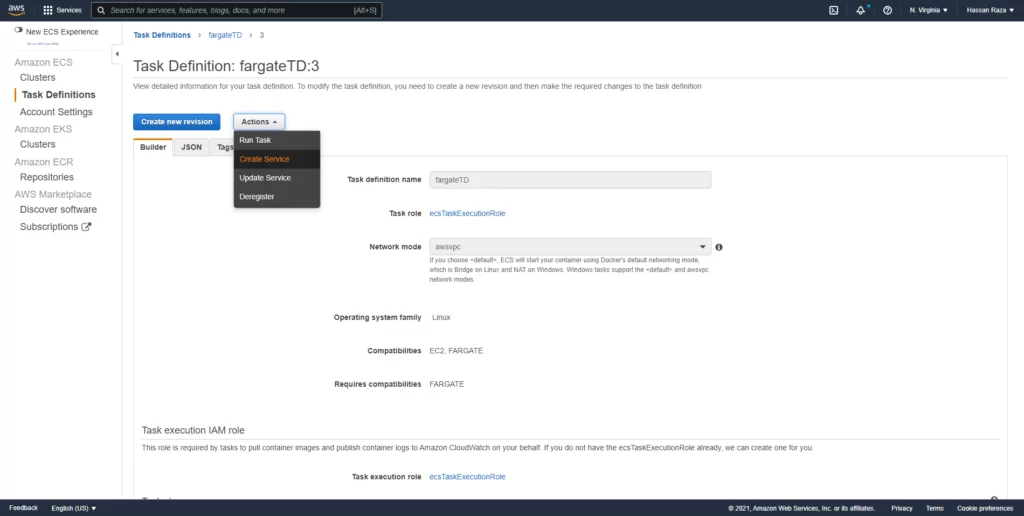
The service type must be Fargate. There are multiple revisions you can create to update your service. The platform version should be 1.4.1, it contains Amazon Linux.
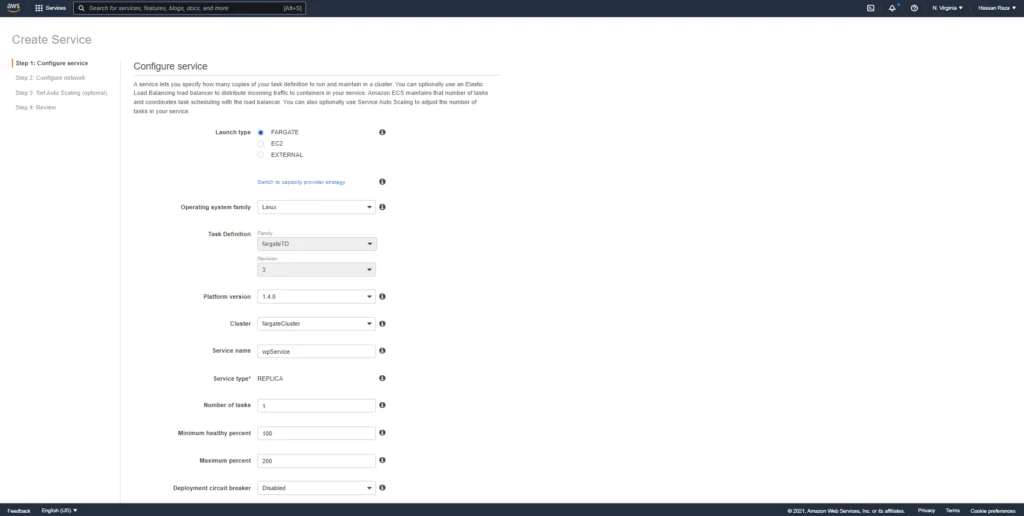
At the network configuration of the container, you will select the VPC and respective subnets and the security group.
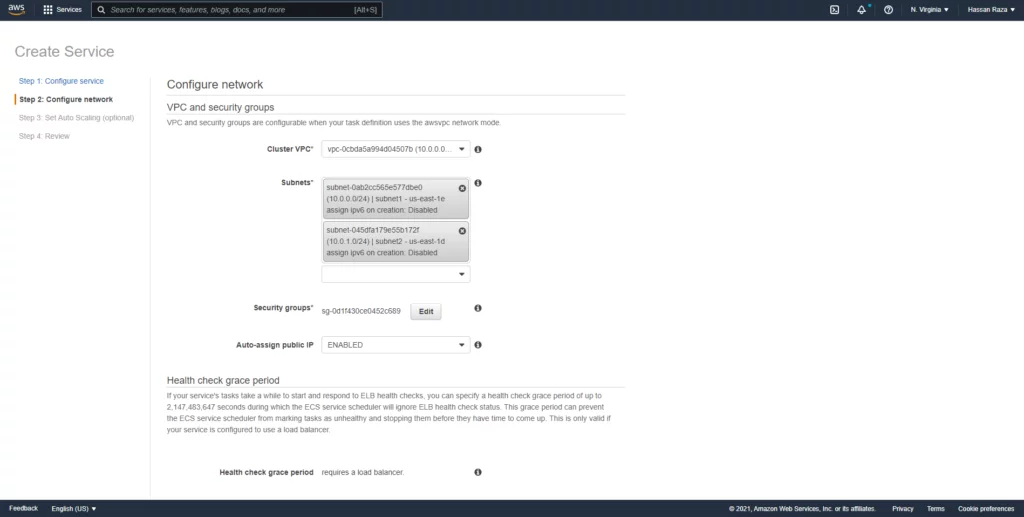
Now we can add a load balancer into our service for internet facing.
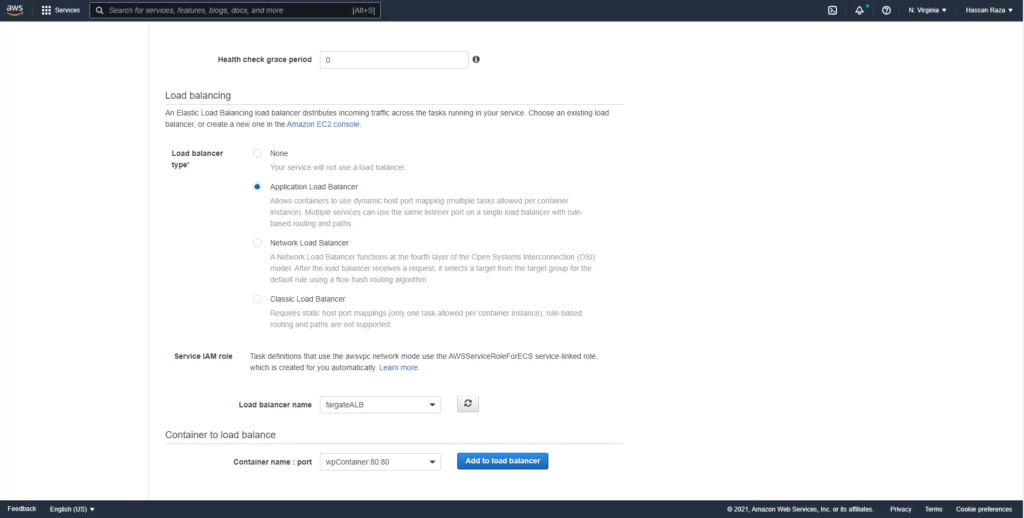
Add the https listener port so that your website runs on port 443 (HTTPS).
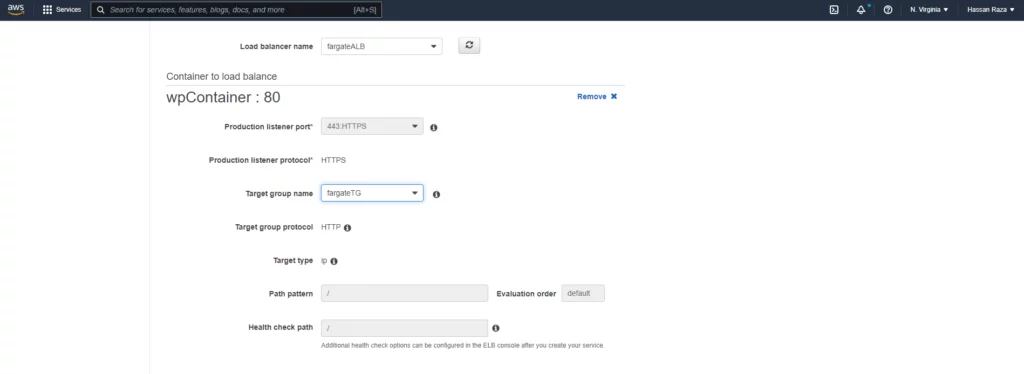
Configure auto-scaling for your container, it’s optional, and then create the service.
After provisioning the service, it deploys the task as displayed in the image below.

Here’s our running container.

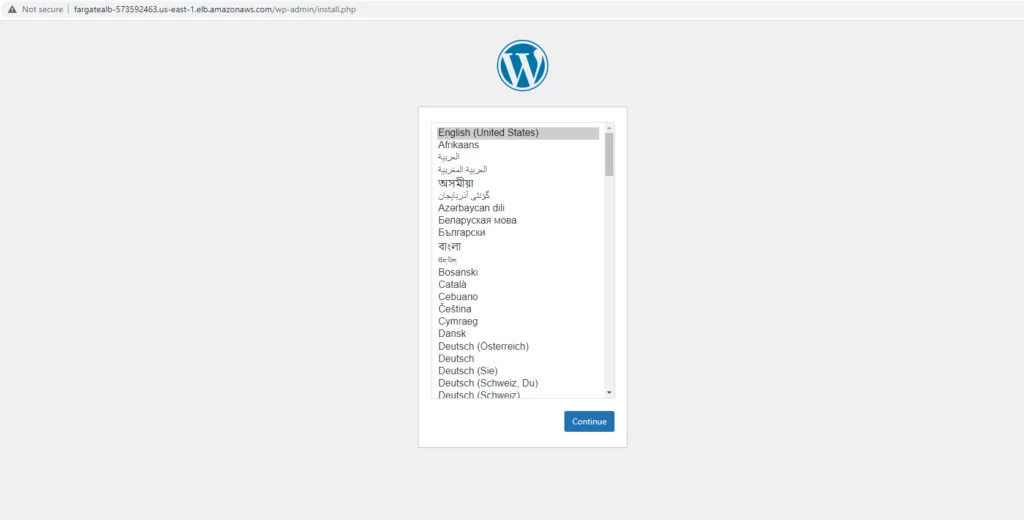
You can access your container through your load balancer public DNS. If you have a valid domain available, you can add your ALB DNS into domain DNS records as CNAME and your valid SSL certificate so that it will run on port 443. Currently, our container runs on port 80.
Embark on your Cloud Transformation!
Start your journey towards scalable, efficient, and innovative cloud solutions with AlphaBOLD. Discover the full potential of AWS together.
Request a ConsultationConclusion
Deployment of WordPress through AWS Fargate architecture offers a remarkable solution for hosting providers. By leveraging WordPress through AWS Fargate, you can easily create a Fargate architecture and host multiple websites simultaneously. This approach not only ensures on-demand scalability, elasticity, reliability, and security but also streamlines the hosting process. We hope this blog assists you in deploying WordPress through AWS Fargate efficiently and effectively, harnessing its full potential to enhance your web hosting experience.
Explore Recent Blog Posts


