Introduction
In our previous blog, we learned how EasyRepro could help you automate Dynamics 365 most efficiently and the benefits that can be achieved if we opt to use EasyRepro instead of creating a test automation framework from scratch.
So, buckle up your seatbelts and get ready because, in this blog, we will see how we can get started using EasyRepro – and the prerequisites we need to fulfill before customizing in EasyRepro.
Cloning the EasyRepro Framework
- Navigate to Microsoft EasyRepro Repository on Github:

You can look at all the system requirements, supported operating systems, and browsers. Moreover, you can learn about the supported CRM versions and what functionalities of CRM you can automate and which you cannot. We can also investigate the release versions of the framework for information purposes.
- Now click the “Code” button present and click the “Download ZIP” button.

- Extract the Zip folder.

Achieve Testing Excellence with EasyRepro and AlphaBOLD!
Challenge the status quo of your Dynamics 365 testing with EasyRepro's advanced capabilities. AlphaBOLD is ready to lead you through the integration of top-tier automation testing into your system.
Request a ConsultationOpening the UI Automation Solution
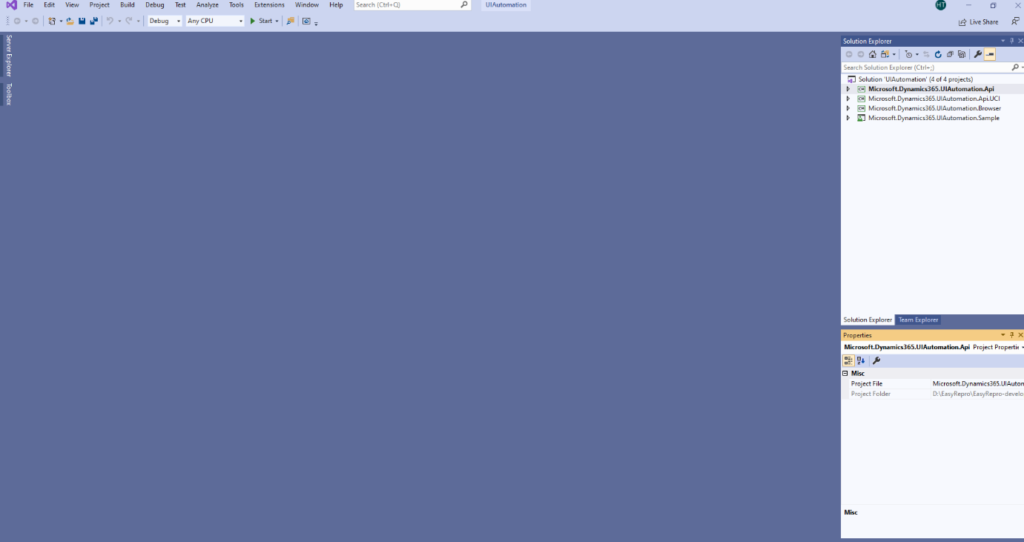
- Now open the extracted files folder and look for a solution file named “UIAutomation.sln” and open that in Visual Studio.

- Reviewing the projects in the solution:

There are four projects in the solution. To understand the framework, let’s first discuss these projects in detail. This is an important aspect and requires you to have exact knowledge of the system. Otherwise, you will waste most of your time wandering in different projects looking for your required functions. So, let us discuss the projects that are available to us.
- Microsoft.Dynamics365.UIAutomation.Sample: This project shows you how to write your tests. If you are new to EasyRepro, you must go through this project to better understand the code structure and how to use it to cater to your testing needs.
- Microsoft.Dynamics365.UIAutomation.Browser: This project helps us to communicate with the web driver (Browser) and other under-the-hood components.
- Microsoft.Dynamics365.UIAutomation.API.UCI: This project specifically used for Unified Interface contains all the methods.
- Microsoft.Dynamics365.UIAutomation.API: This project also contains methods to help us automate Microsoft Dynamics CRM.
Getting Started with Sample Project
Now, we better understand the different projects available to us in EasyRepro. Now, let’s execute a sample test to get a clear picture of things:
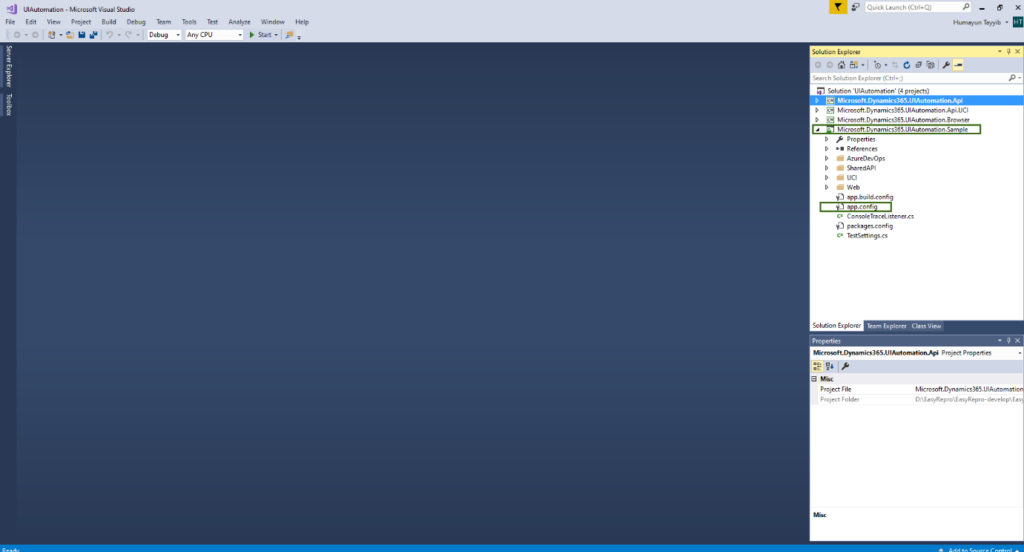
- From the “Solution Explorer”, click on Microsoft.Dynamics365.UIAutomation.Sample the project and expand it. Now you will see a app.config file. Click on it to open the config file.

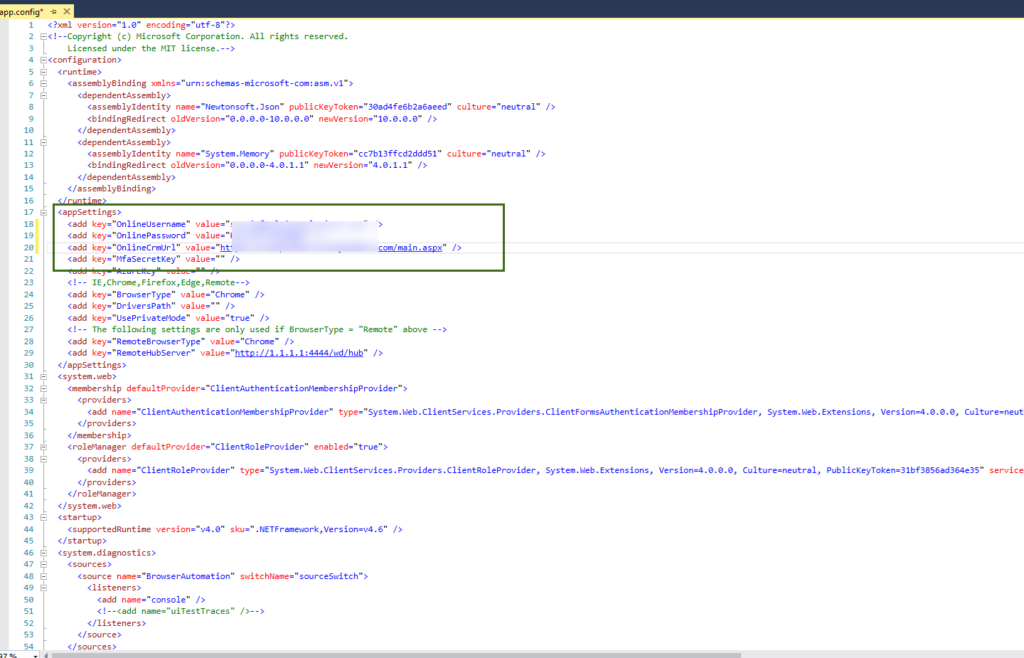
- In the config file, under the <AppSettings>, enter the URL of the CRM system you want to run your test on and enter its login credentials to log in to the CRM system.
Read more: CRM Implementation: Best Practices for Success in Your Organization

- Once you have made the above-mentioned changes. Click the Save button and right-click on the “UIAutomation” solution. Now click on “Build Solution” to build the solution.

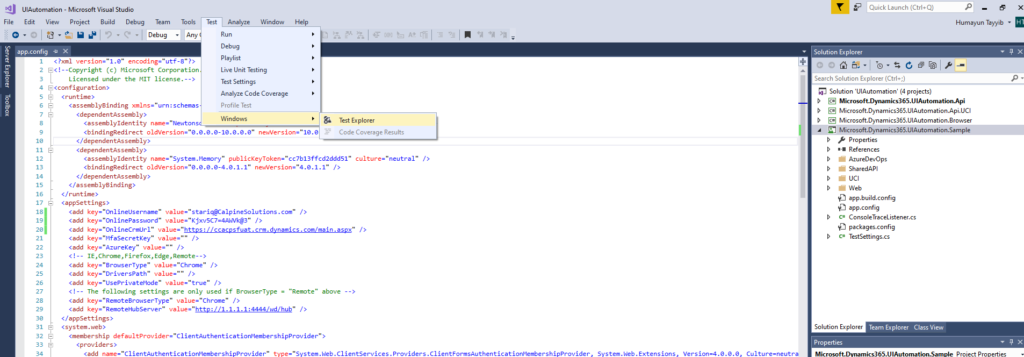
- Once you have built the solution, it is time to execute the sample test case. To do so, navigate to the Test Explorer by clicking on the Test in the Visual Studio header over your mouse on Windows and then click “Test Explorer.”

- Now, from Test Explorer, right-click on the test you choose and click the “Run Selected Tests” button; voila, your test will run successfully. Now, you can automate any functionality you desire in the same way.
Read more: AI in CRM: Exploring Microsoft Dynamics 365 Benefits
Elevate your Testing Strategy Today!
Ready to elevate your Dynamics 365 experience with robust automation testing? EasyRepro offers the solution you've been seeking. Partner with AlphaBOLD to navigate the complexities of automated testing and unlock efficiency and accuracy like never before.
Request a ConsultationConclusion
In this blog, we have learned how to get started on an EasyRepro framework and run tests using the sample project. Our next blog will discuss how we can create custom-designed tests of our choice using EasyRepro.
Explore Recent Blog Posts


