Introduction
Appium is a popular open-source tool that automates native and hybrid mobile applications. The Appium inspector tool is used for task management purposes such as script recording and element discovery. This tool also serves as the standard procedure for identifying mobile application elements. Appium Inspector is a handy tool for QA engineers who want to automate mobile applications. It demonstrates the mobile application elements and different components/layers of the application, making it the best choice for automation. Let’s look further into the architecture of this tool to connect android applications with Appium:
Appium Inspector Architecture
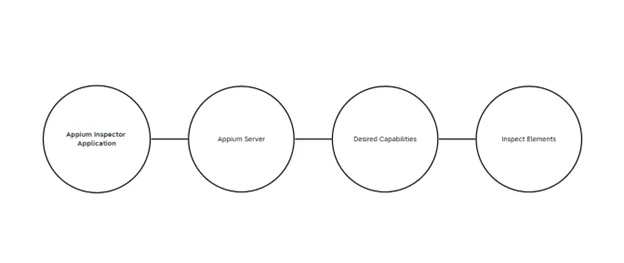
Finding unique elements during mobile automation is extremely challenging. However, the Appium inspector simplifies this complex task through four simple steps. These steps are:
- Setting up the Appium Inspector UI Application.
- Open the Appium desktop application on your computer.
- Activating the Appium server.
- Enter the desired capabilities under the Appium inspector and start the session.
- Inspecting the element.
- Once you have completed the above steps, the application will launch under the emulator/mobile device, allowing you to inspect the elements under the Appium Inspector.
Read More: A Complete Guide to Test Your Mobile App Effectively
Appium Inspector Configurations
In contrast to the other costly licensed tools, you can record and playback the mobile applications using the open-sourced Appium inspector. QA engineers can directly perform any actions on the application and generate the test scripts by inspecting DOM in any desired language.
Setting Up a Real Device/Emulator to Connect Android Applications with Appium
An emulator is a virtual android or IOS device that can be configured or demolished within the system. You can also connect the Appium inspector with your actual device. Let’s now look at how we can prepare an emulator/physical device to communicate with the Appium inspector.
- Activate the emulator on your device or physically connect the device with a PC using a USB.
- Go to the mobile/emulator settings and click on the about phone.
- Click on the android build number to enable the developer mode.
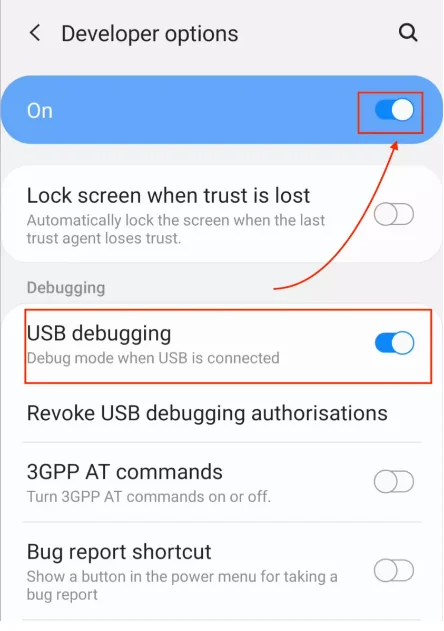
- Dig into the developer option and turn on the USB Debugging.
- Turn on the USB debugging option from under the Developer options menu.
Setting Up Desired Capabilities
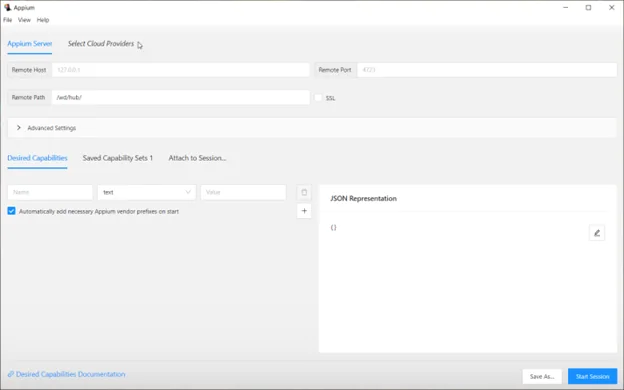
Once you launch the Appium inspector, the following screen will appear:
Unlock Appium Inspector with AlphaBOLD
Discover the ins and outs of connecting Android applications with Appium Inspector. Ready to implement advanced android solutions? Connect with AlphaBOLD for expert web app development services.
Request a DemoWhat are the Desired Capabilities?
The term desired capabilities is used to specify the test environment.
It can be a web browser, mobile device, mobile emulator, mobile simulator, etc. You can set up mobile platforms, mobile devices, and versions using the desired capabilities. Let’s now move on to learn what are the most common desired capabilities for the test environment.
Read More: Leveraging Mobile Capabilities in Dynamics 365 Field Service
Most Wanted Desired Capabilities:
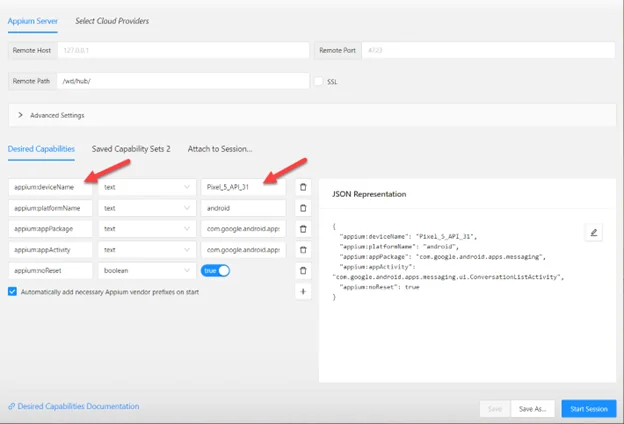
Device Name:
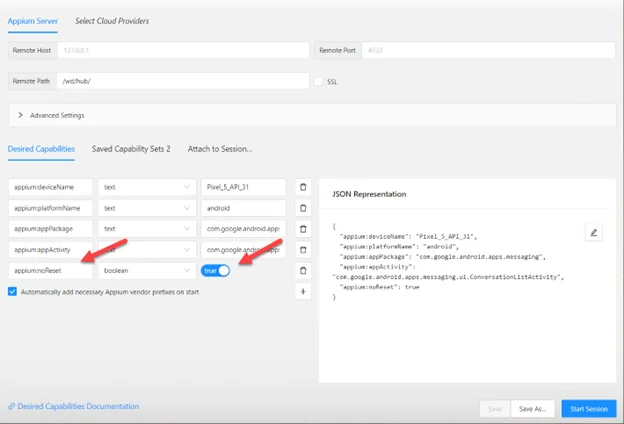
This demonstrates the Android or IOS emulator/device name and takes the capability as ‘Text’. Here is an example:
- Capability Name: appium:deviceName
- Capability type: text
- Capability Value: XYZ_Device
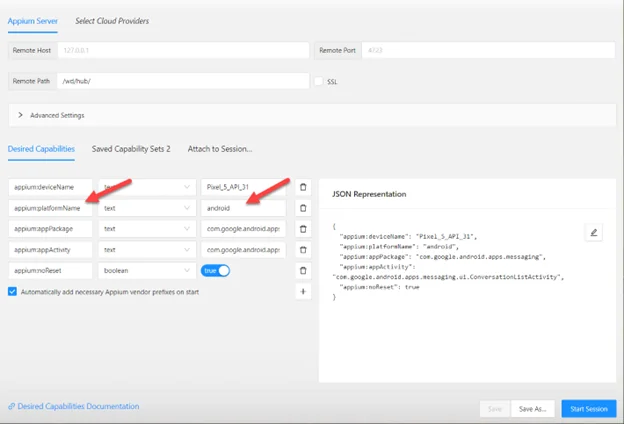
Platform Name:
The platform name determines the Android or IOS name and takes the capability as ‘Text’. Here is an example of how you can set it:
- Capability Name: appium:platformName
- Capability type: text
- Capability Value: android/IOS
Application Package:
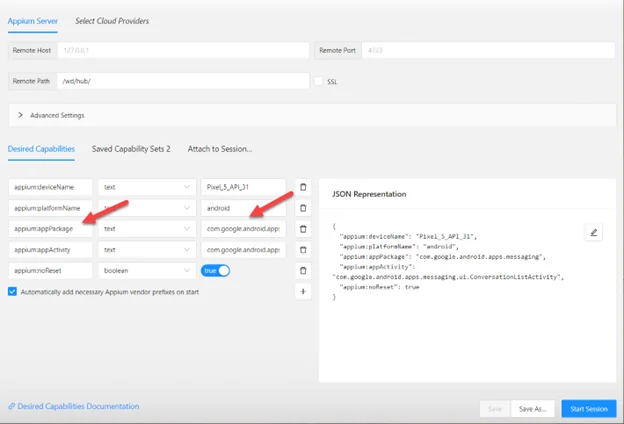
This demonstrates the desired application package that needs to be automated and takes the capability ‘Text’. Here is an example of how you can set it:
- Capability Name: appium:appPackage
- Capability type: text
- Capability Value: com.google.android.apps.messaging
Application Activity:
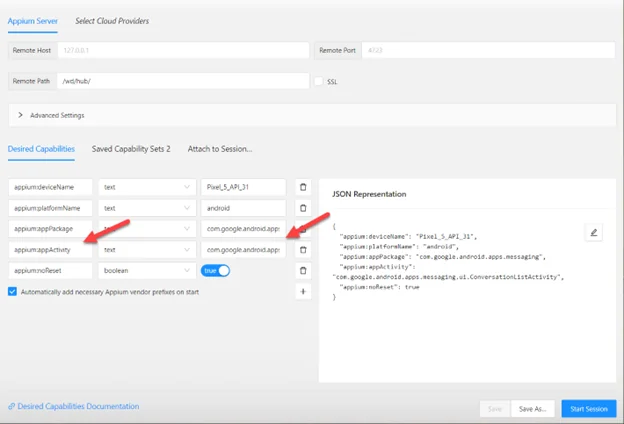
This reveals the desired application activity that is required to be automated, and it takes the capability ‘Text’. Here is an example of how you can set it:
- Capability Name: appium:appActivity
- Capability type: text
- Capability Value: com.google.android.apps.messaging.ui.ConversationListActivity
Platform Name:
The platform name determines the Android or IOS name and takes the capability as ‘Text’. Here is an example of how you can set it:
- Capability Name: appium:platformName
- Capability type: text
- Capability Value: android/IOS
Are you Interested in Optimizing your Android App Testing Strategy?
Dive into seamless Android app testing with Appium Inspector! Ready to implement QA Testing solutions? Connect with AlphaBOLD for Mobile App Development services.
Request a DemoHow Do We Get the Application Package and Activity?
- Open the command prompt on your PC.
- You need to make sure the active emulator is in running condition on your PC.
- Enter the command ”adb devices”.
- The system is going to display a list of all active devices.
- Make sure the emulator name is displayed under that list.
- Navigate to the emulator and open the desired application.
- On the same time run command under the command prompt “adb shell dumpsys window | find “mCurrentFocus”.
- The system will return the output in form of the following “mCurrentFocus=Window{90b473f u0 com.whatsapp/com.whatsapp.registration.EULA}”.
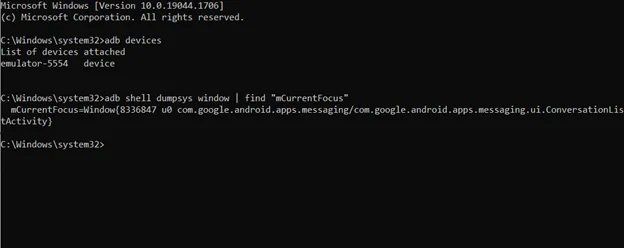
- The application package would be “com.whatsapp” from the output mentioned above.
- The application activity would be “com.whatsapp.registration.EULA” from the output mentioned above.
No Reset:
The “no reset” option restricts the running application from clearing or stopping the application data and takes the capability ‘boolean”. Here is an example of how you can set it:
- Capability Name: appium:noReset
- Capability type: boolean
- Capability Value: true
Conclusion
Hopefully, by reading this, you now have an abstract understanding of the Appium inspector and are ready to link any mobile application with the Appium inspector. If you want to dive deep into connect android applications with Appium or schedule a demonstration, please visit AlphaBOLD or contact us at [email protected].
Explore Recent Blog Posts


