

Across different industries and verticals, there is a recurring need for ERP systems to provide robust handling for financial segmentation, fund management, and business unit tracking. For instance, biomedical companies and not-for-profit organizations (NPO’s) receive grants and require sophisticated solutions that will help them track and classify their expenses against specific funds. However, wholesale distribution companies may have several divisions or brands that they want to report on in their financial statements. Lastly, organizations in architecture, engineering, and construction (AEC) space may need to track revenue and expense against their projects.
Learn more about our NetSuite Services
To provide a better understanding of what NetSuite can do to assist these organizations, I would like to discuss two topics:
- How we can leverage NetSuite’s custom segments to track operational and financial activities of projects/business units (i.e., divisions)/funds (i.e., fund management for nonprofit organizations).
- New transaction balancing feature by segment that can help organizations balance their balance sheets by custom segments.
Custom Segments are custom classifications that are like NetSuite’s regular financial segments: locations, subsidiaries, departments, and classes. Their purpose is to slice/subdivide your data and improve your financial or operational reporting. Therefore, custom segments can impact your GL (by natively showing on your financial reports), or they can be used for classification of your operational data.
Traditionally, in NetSuite, you were able to balance GL posting transactions on the subsidiary or a single entity level. NetSuite has back-end processes that enforce balancing (Assets = Liabilities + Equity) on a (company) subsidiary-level and ultimately can produce multi-entity consolidations through consolidated financial reports.
In the latest 2020.1 release, NetSuite introduced balancing by custom segments feature, which gives you full control over the segment/account breakdown on your balance sheet. For example, let us say that you want to track financials by division/business unit. With custom segments, you can tag each division on your transaction (on either transaction header or transaction lines). Additionally, the balancing feature will ensure that, based on your preferences, the amounts that post to GL will be reclassified to ensure that your balance sheet entries for that segment are in balance across various segments (business units).
How are the segments used?
In our example, we will assume that our company ‘ABC Engineering’ has several projects that they want to set up as custom segments in NetSuite. The company does not have a need for traditional project management but would like to track both revenue and expense against these jobs.
1. Create a Custom Segment
Go to: Customization > Lists, Records, & Fields > Custom Segments (Administrator Role).
- Click ‘New Custom Segment’
Or
- Edit existing Customer Segment and make it a balancing segment. Make sure that your custom segment was set up to impact your GL (GL Impact checkbox is checked).
- Add the appropriate values in the ‘Values’ tab.
- In our example, values represent projects.
2. Record/Transaction Tagging
There are three reasons why segments are more attractive than custom fields. These are:
- The fact that you can specify where they will be used in one single screen, whereas this is not the case with custom fields.
- Custom Segments will natively appear on all relevant reports as soon as they are enabled.
- Lastly, Custom Segments can be tagged on GL posting lines (just like subsidiaries, classes, departments, and locations). This is not possible in the case of Custom Fields.
-
- In the Application & Sourcing tab, you can define where the segments will appear, which record or transaction type, and whether they will appear in the body or on transaction lines.
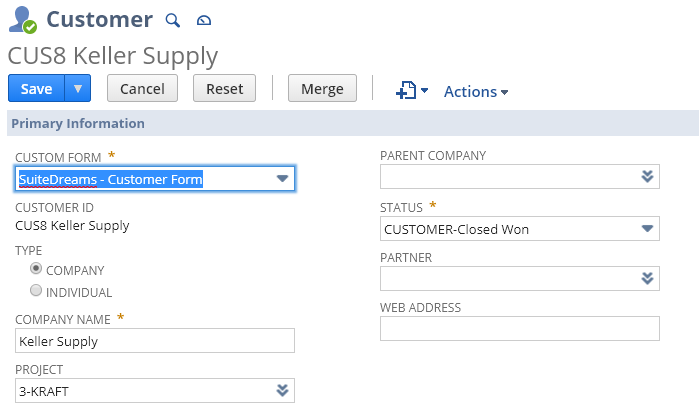
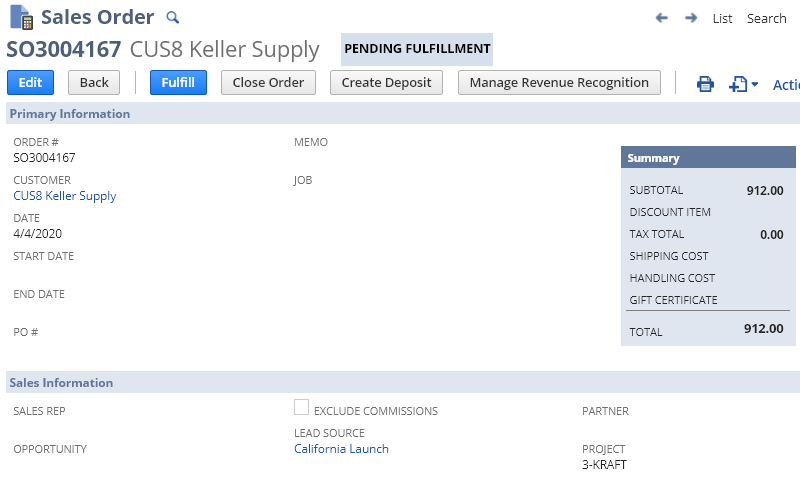
- Let’s assume that ‘ABC’ wants to set the project on the customer record and default it on sales transactions. This is what that will look like:
- Customer-level

- Sales Order-level

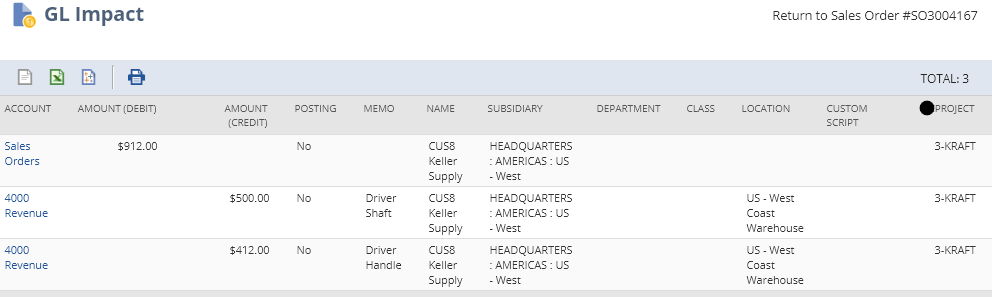
- GL Impact

- Customer-level
- As demonstrated, the ‘project’ segment is tagged down to the posting lines. When the Sales Order is transformed into an Invoice, these lines will post to GL.
Financial Reporting
- Now that we have examined how the segment value gets propagated on transactions, let’s review the result, which is our income statement broken down by segment values (projects).
Balancing
As mentioned, balancing across segments gives you the flexibility to tailor how you will post to GL in relation to your various segments. Below is the step-by-step guide on how to enable this functionality and test it.
Enable the Feature
Go to: Setup > Company > Setup Tasks > Enable Features (Administrator Role).
- Click the ‘Accounting’ subtab.
- Go to the ‘Advanced Features’ section and check the Balancing Segments check-box.
- Click [Save] button.
Create Custom (Balancing) Segment
Go to: Customization > Lists, Records, & Fields > Custom Segments (Administrator Role).
- Click ‘New Custom Segment’
Or
- Edit existing Customer Segment and make it a balancing segment. Make sure that your custom segment was set up to impact your GL (GL Impact checkbox is checked).
- [Save] your ‘Custom Segment’ record.
Configure Intersegment Accounts
Go to: Setup > Accounting > Preferences > Accounting Preferences.
- Click on the Balancing Segments subtab
This part is important. Typically, the ‘Due to Account’ will be an A/P account type, and Due from Account will be an ‘A/R Account’ type. These accounts are used to balance posted amounts across various segments.
You may also want to designate how the balancing will occur for each transaction type. NetSuite will allow for this granularity.
Balancing Procedure
Go to: Transactions > Financial > Balance Transactions by Segment (Administrator Role)
- Run the balancing operation as illustrated below
- Once completed, the operation will generate the balancing Journal Entry on the same screen (you may have to wait for some time for the process to complete).
- Open the balancing Journal Entry and review the GL impact.
- By clicking the ‘Details’ link above, you can access the transaction to which this balancing entry is related.
- Notice, the transaction is marked as ‘Open | Balanced by Segments’
- The transaction can be edited and changed. However, you may need to re-run the balancing activity either through the steps mentioned above or as part of the accounting period close
Review your Balance Sheet
Notice on the Balance Sheet below the GL impact of the balancing J/E, which we created in the previous step.
Conclusion
As demonstrated in this article, it has never been simpler to track revenue/expenses in NetSuite across various business units. The custom segment feature, alongside the new balancing functionality, gives you the flexibility you would expect from a robust accounting system!
Happy testing, and feel free to reach out and share with us your unique scenario!
If you have any question or queries, do not hesitate to reach out to us!
What a wonderful read. Very nice and informative. Keep it rolling.
Can we disable a custom segment that is declared as balancing segment? For example, initially we were tracking financials with reference to division and after a restructuring we went for centralization of all division and dont need this balancing segment anymore.
Hi Hassan,
The balancing can be ‘disabled’ by removing a segment designation in the accounting preferences (under the Balancing Segment tab). In the last version, you would do that on the Segment, and now NS allows you to do it in the accounting preferences. I believe that in the previous version, you could not turn this off because the setting was locked once you made a segment a balancing segment. Now, the system is more flexible.
I hope that helps!