MS Dynamics CRM – Automation Testing: Writing Data to Excel File – Reporting

During Automation Framework Development, we often need to create excel reports to share them with a client. As excel reports are straight forward and easy to understand and interpret, using them for Automation Testing is a common practice.

Writing Test Case Status along with Status of Steps is a rather simple task in Excel because we can add value in excel reporting by integrating the images captured through the Automation Framework. However, Automation Testing is relatively tricky, and our focus is on achieving it successfully in this blog.

Writing Data to Excel file involves different steps. Each of these steps is described below:

Step 1: Create an Excel File:

Create an Excel File and add it to the existing project where reporting is required. A section of the project can easily be defined. For the purpose of this blog, we have formatted the Excel File in a way that it contains the Test Case ID/ Name, Execution Status and Screenshots in a row and have named the sheet as “TestResult” & Column names as “TestCaseID” and “TestStatus”.

Step 2: Create Helping Functions:

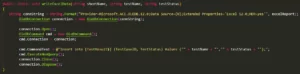
Write Data to Excel:

        public static void writeExcelData(string sheetName, string testName, string testStatus)
        {
string connString = string.Format("Provider=Microsoft.ACE.OLEDB.12.0;Data Source={0};Extended Properties='Excel 12.0;HDR=yes'", excelReport);
            OleDbConnection connection = new OleDbConnection(connString);
            connection.Open();
            OleDbCommand cmd = new OleDbCommand();
            cmd.Connection = connection;
            cmd.CommandText = @"Insert into [TestResult$] (TestCaseID, TestStatus) Values ('" + testName + "','" + testStatus + "');";
            cmd.ExecuteNonQuery();
            connection.Close();
            connection.Dispose();
        }

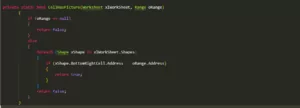
If the Cell has a Picture

 private static bool CellHasPicture(Worksheet xlWorkSheet, Range oRange)
        {
            if (oRange == null)
            {
                return false;
            }
            else
            {
                foreach (Shape xShape in xlWorkSheet.Shapes)
                {
                    if (xShape.BottomRightCell.Address == oRange.Address)
                    {
                        return true;
                    }
                }
                return false;
            }
        }

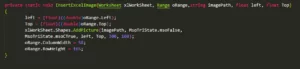
Step 3: Insert Image Function:

private static void InsertExcelImage(Worksheet xlWorkSheet, Range oRange,string imagePath, float left, float Top)
{
left = (float)((double)oRange.Left);
Top = (float)((double)oRange.Top);
xlWorkSheet.Shapes.AddPicture(imagePath, MsoTriState.msoFalse,
MsoTriState.msoCTrue, left, Top, 300, 160);
oRange.ColumnWidth = 58;
oRange.RowHeight = 165;
}

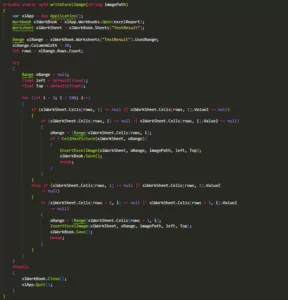
Step 4: Write the Excel Image:

private static void writeExcelImage(string imagePath)
        {         
            var xlApp = new Application();
            Workbook xlWorkBook = xlApp.Workbooks.Open(excelReport);
            Worksheet xlWorkSheet = xlWorkBook.Sheets["TestResult"];
            Range xlRange = xlWorkBook.Worksheets["TestResult"].UsedRange;
            xlRange.ColumnWidth = 30;
            int rows = xlRange.Rows.Count;
            try
            {
                Range oRange = null;
                float left = default(float);
                float Top = default(float);
                for (int i = 3; i < 100; i++)
                {
                    if (xlWorkSheet.Cells[rows, 1] == null || xlWorkSheet.Cells[rows, 1].Value2 == null)
                    {
                        if (xlWorkSheet.Cells[rows, i] == null || xlWorkSheet.Cells[rows, i].Value2 == null)
                        {
                            oRange = (Range)xlWorkSheet.Cells[rows, i];
                            if (!CellHasPicture(xlWorkSheet, oRange))
                            {
                                InsertExcelImage(xlWorkSheet, oRange, imagePath, left, Top);                             
                                xlWorkBook.Save();
                                break;
                            }                           
                        }
                    }
                    else if (xlWorkSheet.Cells[rows, 1] != null || xlWorkSheet.Cells[rows, 1].Value2
!= null)
                    {
                        if (xlWorkSheet.Cells[rows + 1, i] == null || xlWorkSheet.Cells[rows + 1, i].Value2
== null)
                        {
                            oRange = (Range)xlWorkSheet.Cells[rows + 1, i];
                            InsertExcelImage(xlWorkSheet, oRange, imagePath, left, Top);
                            xlWorkBook.Save();
                            break;
                        }
                    }
                }
            }
            finally
            {
                xlWorkBook.Close();
                xlApp.Quit();
            }
        }

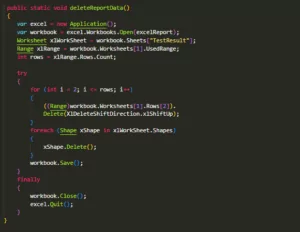
Step 5: Delete Report Data:

Whenever the Test Suite is executed, it appends the old test execution status with the new one. So, in order to resolve this problem, we need to Delete the Report data before the most recent execution. Following is the function that would empty the Excel Report excluding the headers:

 public static void deleteReportData()
        {
            var excel = new Application();
            var workbook = excel.Workbooks.Open(excelReport);
            Worksheet xlWorkSheet = workbook.Sheets["TestResult"];
            Range xlRange = workbook.Worksheets[1].UsedRange;
            int rows = xlRange.Rows.Count;
            try
            {
                for (int i = 2; i <= rows; i++)
                {
                    ((Range)workbook.Worksheets[1].Rows[2]).
                        Delete(XlDeleteShiftDirection.xlShiftUp);
                }
                foreach (Shape xShape in xlWorkSheet.Shapes)
                {
                    xShape.Delete();
                }
                workbook.Save();
            }
            finally
            {
                workbook.Close();
                excel.Quit();
            }
        }

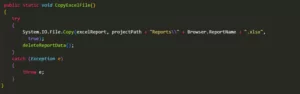
Step 6: Copy Excel File:

As the report needs to be saved with a unique name, this Excel report can be copied with the desired file name, and the Report Data can be deleted later. This way, the next execution cycle can make changes to the base report accordingly.

The following function is used to copy the Excel report:

 public static void CopyExcelFile()
        {
            try
            {
                System.IO.File.Copy(excelReport, projectPath + "Reports\\" + Browser.ReportName + ".xlsx",
  true);
                deleteReportData();
            }
            catch (Exception e)
            {
                throw e;
            }           
        }

Reading and Writing in Excel might be tricky as we use complex data and traverse through thousands of records. For instance, in CRM portals, we must fetch information from thousands of records, which requires navigation between different excel sheets to fetch the records. The above-given functions will be very handy for such cases.

Note: There need to be certain references to be imported and referenced as part of the implementation process.

There you have it! This blog aimed to help you understand how to write test cases in Automation Testing! I hope this blog has brought clarity to the process. If you have any insights, questions, or queries, please leave a comment below!

Leave a Reply

Your email address will not be published. Required fields are marked *