This blog is the next part of the Automate Microsoft CRM Solutions Merge Using Azure CI/CD Pipelines series. In our previous article, we used Azure Build and Release pipelines to merge MS Dynamics CRM solutions. In that case, the pipelines had static values of MS Dynamics Solution name, the number of solutions, source, and destination organizations. In this blog, however, we update Azure Pipelines to use dynamic values that can be changed by a single commit. The pipelines will get the values from a PowerShell script committed in our source control.
The Merge Control File for Automating Microsoft Dynamics CRM Solutions:
The file looks like this:
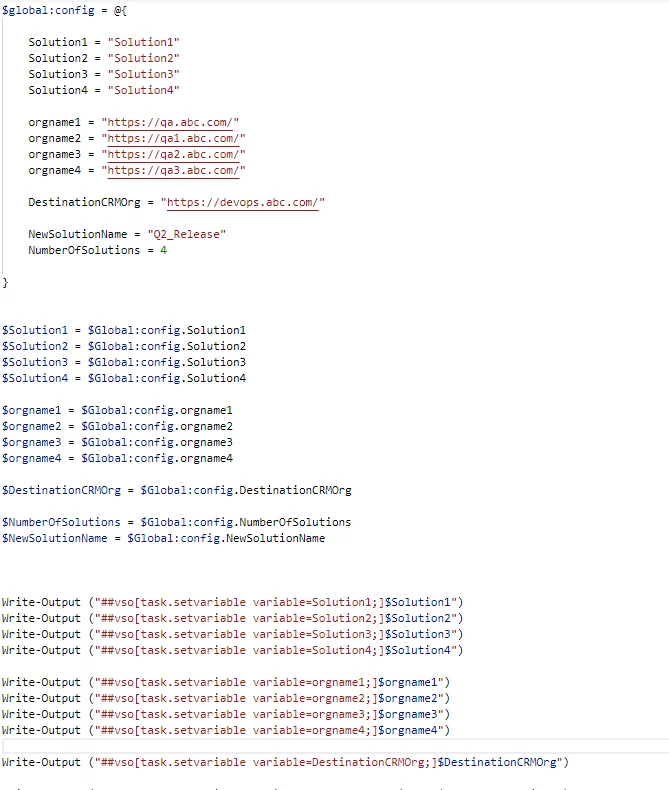
We can divide the file into four portions. The first portion contains the name of the CRM solutions we want to merge. The next portion includes the organizations from where each solution should be exported. The third part is about the destination organization where the CRM merge would occur, and where we will get our master solution. The last part contains the number of solutions and the name of the new solution. We can use a maximum of 4 MS Dynamics solutions using this file, but it can be expanded. The new solution’s name would be the same as the name of the master CRM solution. All solutions would be merged automatically to this master CRM solution.
If you have read our previous blog in this series, then you can easily understand the workings of this script. However, let’s still refresh our memory with a short recap:
In the last blog, we learned how we can build and release pipelines that would:
- Export MS Dynamics solutions from the source organizations.
- Extract those Exported MS Dynamics Solutions.
- Edit the solution.xml file of each to update the same unique name across all the solutions.
- Pack the solutions back to a Zip folder.
- While repacking the solution, it gets the name from a unique name tab (we edited in the previous step to the same name) in the solution.xml file, so we must rename the solution back to its original name.
- Publishing all these repack solutions as artifacts.
- Importing these solutions to a single destination org to merge to a master solution.
We can opt to use the same pipelines but since we will be getting the values from Global Variables, we are not doing so. This script sets the value provided in the merge control file as the global variables for the pipeline.
Build Pipeline to Automate Microsoft CRM Solutions Merge:
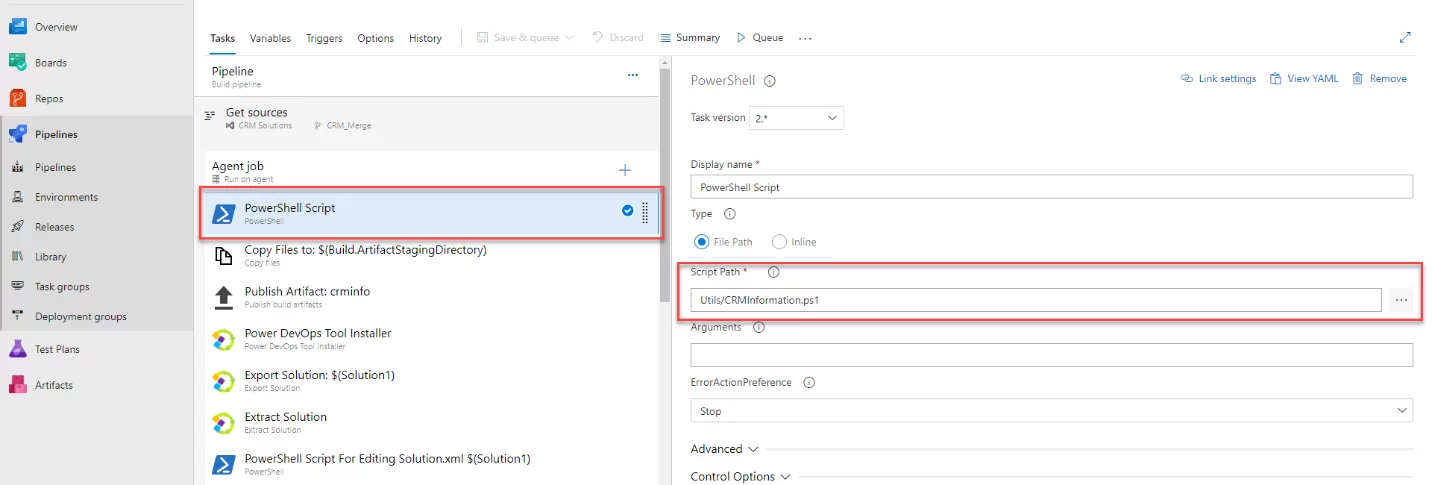
- Copy the script written below and commit it as a PowerShell (.ps1) file in the repository.
$global:config = @{
Solution1 = “Solution1”
Solution2 = “Solution2”
Solution3 = “Solution3”
Solution4 = “Solution4”
orgname1 = “https://qa.abc.com/”
orgname2 = “https://qa1.abc.com/”
orgname3 = “https://qa2.abc.com/”
orgname4 = “https://qa3.abc.com/”
DestinationCRMOrg = “https://dev3.abc.com/”
NewSolutionName = “NewSolution”
NumberOfSolutions = 4
}
$Solution1 = $Global:config.Solution1
$Solution2 = $Global:config.Solution2
$Solution3 = $Global:config.Solution3
$Solution4 = $Global:config.Solution4
$orgname1 = $Global:config.orgname1
$orgname2 = $Global:config.orgname2
$orgname3 = $Global:config.orgname3
$orgname4 = $Global:config.orgname4
$DestinationCRMOrg = $Global:config.DestinationCRMOrg
$NumberOfSolutions = $Global:config.NumberOfSolutions
$NewSolutionName = $Global:config.NewSolutionName
Write-Output (“##vso[task.setvariable variable=Solution1;]$Solution1”)
Write-Output (“##vso[task.setvariable variable=Solution2;]$Solution2”)
Write-Output (“##vso[task.setvariable variable=Solution3;]$Solution3”)
Write-Output (“##vso[task.setvariable variable=Solution4;]$Solution4”)
Write-Output (“##vso[task.setvariable variable=orgname1;]$orgname1”)
Write-Output (“##vso[task.setvariable variable=orgname2;]$orgname2”)
Write-Output (“##vso[task.setvariable variable=orgname3;]$orgname3”)
Write-Output (“##vso[task.setvariable variable=orgname4;]$orgname4”)
Write-Output (“##vso[task.setvariable variable=DestinationCRMOrg;]$DestinationCRMOrg”)
Write-Output (“##vso[task.setvariable variable=NumberOfSolutions;]$NumberOfSolutions”)
Write-Output (“##vso[task.setvariable variable=NewSolutionName;]$NewSolutionName”)
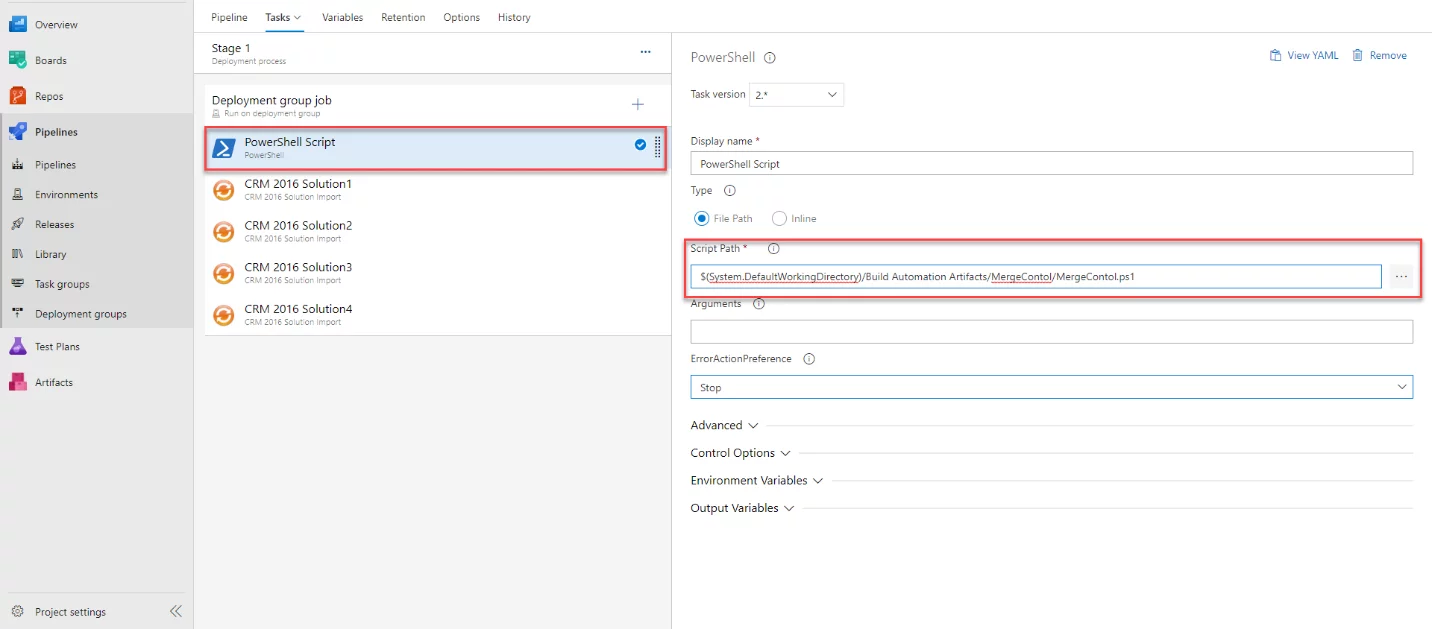
Set Global Variables
Add a step in the build pipeline to run this PS.
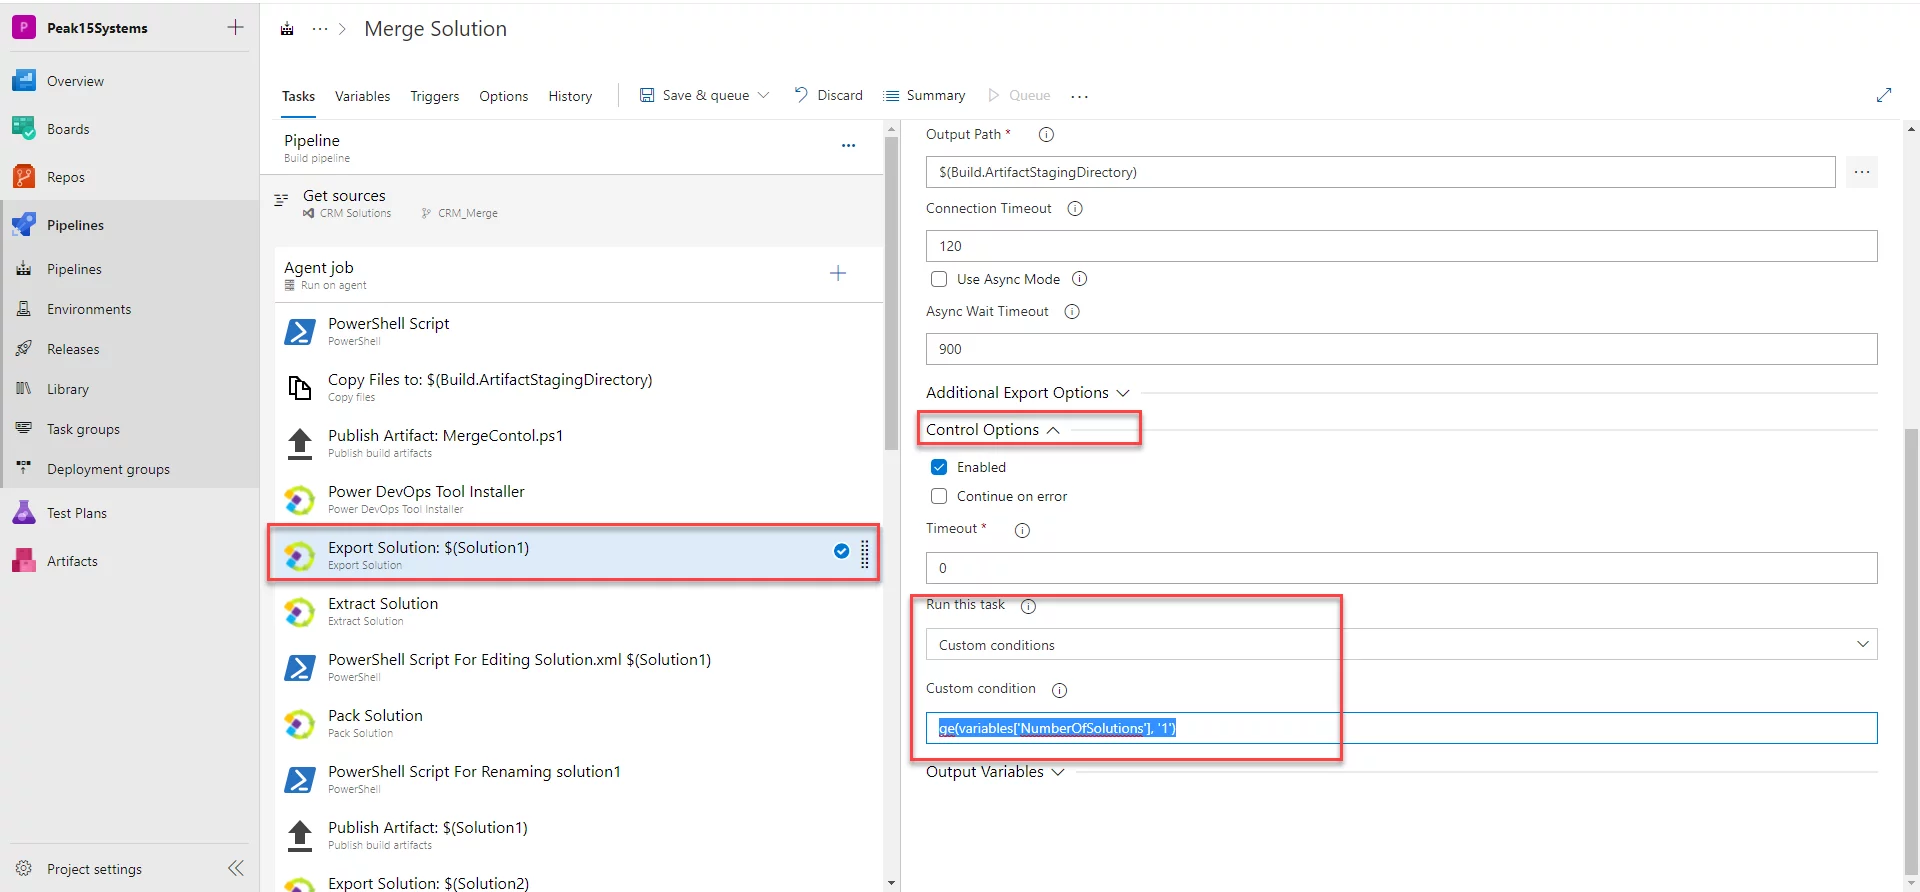
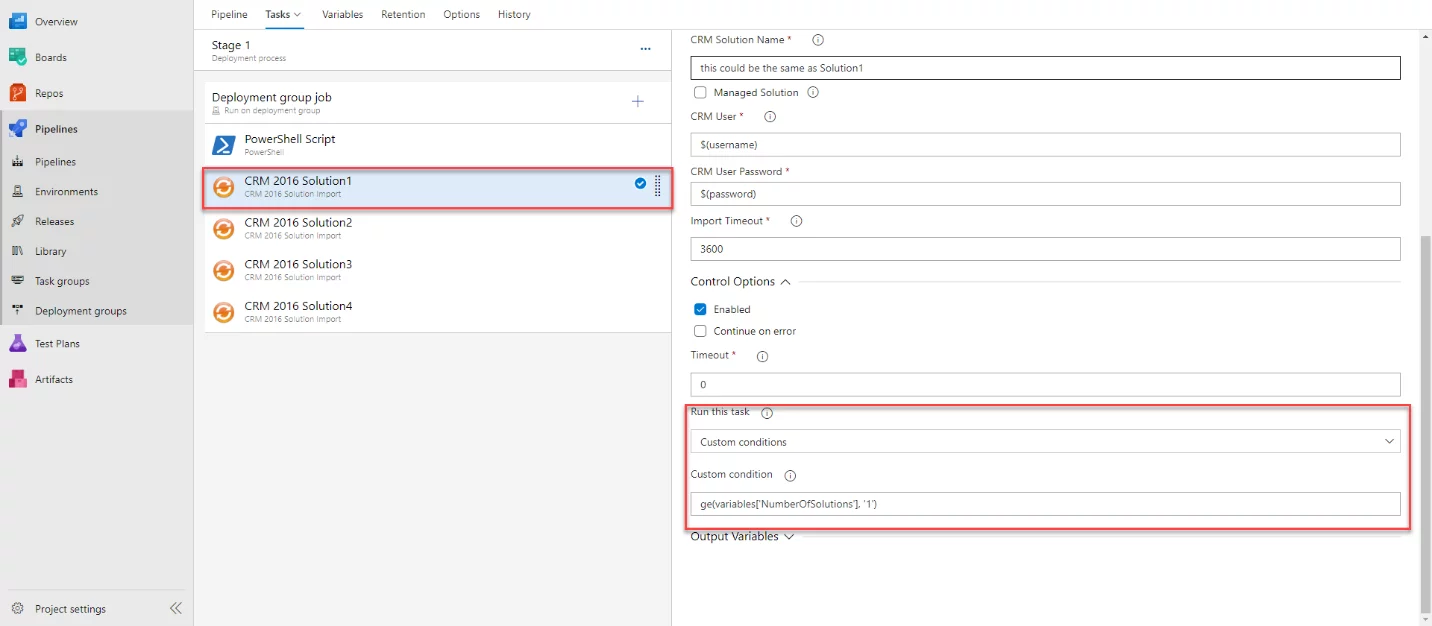
Use Custom Conditions:
These pipelines are set to merge up to 4 Dynamics CRM solutions. However, if there are only two solutions to merge, then custom conditions should be used. For solution no.1, set the custom condition from the control options as ge(variables[‘NumberOfSolutions’], ‘1’). For Solution No. 2, 3 and 4 update the value 1 to 2, 3 and 4, respectively.
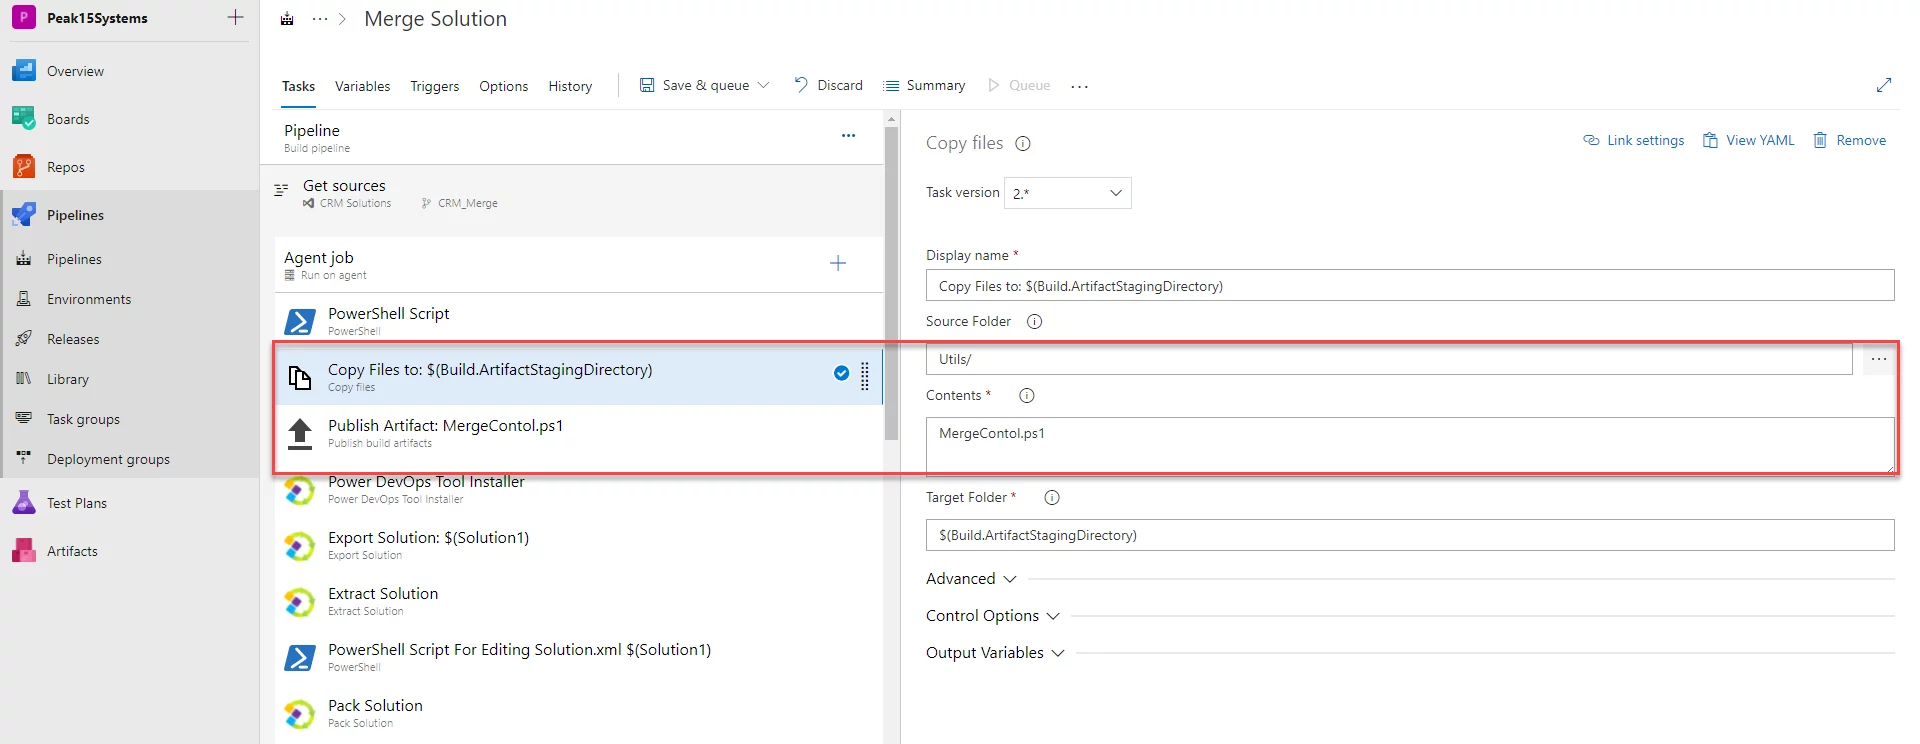
The CRM Solution Control script is required in the release pipeline. Therefore, we need to use copy file and publish artifact tasks to publish this CRM Merge control file as a build artifact.
Release Pipeline to Automate MS Dynamics 365 CRM Solutions:
- Set the Global Variables: Run the Control Script downloaded with Build Artifacts as the first task.
Use Custom Conditions:
The same way we used the custom conditions in the build pipeline, use those in the release pipeline.
Conclusion:
Merging of Microsoft Dynamics CRM solution is a hectic job as we must export and then import all the solutions to a single environment and then add all the components of each CRM solution to a master. This blog guides us on how we can Automate Microsoft CRM Solutions Merge Using Azure CI/CD Pipelines by just updating a single file and committing it back to our repository. The Azure pipelines will get all required fields from the committed file. Moreover, it can perform the CRM merge quickly and efficiently.