“How can we automate merging our CRM Solutions?” is one of the most asked questions when discussing CRM solutions and DevOps Implementations. Merging and Automation are critical concepts of DevOps culture, but there is not a single utility that we can use directly to merge MS Dynamics Solutions. This blog post will discuss methods to merge CRM Solutions manually and automatically using Microsoft Azure Build and Release Pipelines.
Merging Manually:
A solution may contain many components like Entities, Web Resources, Assemblies, etc. The traditional way of merging is to manually import all the solutions on a single environment and then add all the components from each solution to a master one.
The other way is quite simple and less time-consuming. You can merge these solutions by editing their unique names in the Solution.xml file to a master name, as shown in the steps below:
- Export the MS Dynamics CRM solutions locally.
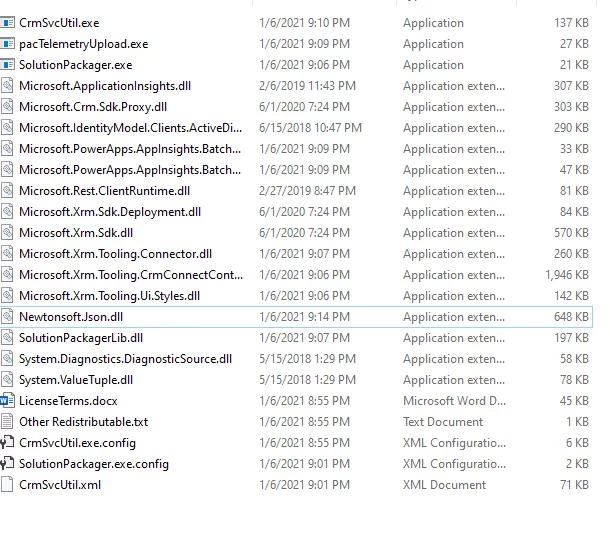
- Extract these by using the Microsoft Solution Packager tool. The Packager tool can be downloaded from https://xrm.tools/SDK. The directory of the downloaded tool will look like this:
The command to extract the solution is the following:
C:ToolsCoreToolsSolutionPackager.exe / action:Extract /zipfile:Solution1.zip /folder:”C: SolutionsExtract”.
Read more: Set Up CI/CD of Microsoft Dynamics CRM Solutions
You can now see all the components of the extracted CRM solutions.

3. Open the Solution.xml file with a text editor and edit the “UniqueName” with the same name across all the CRM solutions that will be merged. If Solution.xml is not in the root directory, it can be found in the /Other folder.

4. Pack all these solutions back to zip files using the Microsoft Solution Packager tool with the following command:
C:ToolsCoreToolsSolutionPackager.exe / action:Pack /zipfile:Solution1.zip /folder:”C: SolutionsExtract”.
5. Now, import all these solutions to an organization. All these solutions should be merged into a single solution with the name you specified in the UniqueName tab.
Automate CRM Solutions Merge Using Azure DevOps Pipelines:
All the steps mentioned above can be automated using Azure DevOps Continuous Integration and Continuous Deployment pipelines. First, let us have a look at the steps to add to the build pipeline:
Build Pipeline:
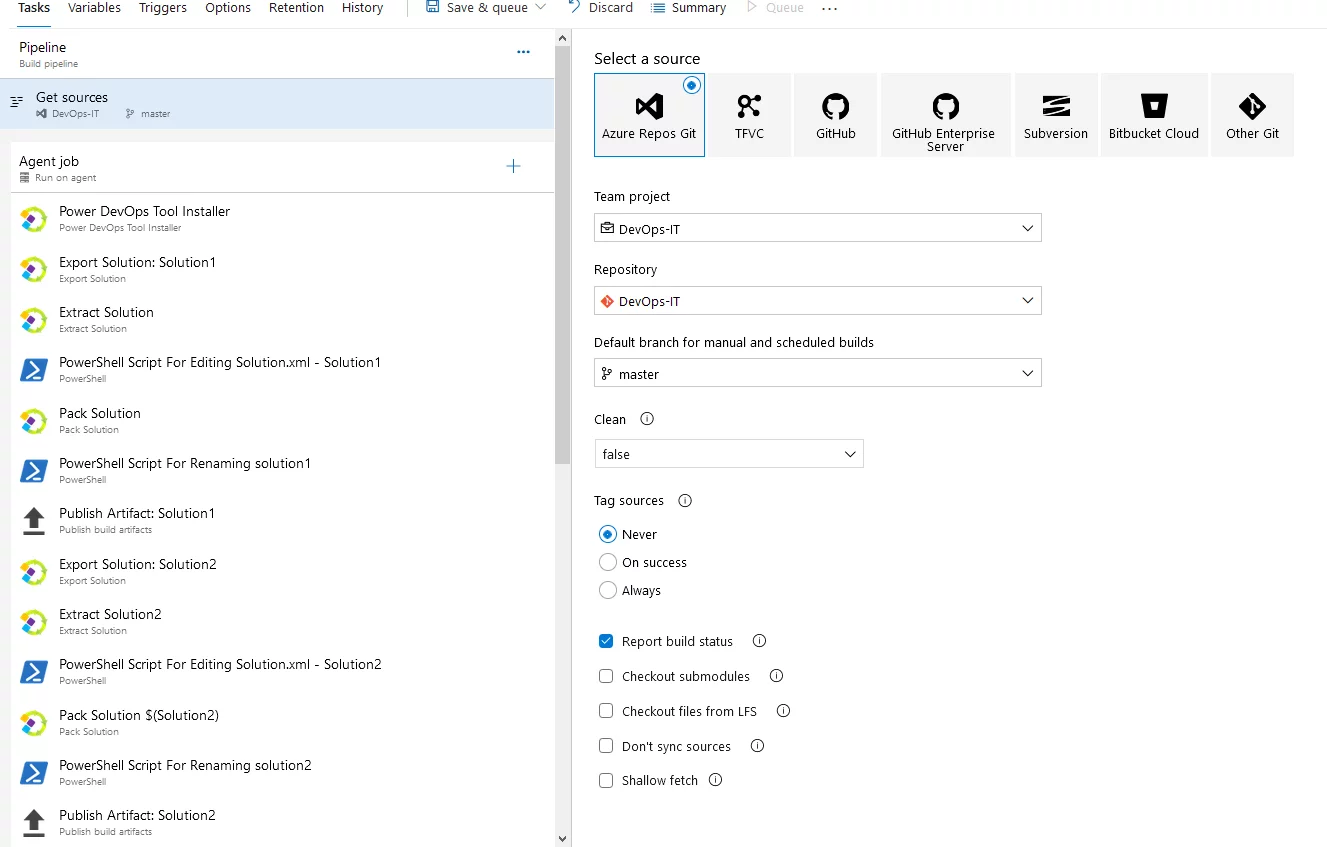
- Power DevOps Tool Installer: This will install the tools required.
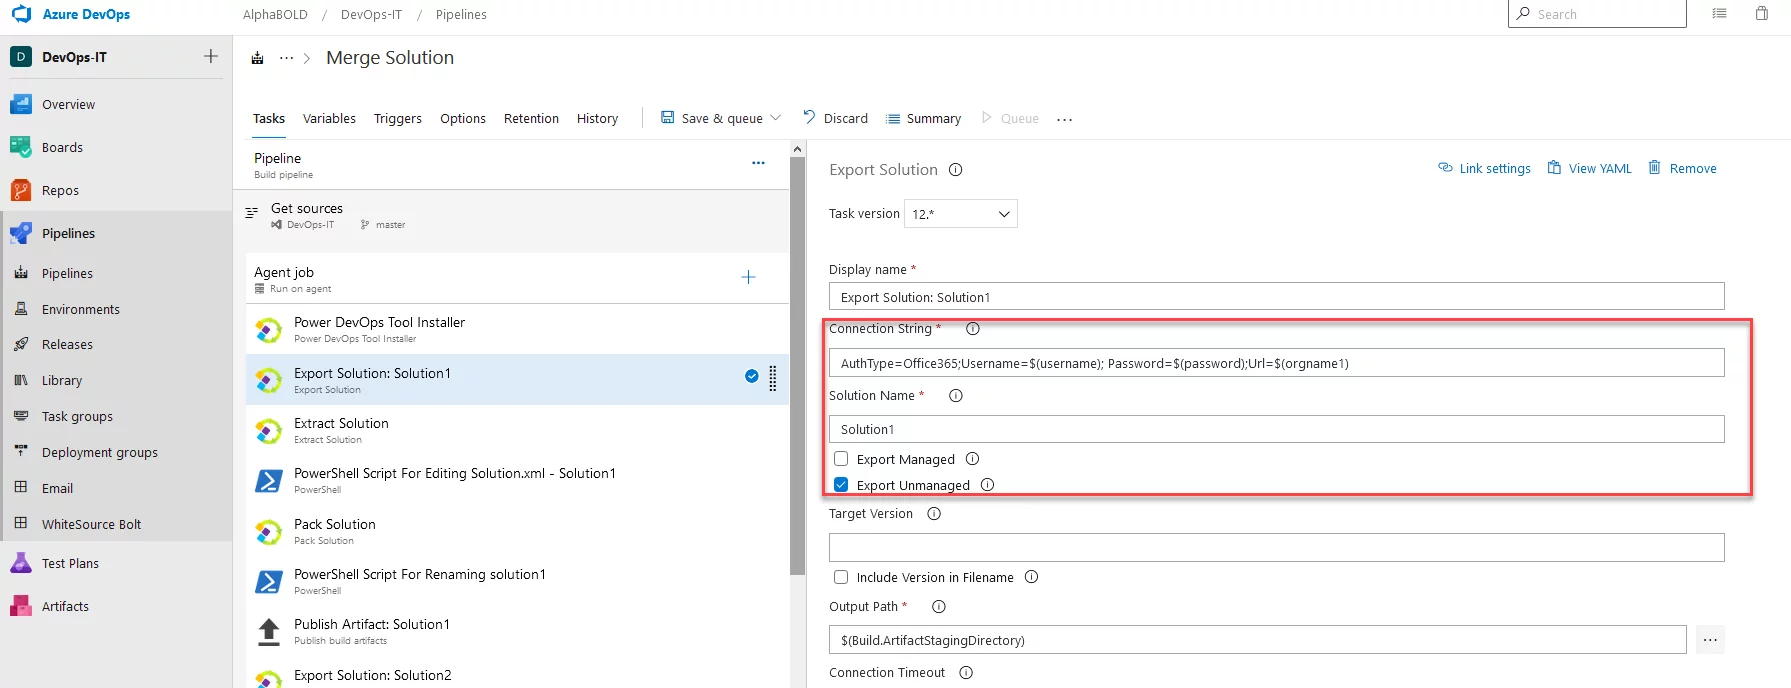
- Export Solution: Solution1: Through this, you can export the solution and provide the connection string to the source org and the name. The connection string will look like this:
AuthType=Office365;[email protected]; Password=Password123!;Url=https://dev.alphabold.com/dev/
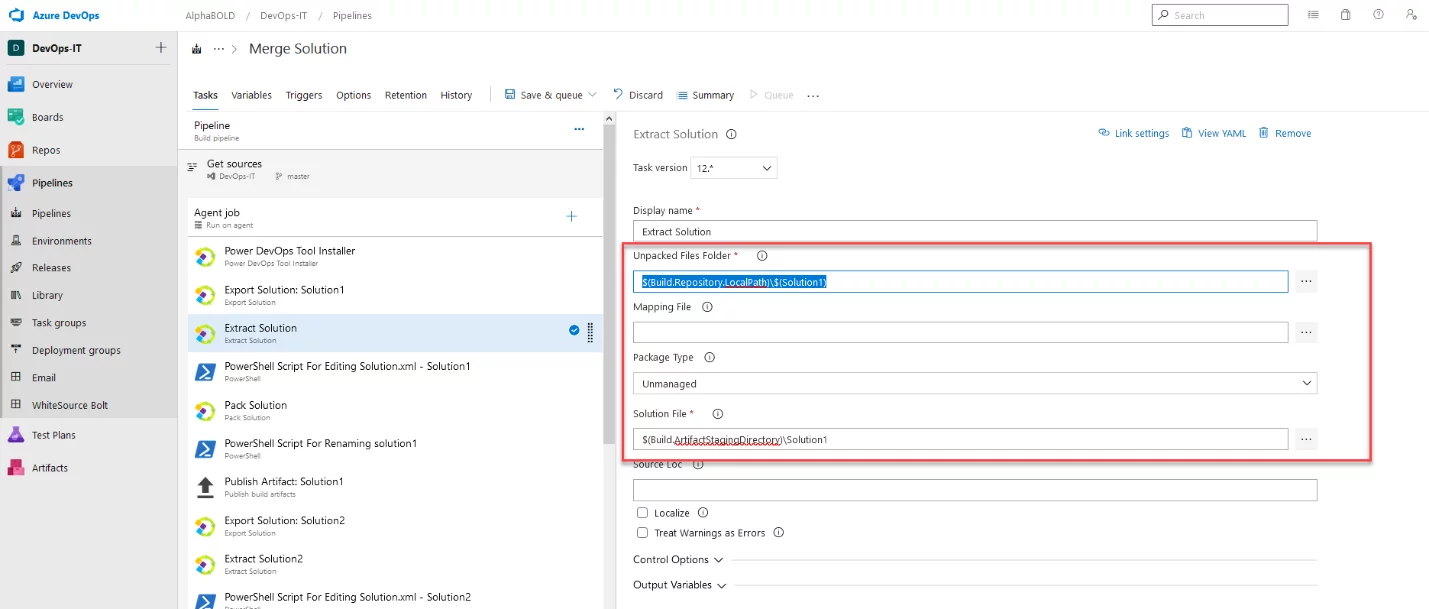
3. Extract Solution: The task will extract our exported Microsoft Dynamics CRM solution to a folder. Provide it with the solution path in the Unpacked Files Folder tab that would be like $(Build.Repository.LocalPath)Solution1 and the folder where to extract.
4. PowerShell Script For Editing Solution.xml: The task will be used to edit the UniqueName tab in the Solution.xml file. The PowerShell will look like this:
(Get-Content $(Build.Repository.LocalPath)SolutionOtherSolution.xml -Raw) -Replace ‘Solution1’, ‘NewSolutionName’ | Set-Content -Path $(Build.Repository.LocalPath)SolutionOtherSolution.xml
It would edit the Solution.xml file from our extracted solution and update the UniqueName from Solution1 to NewSolutionName.
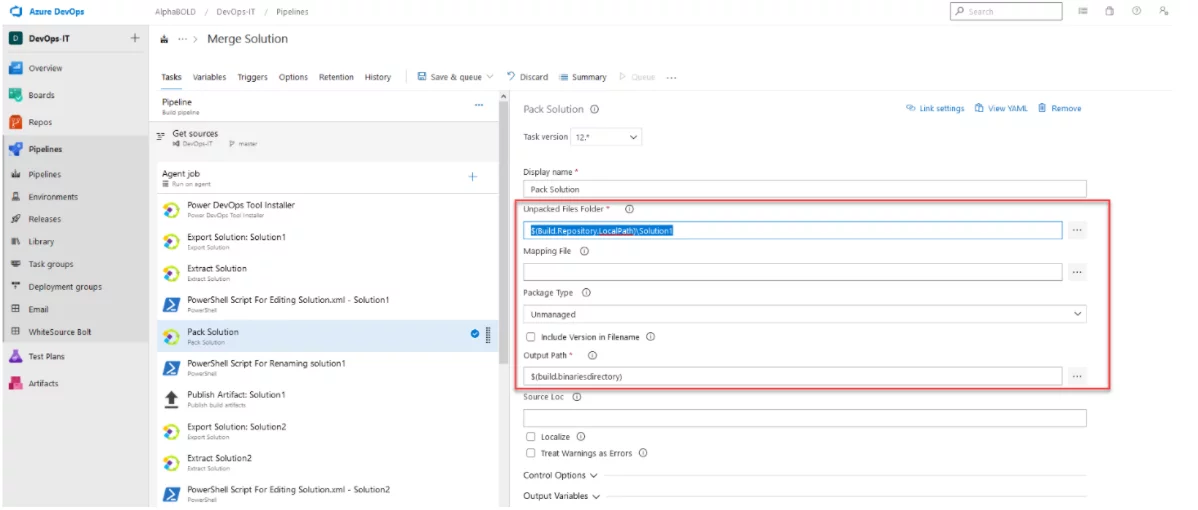
5. Pack Solution: This task would pack the solution to a zip file. Provide it the path to the extracted folder where we have changed the Unique Name in Solution.xml file that would be like $(Build.Repository.LocalPath)Solution1 and the path where the .zip file should be stored.
6. PowerShell Script For Renaming Solution: In the previous steps, we changed the UniqueName in the CRM solution and packed the solution. So, when a CRM solution is packed, it gets its name from the UniqueName tab. So, we must rename the solution as all the solutions would have the same name at the end. A PowerShell script can be used for this.
Rename-Item -Path “$(build.binariesdirectory)NewSolutionName.zip” -NewName “Solution1.zip” -Force -PassThru
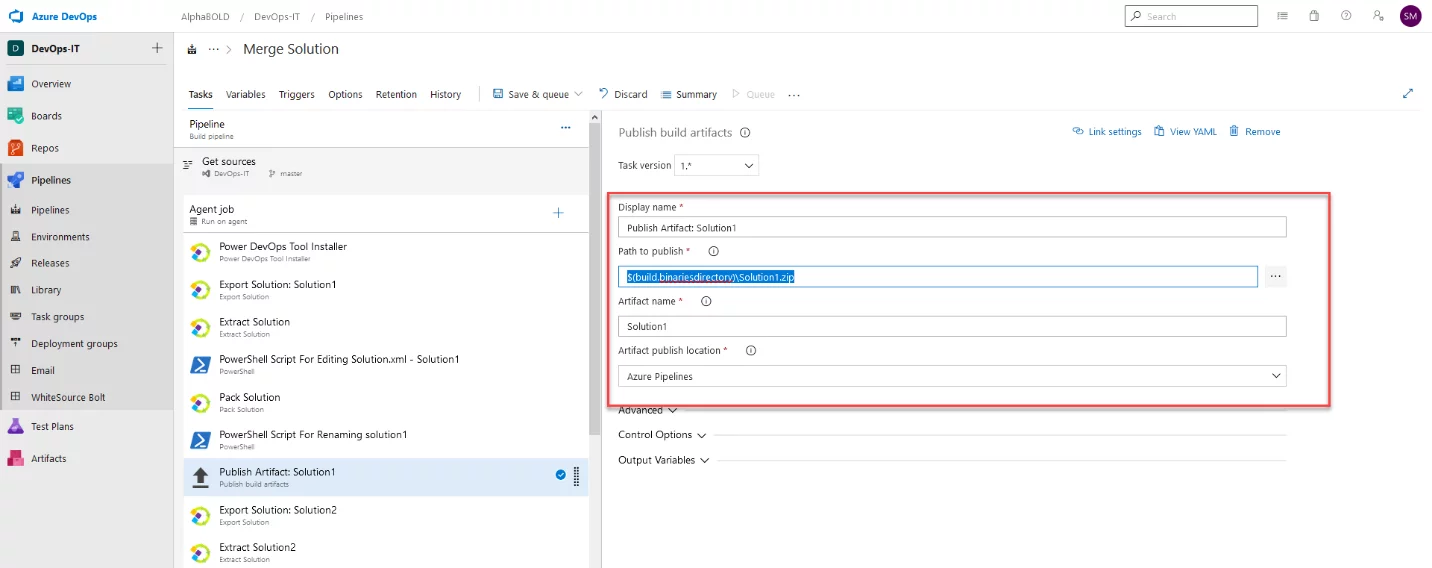
7. Publish Artifact: Now publish the MS Dynamics CRM solution as an artifact to use in our release pipelines to import to any organization. The path to publishing would be
$(build.binariesdirectory)Solution1.zip is the path where we have saved our solution after editing the Solution.xml file and renaming it.
All these tasks would be cloned for every CRM solution. The main thing to remember is to provide the same name in the UniqueName tab for all the solutions.
Release Pipeline:
The Release Pipeline is quite simple. You only need to add tasks to import CRM solutions to an organization where the CRM Solutions Merge should be done.
- Link the release pipeline to the build pipeline we used to publish our solution as an artifact.
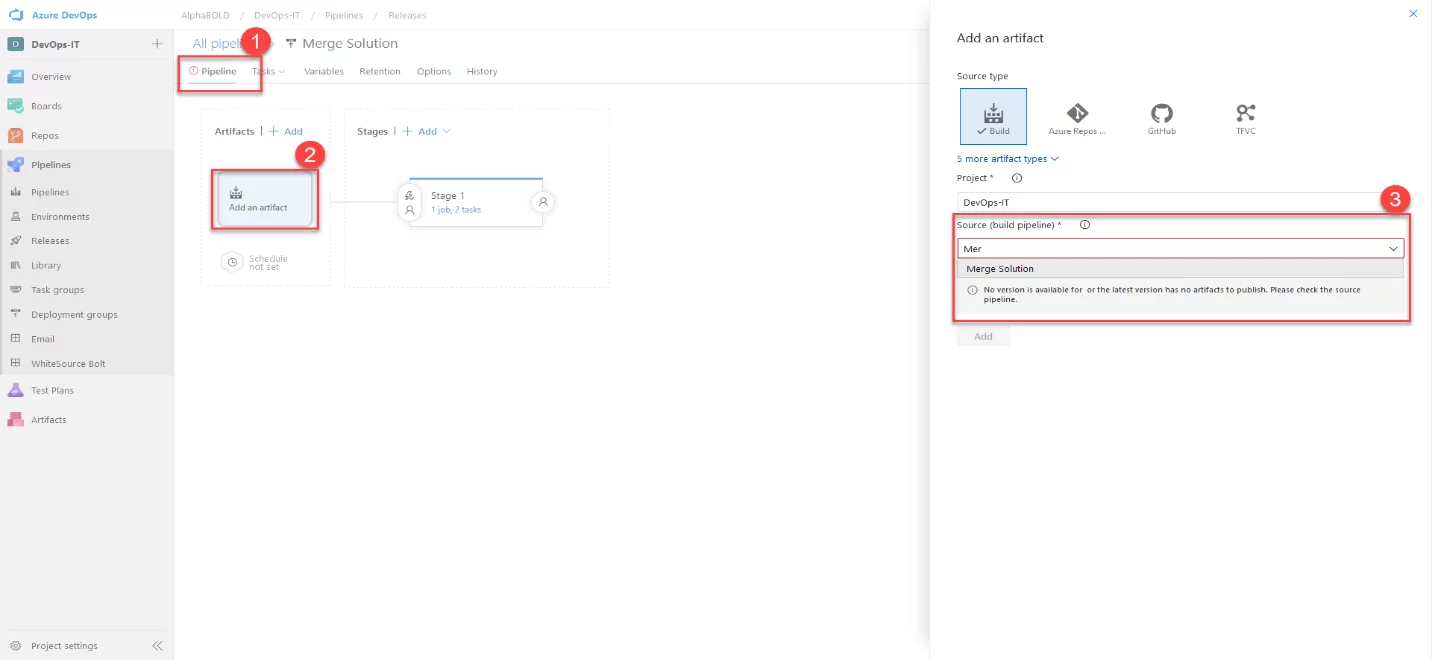
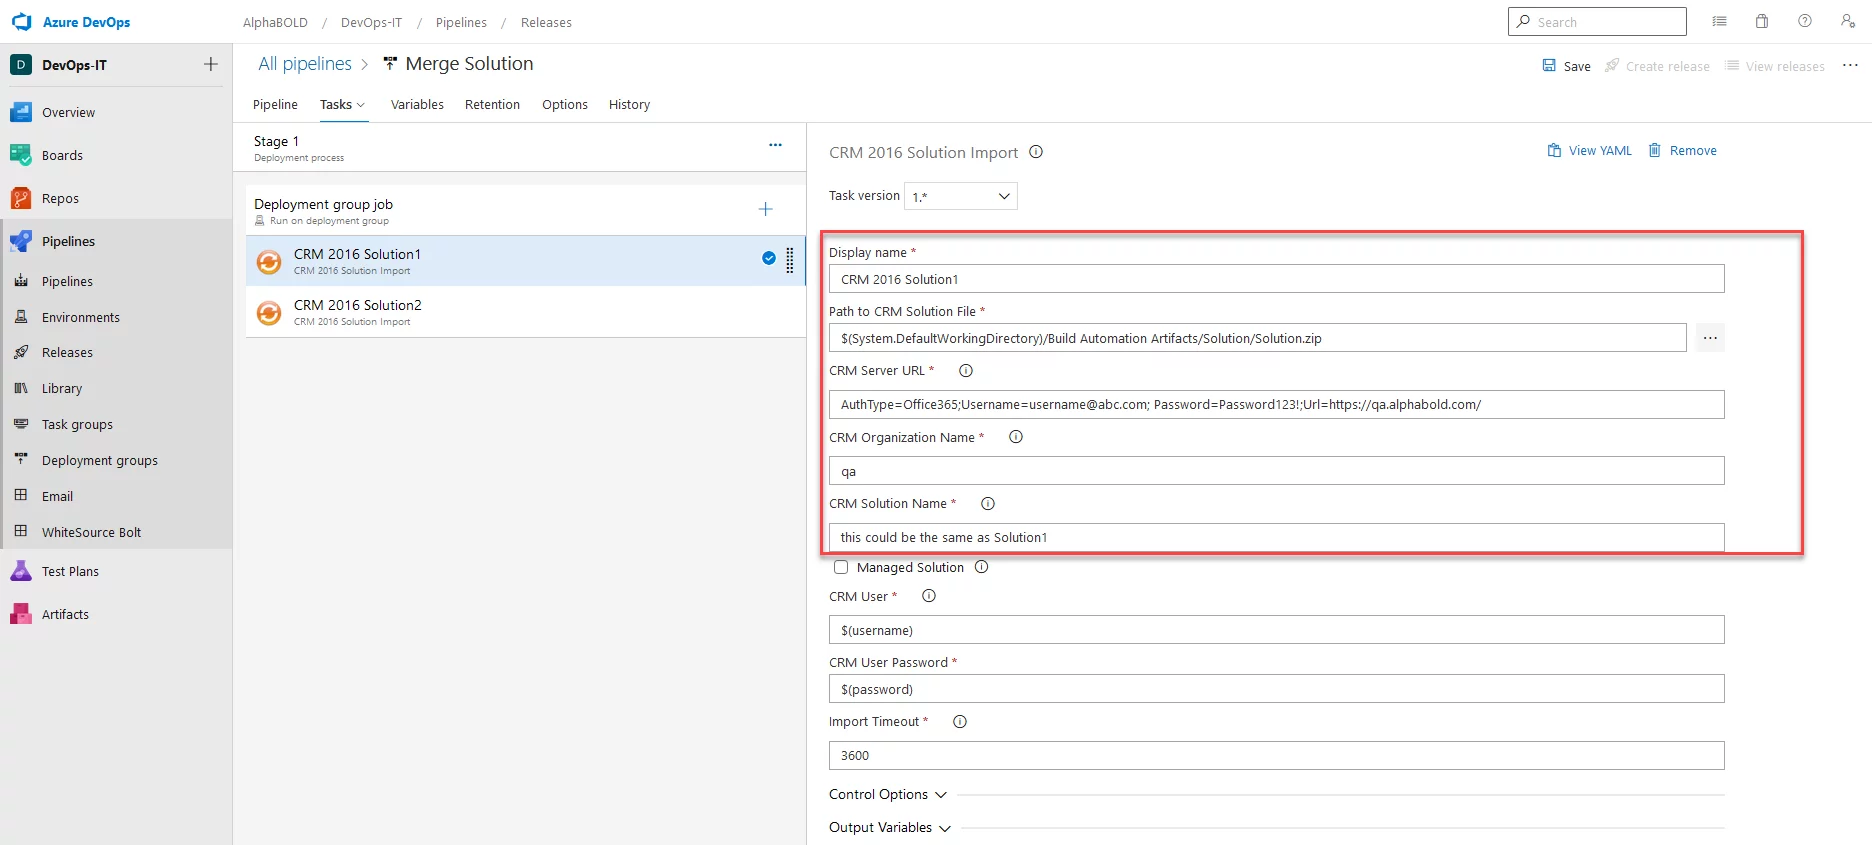
2. CRM Solution Import: Many tasks are available on the Azure DevOps Marketplace to import Solutions to CRM organizations. You can use any of your choices. The CRM 2016 Solution task will get the CRM Solutions from the linked pipeline and import them to the configured organization.
Import all the CRM solutions to the same organization, and all the solutions will be merged as a single solution mentioned in the UniqueName tab.
Conclusion:
Until now, you must manually merge the MS CRM Dynamics solutions by adding all the solutions’ components to a master solution. After reading this blog, you can Automate Your Microsoft CRM Solutions Merge Using Azure CI/CD Pipelines. If you do not want to use the Azure DevOps pipelines, you can manually perform the abovementioned steps. But from now on, merging CRM Solutions will be much easier for you.