Introduction
Power BI Embedded allows you to embed your Power BI reports and dashboards in a web app or a website. In this blog, we will create a demo app using Power BI Embedded for customers using a service principal.
In Power BI Embedded, Microsoft offers two main solutions:
- Embed for your Customers, also known as App Owns Data
- Embed for your Organization, also known as User Owns Data
Embed For Your Customers/ App Owns Data
Allows users to view your reports and dashboards without needing Power BI credentials or a license. This option is mostly used when you share reports with external users. Your app uses a service principal or a master user to authenticate with the Power BI Service.
Maximize Power BI Capabilities with AlphaBOLD
AlphaBOLD helps you with top-tier Power BI services. Our expertise in implementing Power BI can help your organization unlock new levels of insight and efficiency.
Embed For Your Organization/ User Owns Data
Allows you to build an app that needs the user to have a Power BI license and credentials, effectively extending the Power BI service to them. This option is most suitable for internal users.
Power BI Embedded requires Premium capacity which may best be suited for larger organizations. However, for development, you only need a Pro account. You require premium capacity only when your app is ready for production. Fortunately, Power BI allows trial pro accounts. Therefore, in this blog, we will discuss how we can implement a sample Power BI Embedded app for your customers using service principal.
The pre-requisites for the implementation include:
- Active Power BI Pro license (on trial will suffice)
- Microsoft Azure subscription
- Code Editor (Visual Studio, PyCharm, etc.)
Additionally, you also need to have certain access privileges to be able to implement Power BI Embedded. This includes:
- Admin rights in Power BI Service https://github.com/microsoft/PowerBI-Developer-Samples
- Power BI workspace admin rights
- Azure AD Global Admin rights
- Allowing Service Principal to user Power BI APIs
Allowing Service Principal To User Power BI APIs
Once you login to your Power BI Service, the first step is to allow the service principal to use Power BI APIs. You can achieve this using the admin portal as follows:
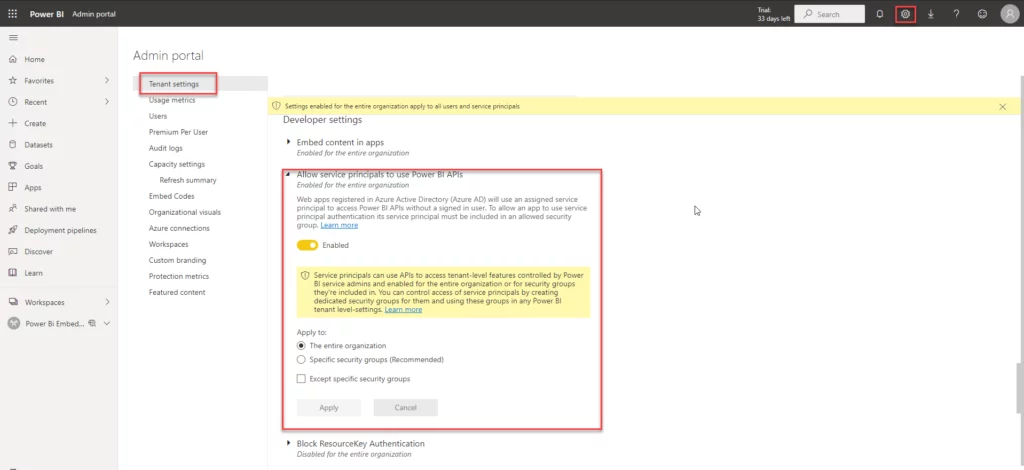
Setting Up Service Principal
Next, we had over to Azure Portal for setting up the Service Principal. Follow these steps:
- Login to https://portal.azure.com/.
- Search for Azure Active Directory, and then select it.
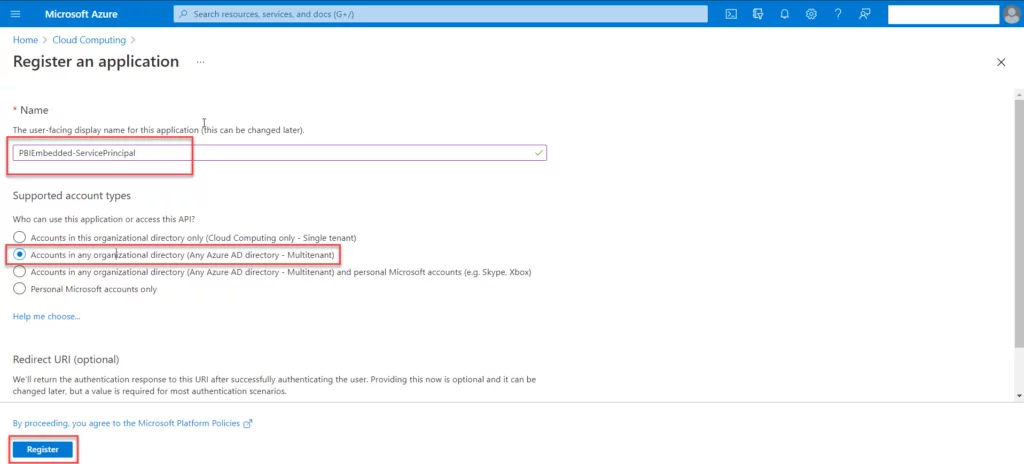
In the Manage section in the pane on the left-hand side, click “App Registrations,” then click “New registration.”
A new window will open. enter the name of the Service Principal in it, select the Multitenant option, and then click “Register” as shown below:
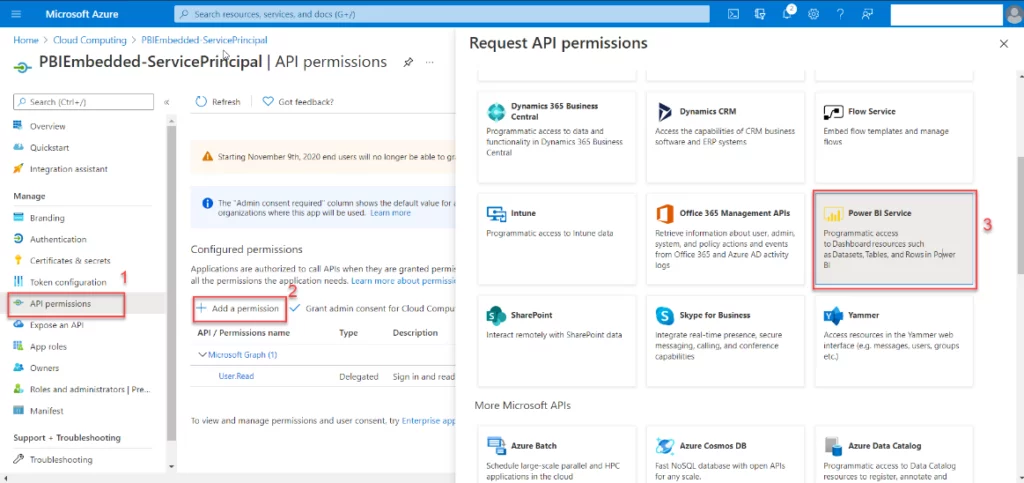
Once this is completed, you need to set up API permissions. In the Service Principal window that will open after the successful registration, click “API permission,” then click “Add a permission,” and lastly, select “Power BI Service.”
In the window that opens, select “Application Permissions.” select both the tenants available and click ‘Add Permission.”
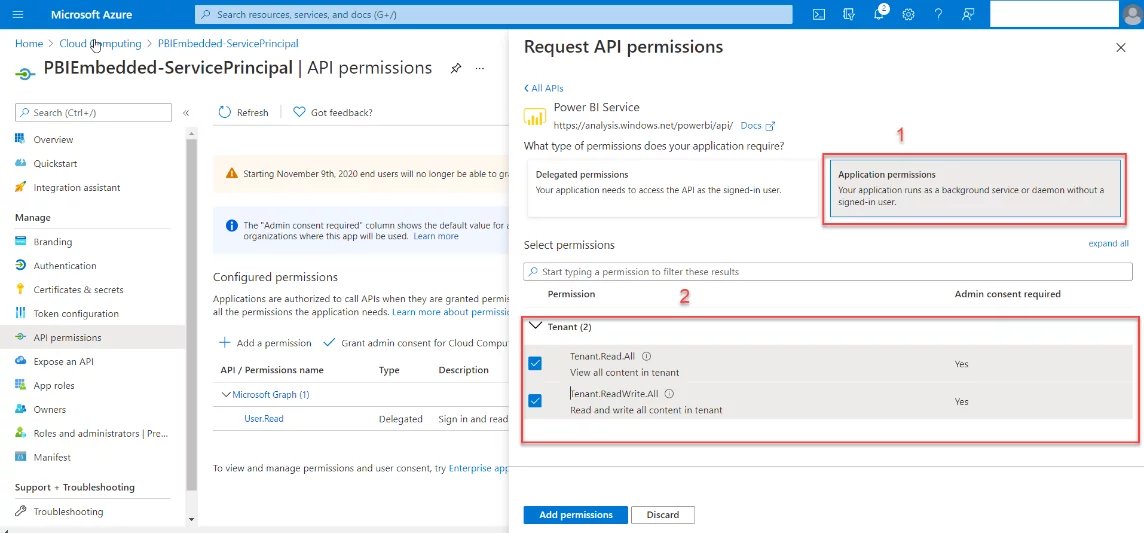
Once this is done, you need to click on the “Grant Admin Consent” and confirm.
Client Secret
Next, set up Client Secret. You can achieve this by clicking on “Client & Secrets” and then select “New Client Secret.” In the window that opens, provide the expiry, and click “Add.”
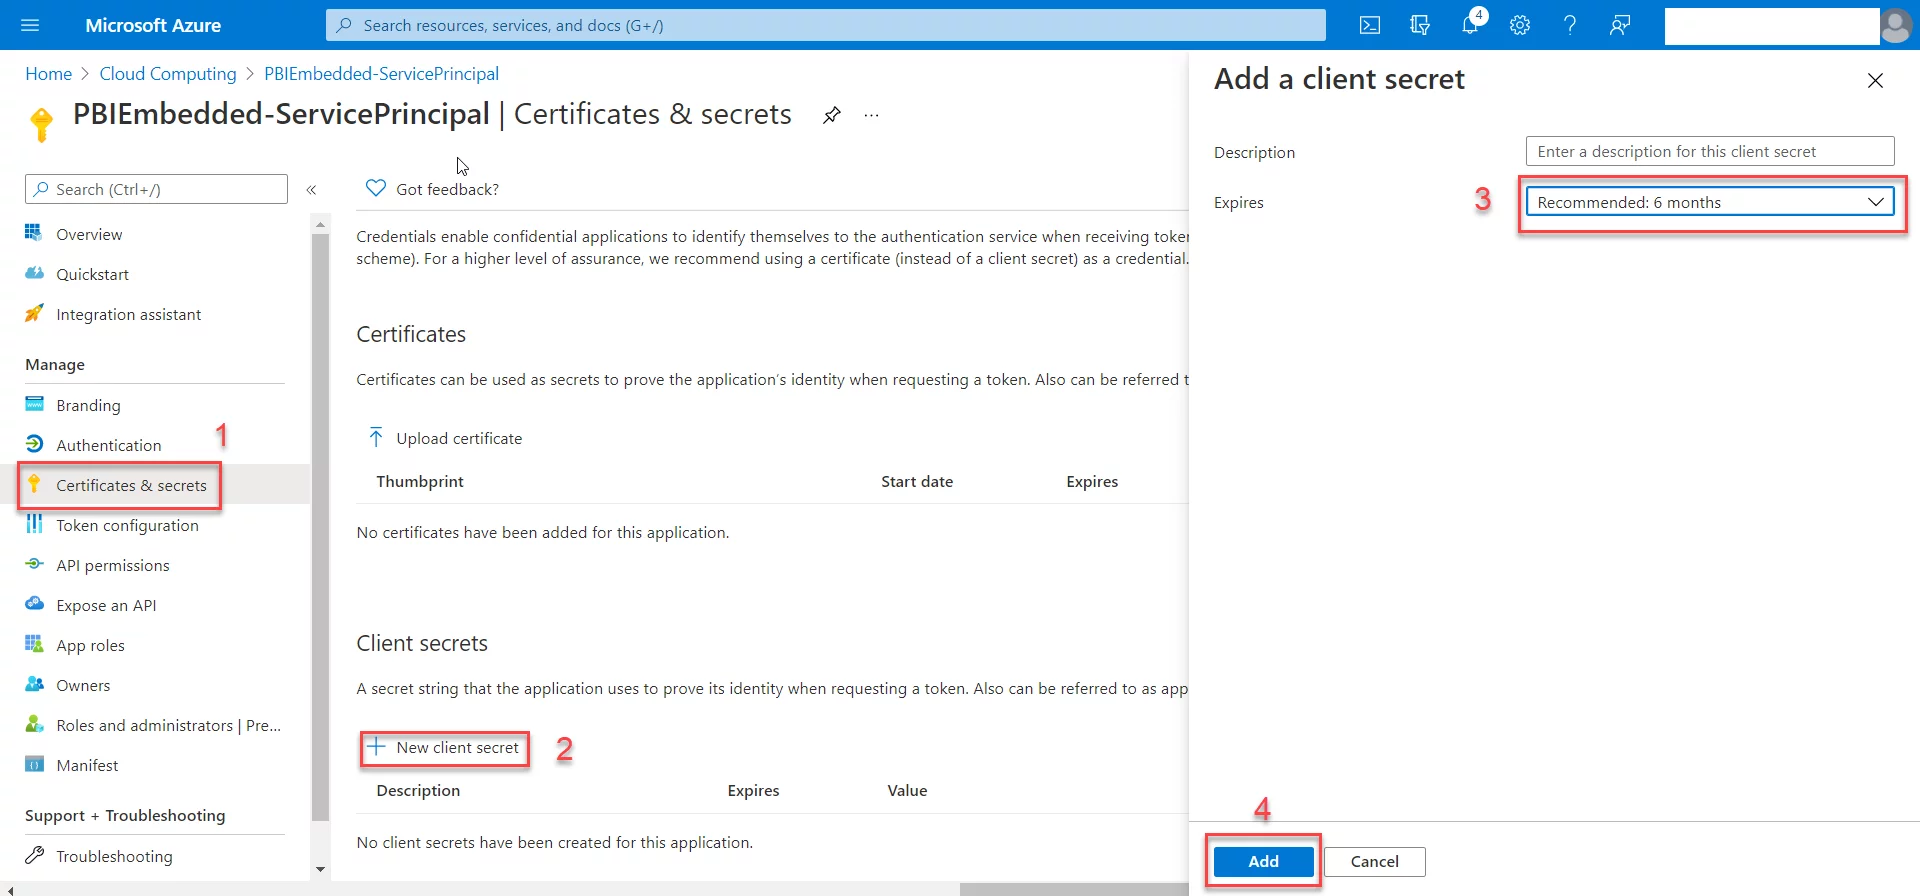
Once this is done, you will see the details of the Client Secret. . Copy the “Value” as you will need it later. This will be your “Client Secret.”

Service Principal, Client ID, And Tenant ID
Next, click on the “Overview” in the pane on the left-hand side. This will take you to another page. From here, copy the Display name (which is your service principal), Application (client) ID, and Directory (Tenant) ID.

Creating A New Workspace In Power BI Service
After saving all the previously mentioned details, the next step is to make a workspace in the Power BI service. For this, follow the steps below:
- Go to Power BI Service, click “Workspaces.”
- Then click “Create a Workspace.”
- Next, give the new workspace a name. Click “create.”
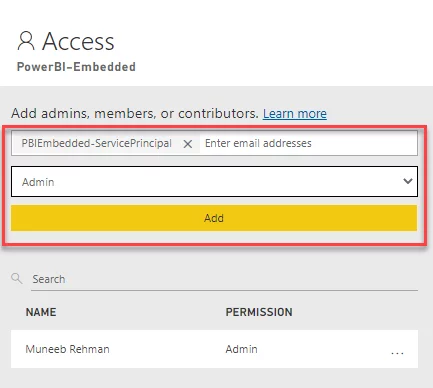
- Once inside the workspace, click on “Access” near the top right corner. Enter the service principal name. The Power BI service will automatically give you a suggestion to include the service principal that you previously set up in the Azure portal.
- Select the service principal, select “Admin” from the drop-down menu and click “Add.”
Publishing Your Report
Next, we can publish a report on this workspace that you can embed in an app as well.
For this demo, we are using the Covid 19 US tracking sample file from Microsoft. Feel free to use another report from the available sample Microsoft reports or your own custom report.
Workspace ID And Report ID
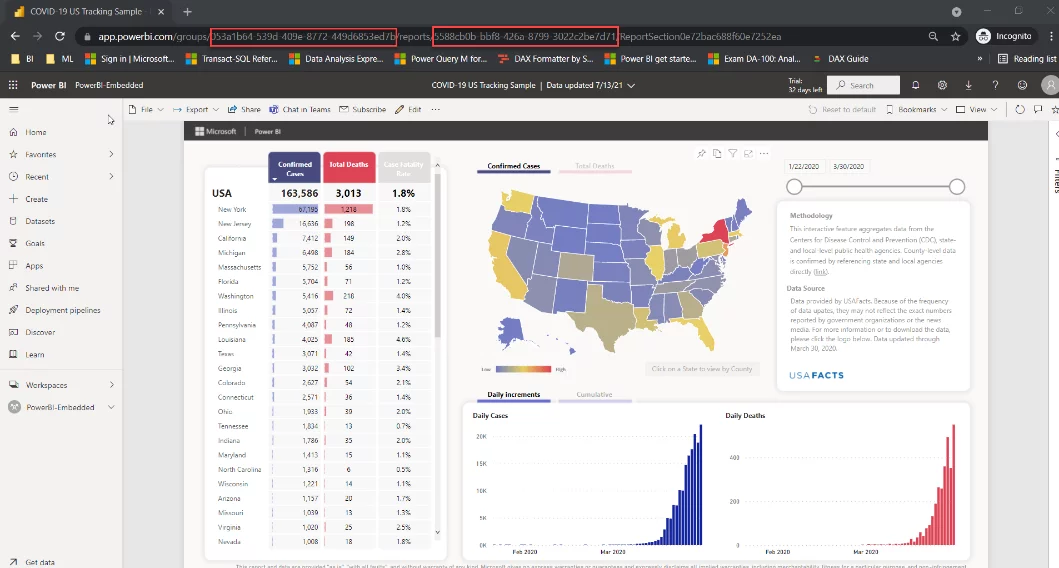
Once you have published the report to the newly created workspace, you need to get the workspace ID and the report ID. You can get this by opening your published report in the Power BI service. From the web URL, you can get the workspace ID and the report ID, respectively, as shown below:
Developing The App
The next step is to select the framework of your choice for app development. You can choose .NET Framework, .NET Core, Java, Node JS, or Python. Microsoft has also provided sample apps in all these frameworks on Power BI Developer Samples.
For demo purposes, we are going to use the sample app provided by Microsoft in Python. For this, follow the steps below.
- Download the Python folder from the link and save it to your local drive.
- Next, open a Python IDE of your choice and open the command terminal. We are going to use PyCharm here.
- Change the directory to the “Embed for your customers” folder that contains the requirements.txt and run the following command:
pip3 install -r requirements.txt

- Next, open the App Owns Data folder in the explorer and open config.py using the Python IDE. Here, you need to provide all the information that we have gathered earlier as shown below. Make sure to have ‘Service Principal’ as the authentication mode.
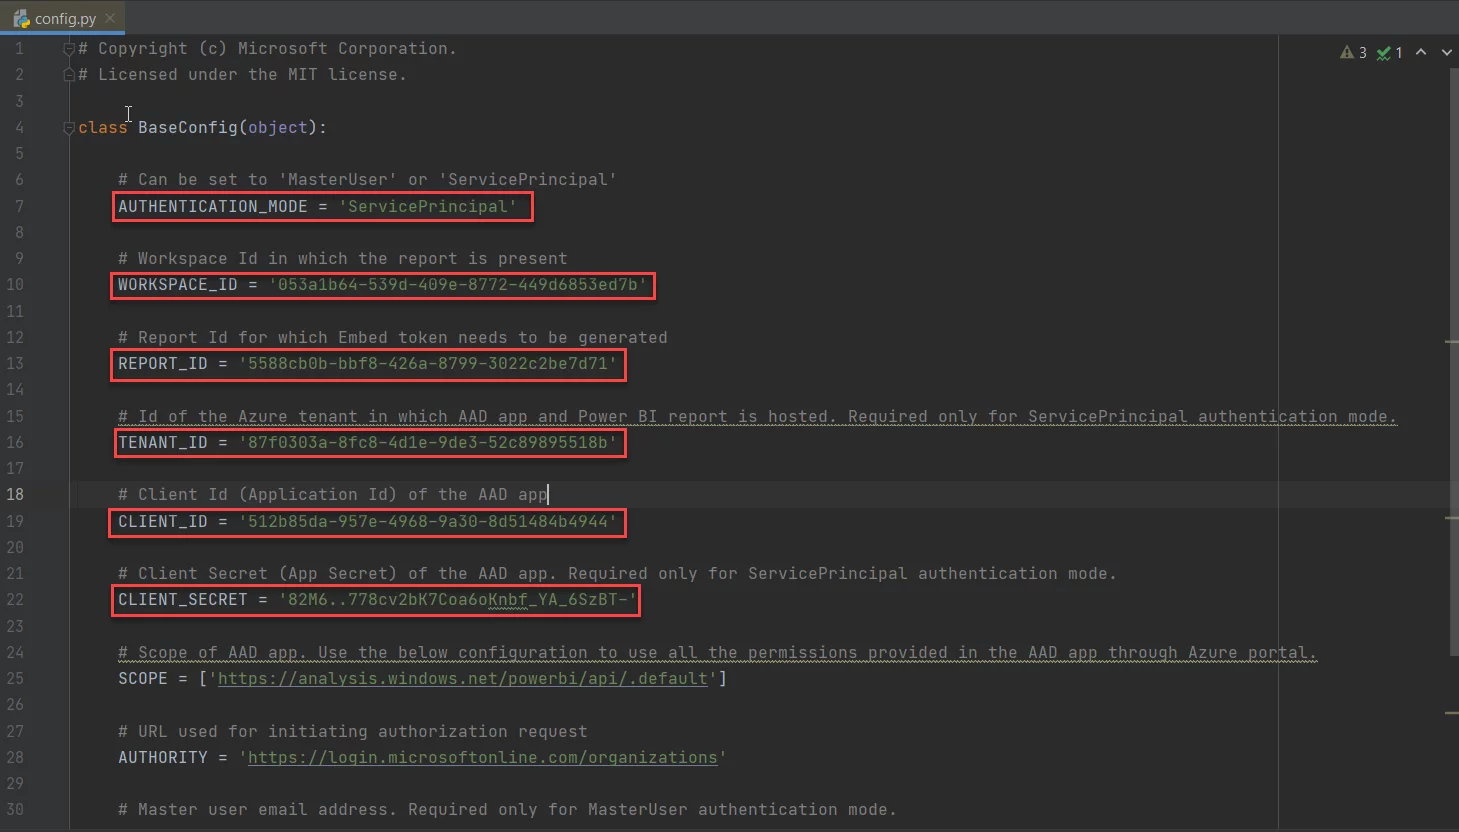
- Save the file and open the terminal again. Change the directory to the App Owns Data and run the following command:
flask run

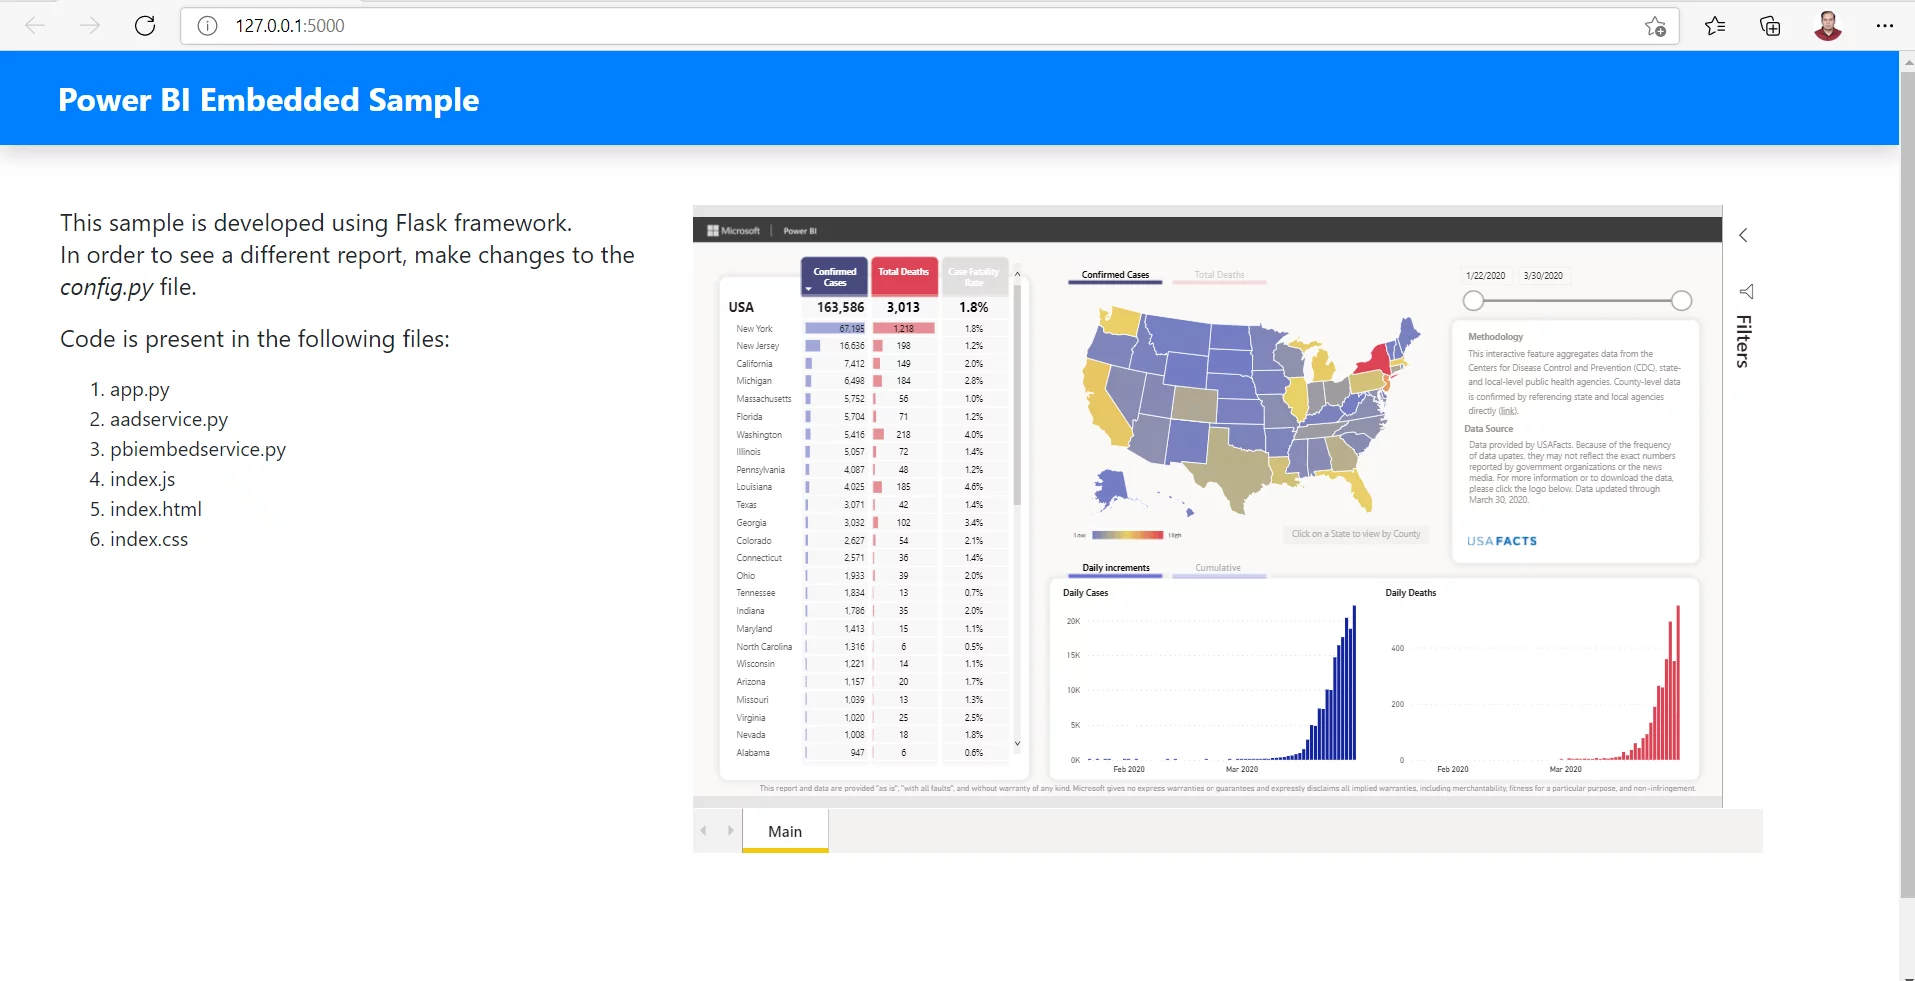
Running the flask run command will render the app on your browser (Edge, Chrome, or Firefox). Here, now you have a sample app in development. You can make changes to your app as required. For production, you would need to have a Premium capacity.
Moving The App To Production
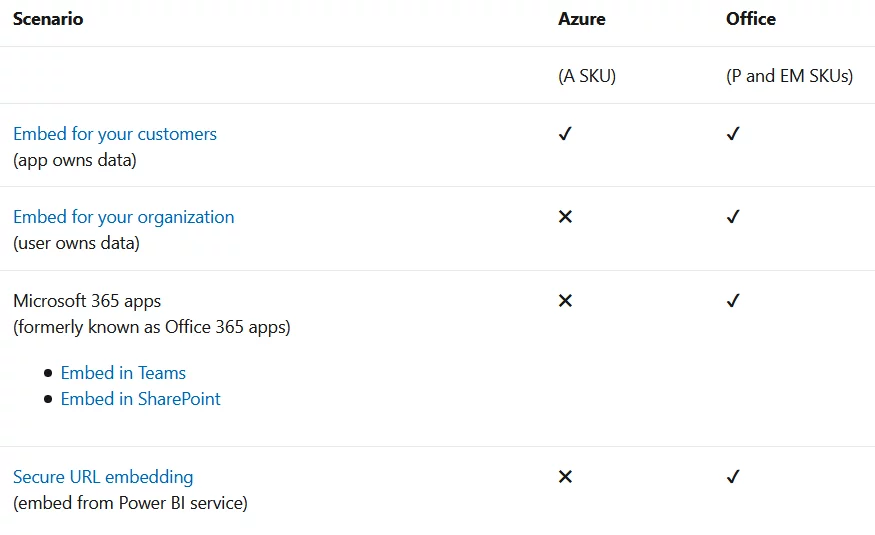
As discussed earlier, moving the app to production requires a dedicated capacity. This allows you to offer your reports and dashboards to the end-user without having to purchase any license. The capacities that you can purchase fall into two main categories:
- Power BI Premium: Microsoft 365 subscription available in two SKU families, EM, and P.
- Azure Power BI Embedded: Purchased from Azure portal, in the A SKU family.
The following table provided by Microsoft explains what these capacities offer beyond the app owns data.
Read more about Dataflows In Power BI
Once you have purchased a capacity, you need to assign the workspace to the dedicated capacity using the Power BI Rest API and service principal object ID.
Elevate Your Data Insights with AlphaBOLD's Power BI Solutions
Discover how AlphaBOLD's Power BI services can enhance your data analysis and reporting capabilities.
Request a DemoConclusion
With the Power BI Embedded app using service principal authentication and Python framework implemented, and the development of the app is completed, we can purchase a dedicated capacity to run the app through ISV.
Explore Recent Blog Posts


