
Table of Contents
Introduction
Customer feedback is the most direct signal a business has about whether its service delivery is working. Yet for most organizations, the gap between collecting feedback and acting on it remains stubbornly wide: surveys go out, responses come in, and the insight sits in a report that nobody reads until the next quarterly review. Dynamics 365 Customer Voice was built specifically to close that gap, but the 2026 version of the product is substantially more capable than what most documentation describes.
With the integration of Microsoft Copilot AI, real-time Dataverse sync, and Copilot Studio survey bots, Customer Voice has evolved from a forms tool into a full customer feedback intelligence platform. Organizations using it correctly in 2026 are not just collecting NPS scores. They are triggering automated service recovery workflows, surfacing sentiment trends across 23 languages before the weekly leadership meeting, and giving frontline service agents a live satisfaction score on every customer record in their Dynamics 365 Customer Service workspace.
This guide covers the full setup from installation through automation and AI-powered analysis, updated for the capabilities available in 2026. Whether you are deploying Customer Voice for the first time or evaluating whether your existing setup is capturing the full value of the platform, this is the reference you need.
Microsoft continues to evolve its business application ecosystem with powerful AI-driven enhancements in 2025 and 2026, including everything from ERP-style application suites to better integration and usability of existing features. Dynamics 365 Customer Voice is an example of the latter, representing an important step forward for how customer feedback is sought after and processed.
Updated 2026: Customer Voice now integrates seamlessly with Microsoft Copilot and AI-powered analytics, enabling businesses to derive deeper insights from customer sentiment automatically. Learn more about our Microsoft Dynamics 365 services
Customer Voice builds on its predecessor, Forms Pro, by focusing on tighter integration with Dynamics 365 and Microsoft’s Power Platform applications. This integration means the app is much more intuitive to use. Users can leverage the knowledge of Microsoft’s other Power Platform products, especially Power Automate, to produce highly robust and scalable surveys.
What Is Dynamics 365 Customer Voice and How Does It Compare?
Before diving into setup, it is worth anchoring on where Customer Voice sits in the Microsoft ecosystem in 2026 and how it compares to the alternatives teams frequently evaluate. Customer Voice replaced Microsoft Forms Pro in 2020 and has since matured into a full enterprise feedback management platform. It is the right tool for organizations already running on the Microsoft Power Platform who need surveys that integrate natively with their CRM data, trigger automated workflows, and report into Power BI dashboards, all without additional middleware.
Customer Voice vs. the alternatives in 2026
Compared to SurveyMonkey or Qualtrics, Customer Voice offers tighter native Dataverse integration and lower total cost for Microsoft-stack organizations, but fewer advanced question branching features. Compared to Microsoft Forms, Customer Voice provides Dynamics 365 data binding, Power BI reporting, satisfaction metrics (NPS, CSAT, Custom Score), and Power Automate triggers on specific response conditions. For teams already licensed on Dynamics 365 Customer Service or Sales, Customer Voice is included with the license and is the logical choice.
You may also like: Power Automate and Dynamics 365 Workflow: Which/When to Use?
How to Set Up Dynamics 365 Customer Voice: Step-by-Step
A common use case for Customer Voice is to send customer surveys after a customer service interaction, usually upon resolving a case in Dynamics 365. Here is how this is done with the current Customer Voice experience.
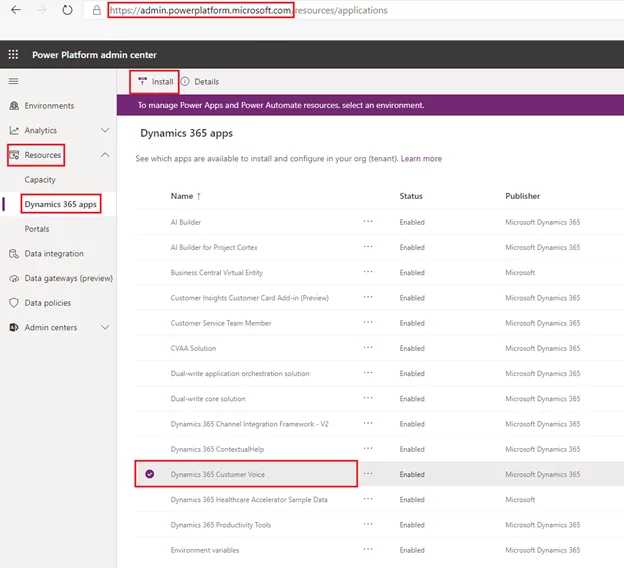
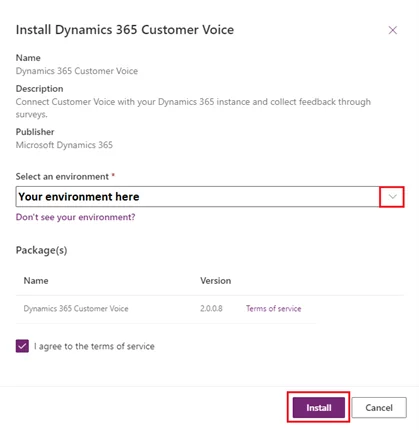
- You may be asked to select an environment and confirm the installation; simply choose the appropriate Dynamics 365 environment and click Install.
- Once the solution is installed, navigate to https://customervoice.microsoft.com. This is the home base of Customer Voice, where all projects and surveys are managed. Click on the New Project button to see how straightforward it is to set up a survey.
Ready to Transform Your Customer Feedback Strategy?
Discover how AlphaBOLD can help you implement Dynamics 365 Customer Voice with AI-powered analytics, seamless Dataverse integration, and automated feedback workflows.
Request a Demo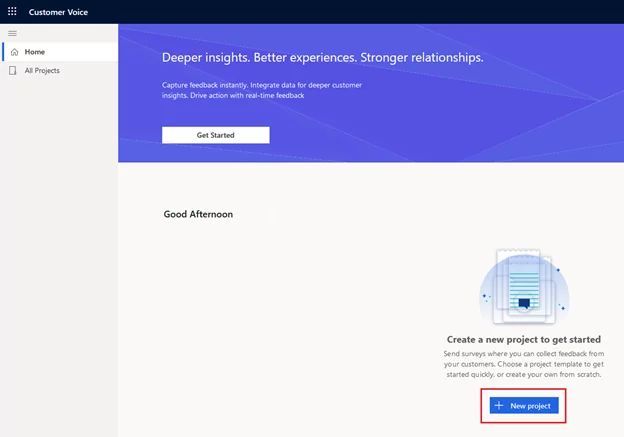
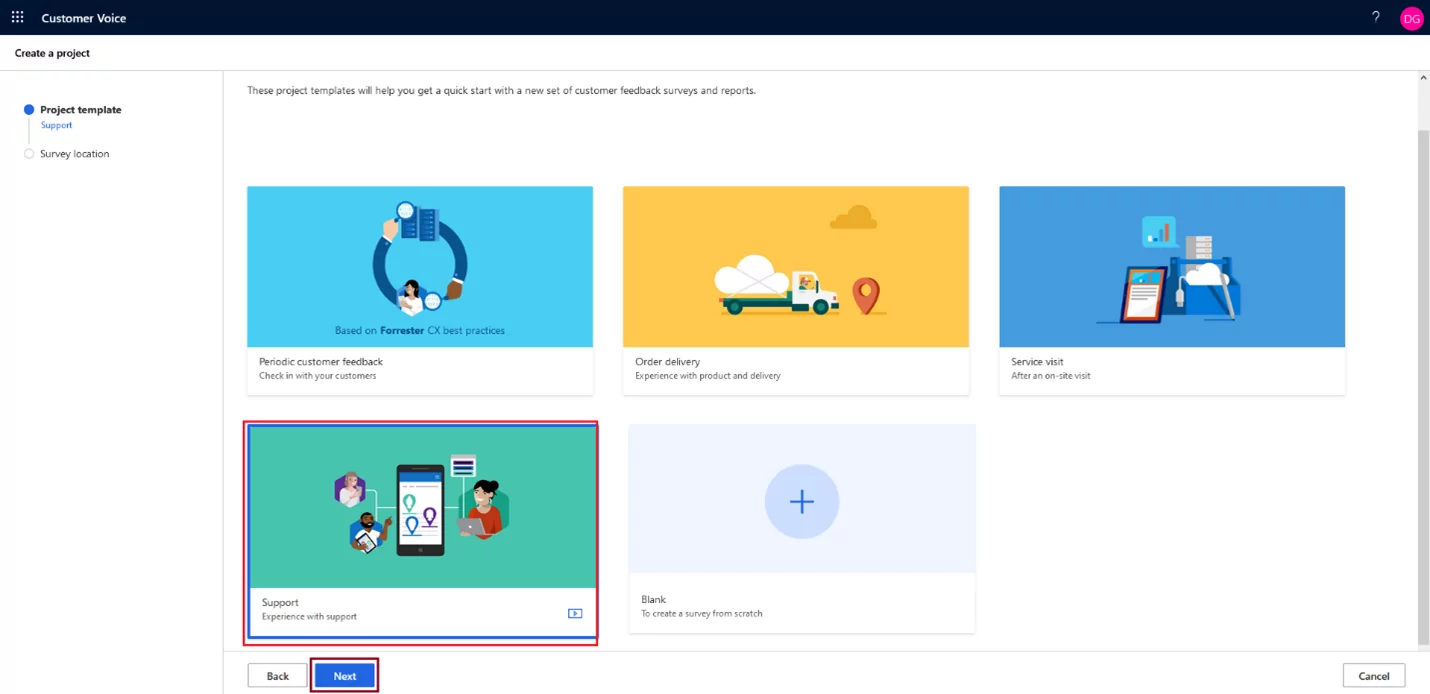
- Customer Voice will give us a few templates and the ability to create your survey from scratch. In this case, we will select Support, as it already has some of the features we want built right in.
- You may be asked for the location and/or environment when creating the survey. Simply choose the same Dynamics 365 environment used in an earlier step.
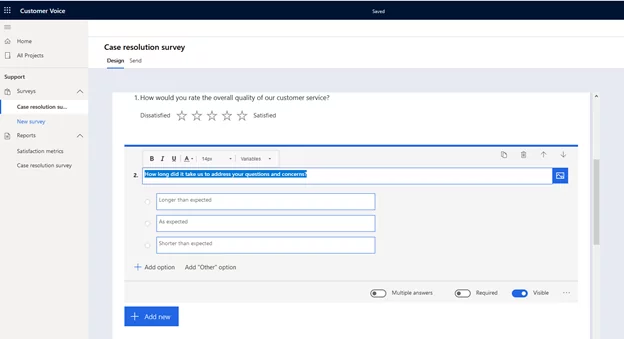
- Upon creating the survey, we see it has already populated some basic information, including a header and questions with different answer formats. All these assets are easily configured; modifying a question’s text or adding a new answer option just requires clicking on what you would like to change.
- For example, in the screenshot below, I clicked on question 2. This brings up a simplified editor like the email tool in Dynamics 365, allowing me to add or remove options individually. I can even specify whether the answer is required for the survey to be submitted or allow customers to choose multiple answers.
- Once the survey is set up to your satisfaction, we must set up the trigger behavior to ensure surveys are being sent to customers. Click on the Send button to see a few different options. We will use automation here, allowing us to trigger based on Dynamics behavior via Microsoft’s Power Automate tool.
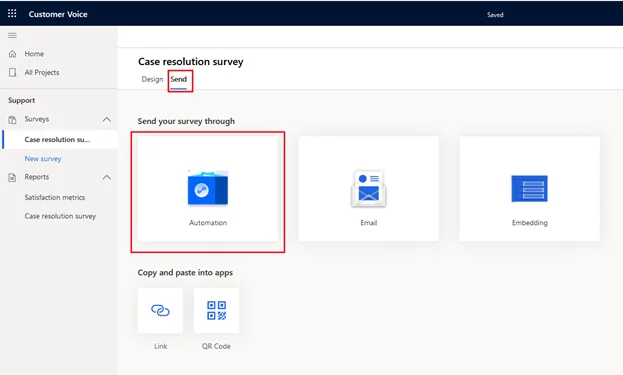
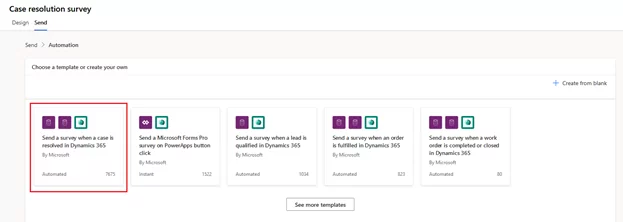
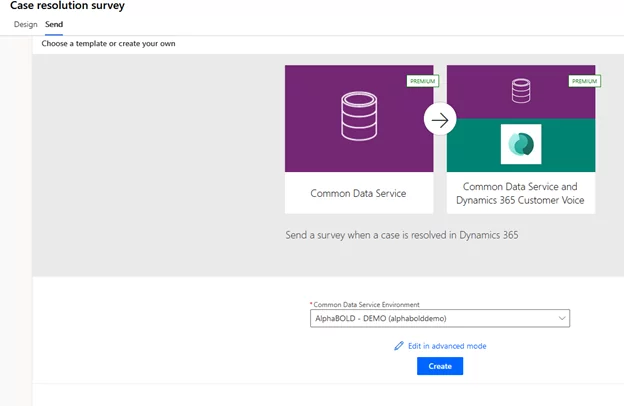
- Once Automation has been clicked, Customer Voice will provide you with some common templates and the ability to create customized behavior. In this case, we would like to send a survey when we resolve customer service cases in Dynamics, so we will choose “Send a survey when a case is resolved in Dynamics 365”.
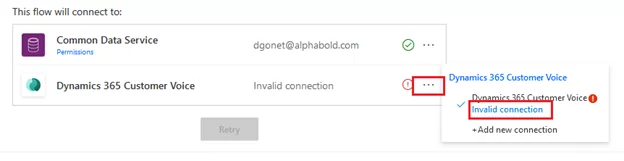
- This step will ask you to confirm which connectors will be used for automation. Suppose this is your first time using Power Automate with this Dynamics environment. In that case, you may need to confirm your credentials, which you can do by clicking the ellipsis next to the connector and clicking the blue “invalid connection” link.
- Once the connectors are validated, click Continue, then Create. This will set the automation up based on the template without requiring any advanced setup.
Read more: Power Automate & Dynamics 365 Workflow Which/When to Use?
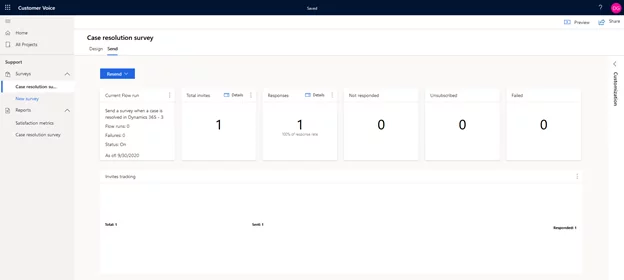
- Once the setup is complete, you will be brought to the survey response dashboard, where you can see the number of invitations sent, the responses received, and any flagged issues like survey failures.
- In this screenshot, you can see that a user has responded to my survey:
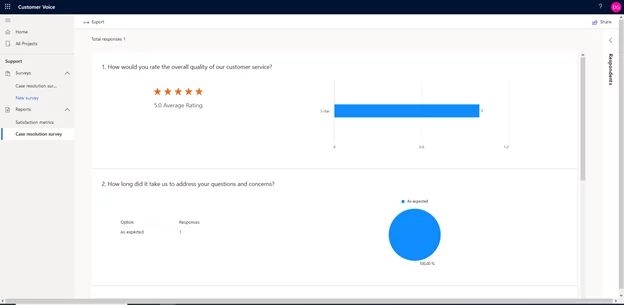
- An excellent feature in Customer Voice is the ability to see visualizations of the data coming in on your survey. By clicking on “Case resolution survey” under “Reports,” we can see that the survey is linked with Power BI analytics right out of the box:
AI-Powered Sentiment Analysis and Copilot Integration (2025-2026)
With Microsoft’s 2025 Release Wave 2 (October 2025 – March 2026), Dynamics 365 Customer Voice now benefits from enhanced AI capabilities across the entire Microsoft ecosystem. Here’s what’s new:
- Copilot-Powered Survey Analysis: Survey responses are now automatically analyzed using generative AI. Copilot can summarize feedback trends, identify emerging customer concerns, and suggest actionable improvements, all without manual intervention. For contact centers processing thousands of responses per week, this is the difference between having a feedback program and actually acting on it.
- Advanced Sentiment Analysis: Customer Voice leverages Azure AI Language services (formerly Azure Cognitive Services Text Analytics) to classify responses as positive, negative, or neutral with significantly improved accuracy compared to the pre-2025 model. The sentiment engine now supports 23+ languages natively, meaning global businesses can analyze feedback in customers’ native languages without running separate translation pipelines. Sentiment scores are surfaced directly on the Dynamics 365 Customer Service record alongside the case history.
- Real-Time Dataverse Sync for 360-Degree Customer View: Survey responses now sync in real time with Microsoft Dataverse, meaning service representatives can see customer satisfaction scores directly within the Dynamics 365 Customer Service workspace the moment a response is submitted. This eliminates the reporting lag that previously made Customer Voice data feel historical rather than actionable. A service agent handling a follow-up call can now see that the customer rated their last interaction a 3 out of 10 before the conversation begins, allowing them to adjust their approach accordingly.
- Customer Intent Agent: Released in 2025 Wave 2, the Customer Intent Agent analyzes past survey responses and interaction history to predict customer needs before they are expressed. This allows service teams to proactively address issues before they escalate to complaints. The Intent Agent surfaces its predictions directly in the Dynamics 365 Customer Service workspace and can trigger proactive outreach workflows via Power Automate when a customer’s predicted sentiment falls below a defined threshold.
Further Reading: Unlocking the Power of AI in Dynamics 365 Customer Service
Advanced Dataverse Integration and Power Platform Automation
Customer Voice data is stored natively in Microsoft Dataverse, enabling powerful integrations across the entire Power Platform ecosystem. Here’s how to leverage this architecture:
- Key Dataverse Entities: Survey responses, invitations, and satisfaction metrics are all stored as Dataverse entities. This allows you to build custom Power Apps for survey management, create Power Automate flows triggered by specific response patterns, and generate Power BI dashboards for executive reporting.
- Personalization Variables: You can add up to 15 personalization variables to customize surveys for each recipient. Pull data directly from Dynamics 365 contact records to address customers by name, reference their recent purchases, or include account-specific details.
- Automated Survey Triggers: Use Power Automate with Dataverse connectors (not the legacy Forms connector) to trigger surveys based on any CRM event—case resolution, opportunity closure, service appointment completion, or custom workflow stages.
Technical Note: Always use Dataverse connectors for Customer Voice automation. The legacy Microsoft Forms connector may cause warm data lock errors when survey responses exceed 65,000 records.
Further Reading: Power Automate & Dynamics 365 Workflow: Which/When to Use?
Copilot Studio Survey Bots for Contact Center
Microsoft has introduced a new survey capability within Dynamics 365 Contact Center that uses Copilot Studio to create AI-powered survey bots. This complements Customer Voice with channel-specific feedback collection:
- Omnichannel Deployment: Survey bots can be deployed across voice, live chat, SMS, and social media channels. Customers receive contextual surveys immediately after their interaction, capturing feedback while the experience is fresh.
- Generative AI Configuration: Contact center managers can use Copilot Studio’s generative AI capabilities to streamline survey configuration. The AI suggests appropriate questions based on interaction type and customer history.
- Power Automate Integration: Survey bot responses can trigger Power Automate flows for immediate action—such as escalating negative feedback to supervisors or generating follow-up tasks for service representatives.
Important Note: Copilot Studio survey bots are separate from Dynamics 365 Customer Voice. While both store data in Dataverse, they serve different use cases use Customer Voice for email-based surveys and scheduled feedback campaigns, and Copilot Studio bots for real-time conversational feedback.
External Resource: Microsoft Learn: Dynamics 365 Customer Voice Satisfaction Metrics
Turn Customer Insights into Business Growth
AlphaBOLD's certified Dynamics 365 experts can help you design surveys that drive action, integrate feedback with your CRM, and build executive dashboards with Power BI.
Schedule Your Strategy Session TodayUnderstanding Satisfaction Metrics
Dynamics 365 Customer Voice includes support for standardized satisfaction metrics that can be mapped to survey questions:
- Net Promoter Score (NPS): Measures customer loyalty using a scale from 0 to 10. Respondents are grouped as Detractors (0-6), Passives (7-8), or Promoters (9-10). NPS is calculated by subtracting the percentage of detractors from promoters.
- Sentiment Analysis: Identifies customer attitude toward a product or service by grouping text responses as positive, negative, or neutral. Customer Voice now supports 23+ languages for sentiment analysis.
- Customer Satisfaction (CSAT): Measures satisfaction with a product or service using rating-type questions on a scale of 1 to 5.
- Custom Score: Uses combined survey scores from multiple questions to measure overall satisfaction level.
Further Reading: The Power of Real-time Data in Dynamics 365 Customer Insights
Conclusion
Customer Voice is a major step forward in Microsoft’s Power Platform infrastructure. Surveys are straightforward to create and integrate well with Microsoft’s entire product stack, allowing users and system customizers to spend more time on survey design and the customer experience rather than data management and complicated configuration.
With the 2025-2026 enhancements, that statement is more true than when it was first written. Copilot integration, 23-language sentiment analysis, real-time Dataverse sync, the Customer Intent Agent, and Copilot Studio survey bots have collectively transformed Customer Voice from a capable forms tool into an enterprise customer intelligence platform. The gap between collecting feedback and acting on it, which was the original problem the platform was built to solve, is now measurably narrower for organizations that take advantage of these capabilities.
The organizations capturing the most value from Customer Voice in 2026 are not the ones with the most sophisticated surveys. They are the ones who closed the loop: automated triggers that send surveys at the right moment, Dataverse integrations that surface satisfaction data where service agents actually work, Power BI dashboards that make trends visible to leadership, and Power Automate flows that turn a low CSAT score into a follow-up action before the customer has closed their browser. That full loop is achievable today with the platform as it exists, and AlphaBOLD’s Dynamics 365 practice helps organizations build it systematically.
If you have any questions or queries, please contact us!
FAQs
Dynamics 365 Customer Voice replaced Microsoft Forms Pro in 2020. It is Microsoft’s enterprise survey and feedback management platform, designed specifically for organizations running on the Microsoft Dynamics 365 and Power Platform ecosystem. Unlike Microsoft Forms, Customer Voice supports CRM data binding, Power BI reporting, satisfaction metrics (NPS, CSAT, Sentiment, Custom Score), and native Dataverse integration for real-time data sync and Power Automate automation.
Customer Voice is included at no additional cost with Dynamics 365 Customer Service Enterprise and Professional, Dynamics 365 Sales Enterprise, and Microsoft 365 E3/E5 plans. The included entitlement covers 2,000 survey responses per user per month. A standalone Customer Voice license is available for organizations outside these plans. Always verify your current license entitlements before procuring additional capacity.
Customer Voice integrates with Power Automate through Dataverse connectors that trigger flows based on survey events: a new response submitted, a specific NPS score threshold crossed, a case resolution in Dynamics 365, or any custom CRM workflow stage. Always use the Dataverse connector rather than the legacy Microsoft Forms connector. The legacy connector has throughput limitations and causes data lock errors at high response volumes. Pre-built templates are available for the most common triggers, including post-case-resolution surveys and NPS campaigns.
Customer Voice is designed for structured, email-based survey campaigns with satisfaction metric tracking and Power BI reporting. Copilot Studio survey bots are designed for real-time conversational feedback at the end of live interactions across voice, chat, SMS, and social media channels. Both store response data in Dataverse and can feed the same Power BI reporting layer, but they serve different feedback collection scenarios. Use Customer Voice for post-service email surveys and relationship NPS campaigns; use Copilot Studio bots for in-channel feedback immediately after a live interaction.
Customer Voice uses Azure AI Language services for sentiment classification, which as of 2026 supports 23+ languages and classifies responses as positive, negative, or neutral. The 2025 Release Wave 2 model shows improved accuracy over the prior version, particularly for short-form responses typical of post-service surveys. Sentiment scores are applied to open-text responses and, in 2026, to composite rating patterns across a survey session. The scores are surfaced directly on Dynamics 365 customer records in real time as responses are submitted.
The Customer Intent Agent, released in 2025 Wave 2, is an AI model that analyzes past Customer Voice survey responses and customer interaction history to predict future customer needs and satisfaction risk. It surfaces its predictions directly in the Dynamics 365 Customer Service workspace and can trigger proactive Power Automate workflows, such as scheduling a proactive outreach call when a customer’s predicted satisfaction score falls below a defined threshold. It is designed to shift contact center operations from reactive to proactive service delivery.
Yes. Customer Voice supports up to 15 personalization variables per survey that pull data directly from Dynamics 365 contact records. This allows surveys to address customers by name, reference their most recent case number, include account-specific details, or note the specific product or service being surveyed. Personalized surveys consistently achieve higher response rates than generic equivalents and produce more actionable data because respondents understand which specific interaction is being evaluated.
Customer Voice connects to Power BI natively through Dataverse. Survey responses, satisfaction metrics, and invitation data are all stored as Dataverse entities that can be queried directly through the Power BI Dataverse connector. The Customer Voice dashboard in the platform also includes built-in Power BI visuals for response rate, NPS trend, CSAT distribution, and sentiment breakdown. In 2026, tenants with Microsoft Copilot licensing also receive AI-generated narrative summaries alongside these visuals in the embedded dashboard.
Explore Recent Blog Posts