

Power Apps Components are extremely useful tools for Dynamics 365, allowing developers to extend the functionality of Dynamics well past what it can do out of the box. The dataset component type is especially powerful and can be used to embed almost anything inside of a Dynamics form.
PCF control management is largely handled through the Visual Studio command prompt, rather than a user interface, which makes iteration extremely fast. However, it includes a bit of a learning curve for those not experienced with the command prompts. If you are not used to the command prompt, don’t let that be a concern; the commands are straightforward. After the initial setup, it’s a simple matter of re-running the same commands when changes are made.
Learn more about Dynamics 365 Services!
Initial Setup
Set up your development environment
- Make sure Npm or Node.js is installed.
- Make sure .NET Framework 4.6.2 Developer Pack is installed.
- Make sure Visual Studio is installed, any version 2017 or later.
- Install Microsoft Power Apps CLI (https://aka.ms/PowerAppsCLI)
- This link will immediately download the required .msi file.
- Open Developer Command Prompt for VS 2017 and run the following command:
- pac install latest
Alternatively, detailed installation instructions are available here: https://docs.microsoft.com/en-us/powerapps/developer/common-data-service/powerapps-cli
Create a new component
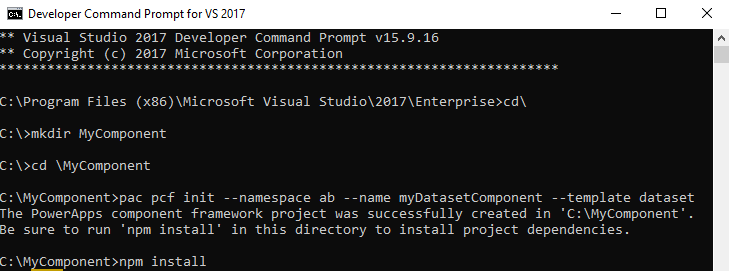
- Create a new folder, either via File Explorer or with mkdir <folder name>.
- Navigate to the new folder via the Visual Studio command prompt with cd <file path>.
- Use the following command to initialize the component:
- pac pcf init –namespace <namespace> –name <component name> –template <component type>
- Namespace: This can just be a short string, e.g., ab (for alphabold).
- Component Name: Any string.
- Component Type: Either “field” or “dataset,” the difference is essentially whether the component will be responsible for managing one piece of data or a table representation.
- pac pcf init –namespace <namespace> –name <component name> –template <component type>
- Run npm install to pull in the necessary dependencies.
This process will create a new component project at the specified location, with everything you need automatically populated:
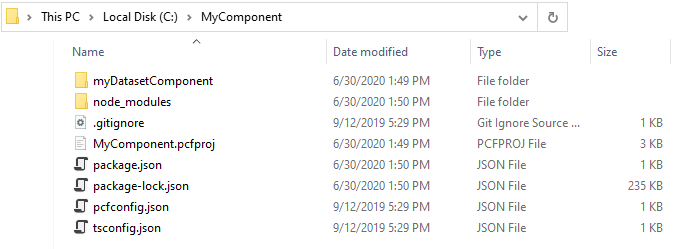
Most of this template can largely be ignored while working on the component, as we will spend most of our time inside the component folder (myDatasetComponent in the above screenshot).
Create authentication profiles
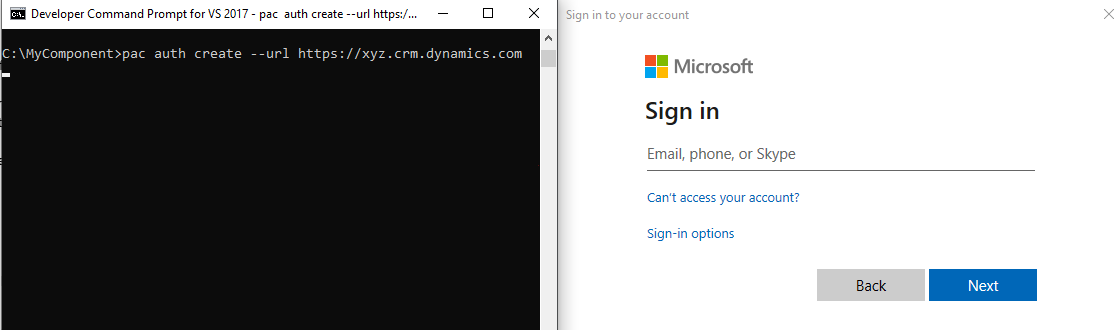
- Use the following command to create an authentication profile:
- pac auth create –url <instance URL >
- Instance URL: Something like https://xyz.crm.dynamics.com.
- This will generate a standard Dynamics login prompt; once you have logged in, the profile will be created.
- Create one profile for each instance into which you expect to publish the component. For example, you may have one profile for a staging environment and another for production.
- pac auth create –url <instance URL >
Managing a Component
Once a component is set up, making changes is a bit like working on a single-page web application; the component’s appearance is handled via CSS classes, and data is handled in a TypeScript file.
Anatomy of a Component
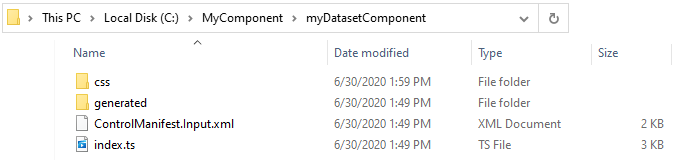
PCF Components have a consistent file structure, which makes modification straightforward. Here is a rough outline of the files and folders you are likely to see inside the component folder (myDatasetComponent in the above example):
- css > style.css
- Holds all CSS classes for aesthetics. You may need to create this folder and file yourself.
- generated folder > ManifestTypes.d.ts
- This folder and file can be ignored, as they are automatically generated based on the control manifest file.
- ControlManifest.Input.xml
- This file holds top-level information for the PCF Control, including global parameters that are exposed to CRM. These parameters can be modified directly within this file if needed.
- The control manifest can generally be ignored unless attempting to add, remove, or modify global parameters.
- index.ts
- This file is the primary focus of a PCF Component and is where all process logic will be.
Publishing the component
There are two main ways to publish a PCF component, either by creating a solution and manually importing it or using the Power Apps CLI to do so automatically. The CLI is much faster and easier for development, so it’s what I’ll focus on here.
- Navigate to the project folder via the Visual Studio command prompt with cd <file path>. In our above example, this would be the MyComponent folder.
- Use the following command to select the appropriate authentication profile:
- pac auth select –index <index>
- If you do not know the index number, run pac auth list and use the value in brackets next to the correct profile as the index. The active profile is marked with an asterisk.

- Run the following command to publish the component:
- pac pcf push –publisher-prefix <publisher prefix>
- Publisher Prefix: This can just be a short string, e.g. ab (for AlphaBOLD)
- pac pcf push –publisher-prefix <publisher prefix>

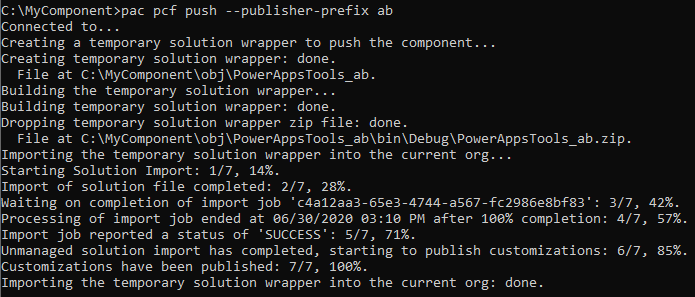
Once published, the component will be in a solution called PowerAppsTools_<namespace> by default.
Explore Dynamics 365 Services!
Configuring a component in Dynamics
After publishing a component to an environment for the first time, it will likely need to be added to a form and configured. This can be done by adding a control to the desired field or list:
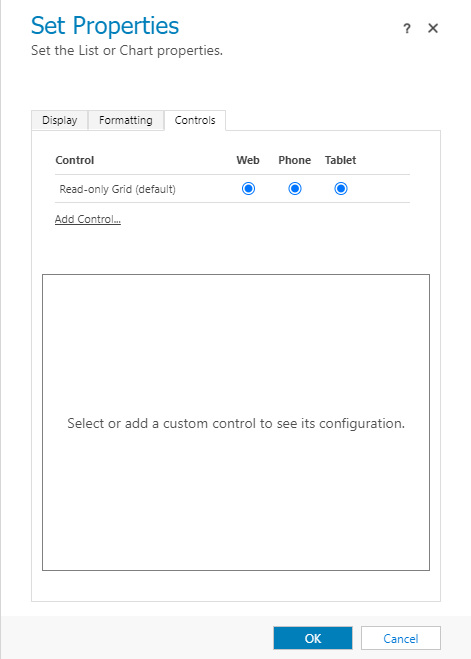
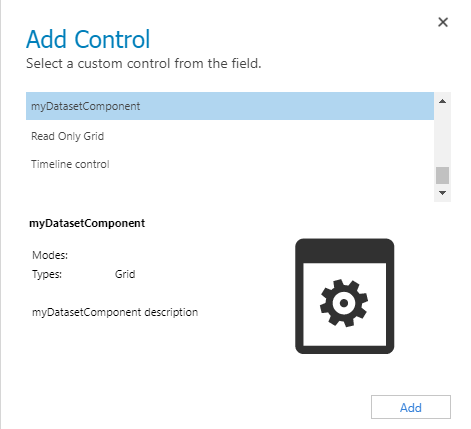
- Navigate to the desired form in CRM and opening the properties panel of the appropriate field or list. Click on Controls, then select “Add Control…”

- Select the component (myDatasetComponent, in this case) and click Add.

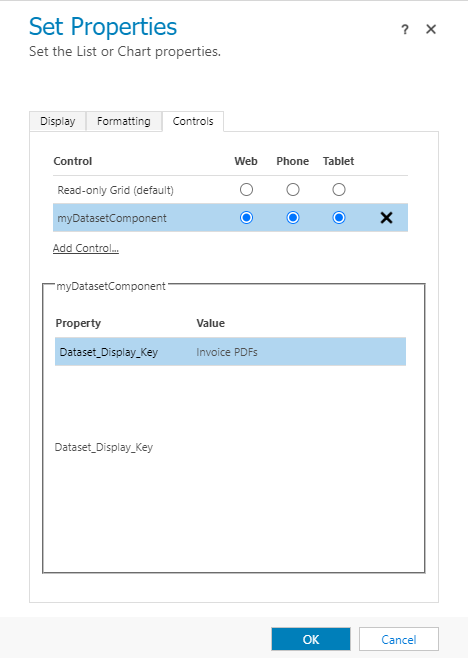
- Change the control from Read-only Grid (default) to the new component wherever it’s needed. If any properties have been added in the ControlManifest.Input.xml file, they will be visible in the section below the controls.
- The template does not come with editable properties by default, and simply includes a display key for the control.
Conclusion
PCF controls are a great way to visualize data in CRM and allow for an enormous amount of customization. Iteration is fast and straightforward once the initial setup process is complete, and hopefully, this blog has helped you get through it without too much stress. The next step is to find problems you would like to solve with PCF controls, and If looking for inspiration, PCF Gallery (https://pcf.gallery/) is a great resource.
If you have any questions or comments, please not hesitate to reach out to us!
If you have any question or queries, do not hesitate to reach out to us!
Happy configuring!