Introduction
This is the third and last part of our series blog, discussing the Smart Temperature Monitoring Systems (STMS). In the first blog, we introduced STMS and its different features. In the second blog, we discussed multiple use cases of STMS along with a tutorial and a live demo. This last part will discuss the importance of telemetry in IoT, a brief comparison of the technology stack for telemetries visualization, and a video tutorial for streaming telemetries.
Importance of Telemetry in IoT
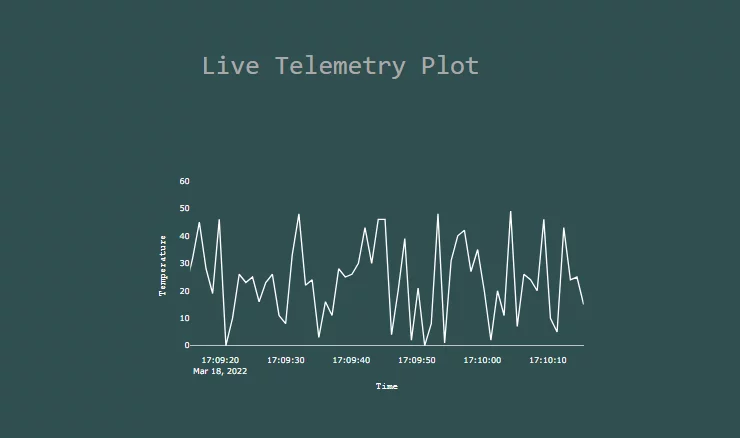
Telemetry is a process that collects raw data from sensors and then transmits it to a local or cloud server. Telemetry has been around since the 1800’s but its importance has increased due to the recent expansion of Internet of Things technology and Artificial Intelligence.
Today’s telemetry can sense and transmit information based on different variables such as sound, vibration, airflow, fluid levels, torque, air composition, electrical currents, moisture, light, position, heat, speed, and other metrics. This information is processed through various data visualization solutions deployed locally or on the cloud. In addition, machine learning can be applied to collected data and convert it into useful insights, making things cheaper, better, faster, and more efficient.
A Brief Comparison of Technology
It can be quite challenging to choose the right framework for application development. There are multiple options available for streaming telemetry. However, the SocketIO and SignalR are the first and the most popular names that you will hear.
Although there are similarities that SignalR and Socket IO share, both have their own benefits and usage. SignalR needs to be deployed on a server, and it works with the host of ASP.NET, OWIN, and the self-host. Hence you can consider using it with the windows service. The SignalR supports the clients for browsers like .NET, Silverlight, Windows Phone 7, etc. Moreover, it also helps to work with Mono Touch, iOS, etc.
Unlike the SignalR, Socket IO is a detailed real-time application framework. It is highly efficient in enabling real-time bidirectional communication, which is event-based. In addition to this, Socket IO is highly capable of working on most platforms, devices, or on the browser. If you require better speed and reliability while developing, then the Socket IO can be a better choice than the SignalR. However, the SignalR is the top choice due to its reliability in working with the .NET server.
Video Tutorial
Python Script for Sending Temperature Telemetries on React App
In the tutorial Smart Temperature Monitoring System Part 2, we demonstrated how to set up temperature sensor Ds18B20 with a raspberry pi and get temperature data. This tutorial covers script modification from the previous blog and send temperature telemetries to a node SocketIO server.
We will need a few libraries to install before we proceed. Open the shell in raspberry pi and type the command (pip install “python-socketio[client]”) to install the python socket.io client.
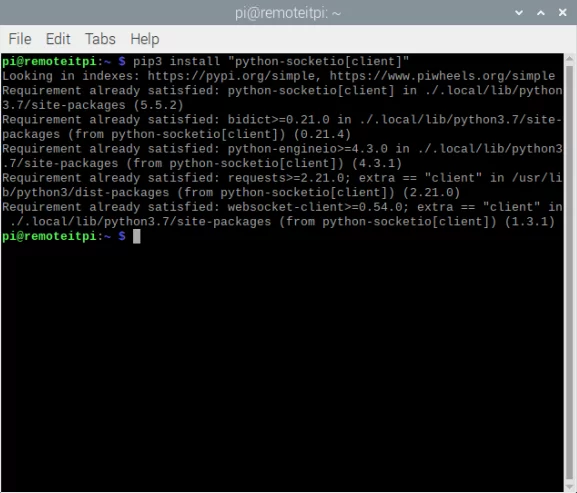
Fig 1: Installing socketio library
To send temperature telemetries, we need a python script. Here is the code: